Today it's wheels again (etc.).
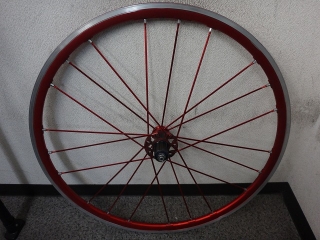
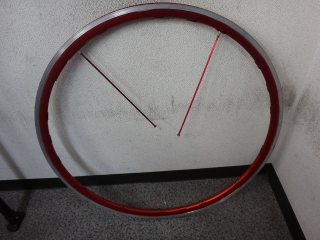
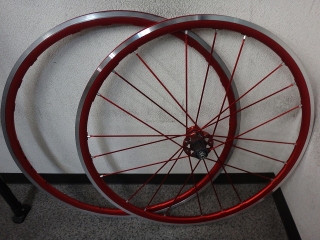
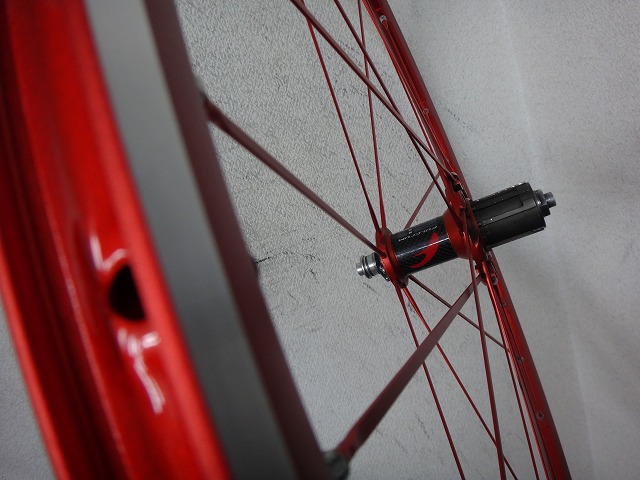
I received a rear wheel from a customer for a Racing Zero (レーシングゼロ) Japan limited model.
While it doesn't have a tie-laced spoke design, the hub, spokes, and rim are all red,
matching the original first-generation Racing Zero color scheme.
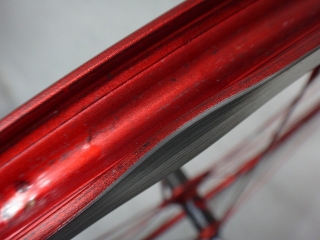
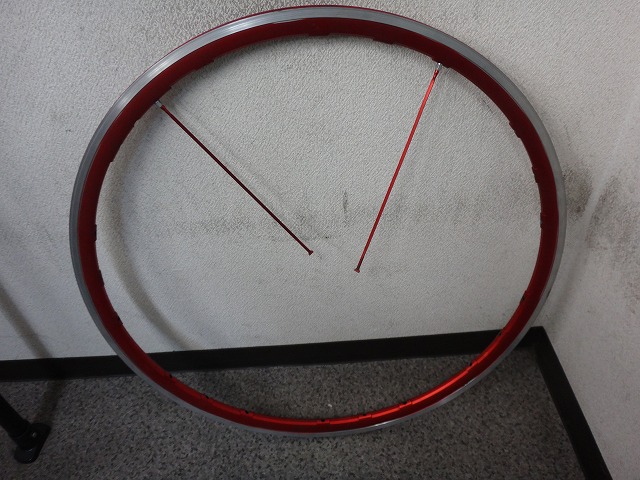
The bead hook was deformed due to buckling, so I had to replace the rim.

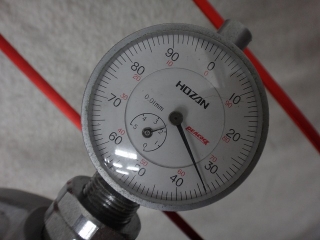
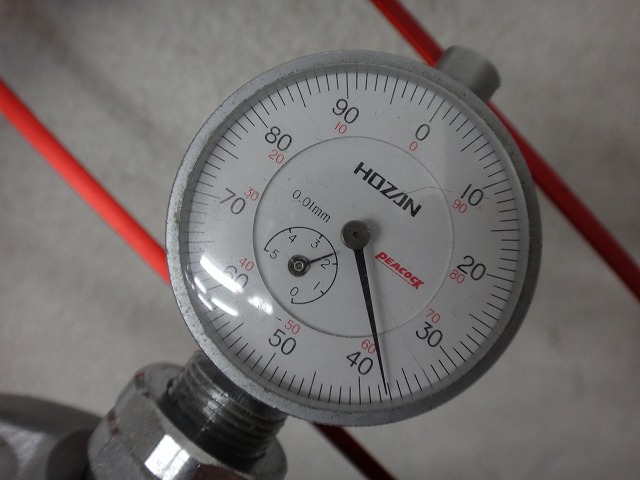
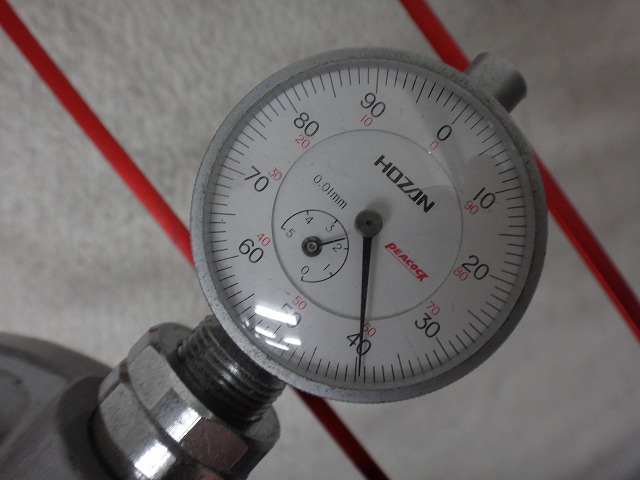
Before disassembling, I measured the first spoke tension on the non-drive side (H1ST) with a Hozan tension meter,
and it was hovering around 230 or just under 230.
The maximum value in the variation was around 230, with everything else over 220,
and averaging around 225 is pretty much the standard for a factory-built non-tie-laced wheel
(according to our shop's measurements).
If the average were 230, it would be quite tightly tensioned for a factory build,
but since this rear wheel has seen years of use, it should have sagged somewhat,
making it quite a tightly tensioned specimen overall.
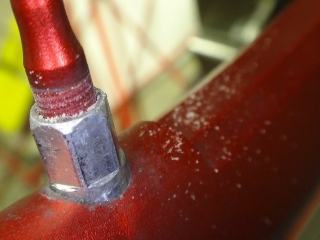
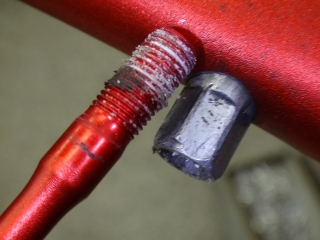
There are many nipples on the verge of seizing. White powder comes off in chunks.
You can see in the image above how much is packed into the spoke wrench hole.
I put the difficult-to-turn nipples aside for later,
and prioritized loosening the ones that would move, removing the spokes,
then removing the hub from the spoke hook. This way,
I can "hold the nipple with a nipple wrench and turn it with a spoke wrench tool".
Also, in that state, since the reason the nipples are hard to turn is removed,
the spoke tension is eliminated, so the spoke (not the nipple, but the spoke) becomes easier to turn
than when the wheel is in its formed shape.
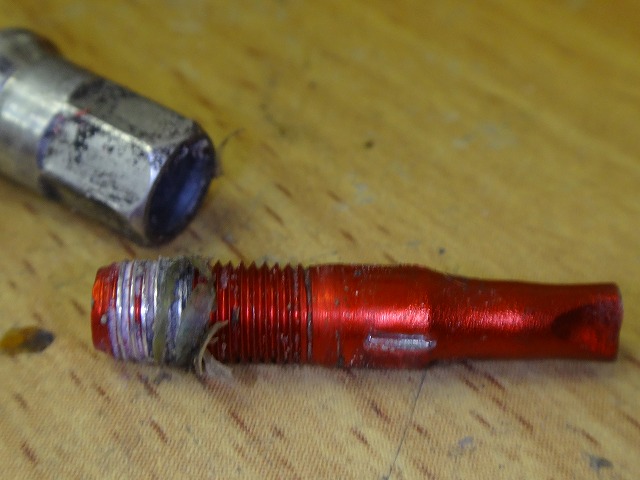
Even with that method, there were two nipples that absolutely wouldn't budge.
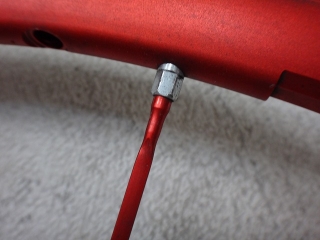
This one next to the valve hole won't budge at all.
If I forced it, I could clearly twist it off.
The other one got snapped off—you can barely see it at the edge of the image.
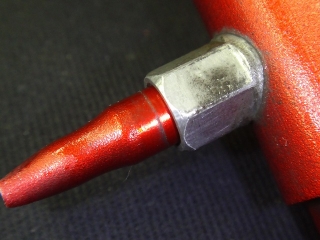
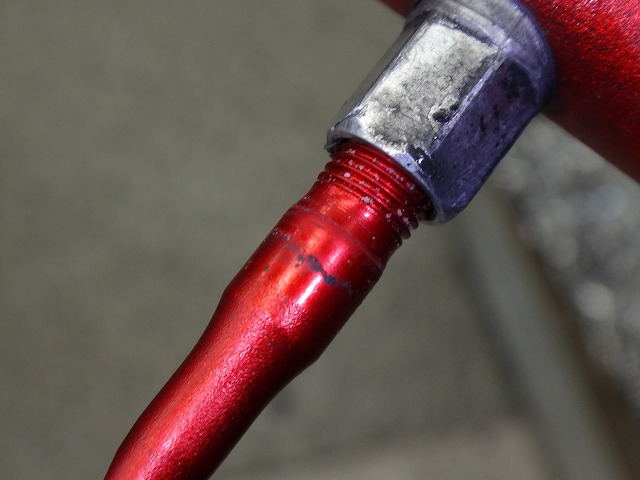
For both nipples, I applied a good amount of penetrating rust-preventative oil
and let it sit for a while, but this one still wouldn't budge.
The black mark on the spoke shows where the nipple was before I worked on it,
but it had already loosened that much before I even applied the oil.
It was impossible to loosen it further, yet I could still tighten it again.

Since it didn't matter if I scratched the spoke,
I managed to force it loose somehow.
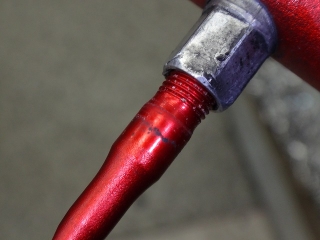
The nipple next to the valve hole initially seemed completely seized,
but I managed to get it loose somehow.

Got it built.


It's a bit on the tight side, but not abnormally tight.

I didn't see what the original looked like,
but I positioned the hub body phase as seen through the valve hole
to be closest to the Fulcrum logo.
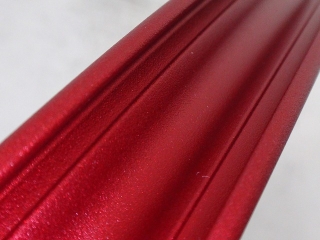
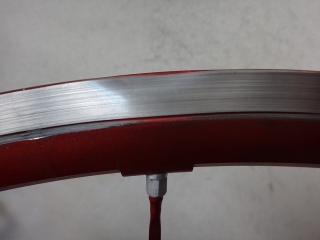
As you can see from the image of the buckled rim before the rebuild,
this rim is a 2WAY-FIT.
When ordering the rim, there were strong reasons to be skeptical,
so I ordered this rim with considerable anxiety.
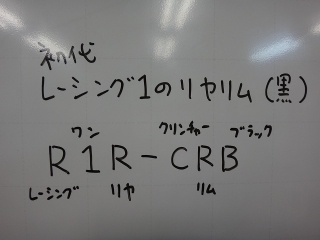
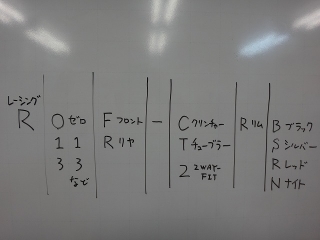
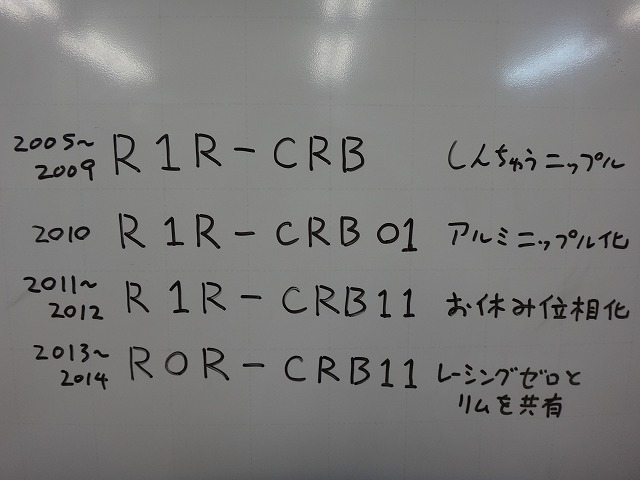
I'll explain the naming convention for rim part numbers from Racing 1 through Racing 7.
For example, the rear rim for the first-generation Racing 1 clincher in black
would have the part number R1R-CRB.
Each letter and number means what's shown in the image above.

However, even for the same Racing 1 clincher black rim,
when the year (specs) change, a number is added to the end of the part number.
This number increases as 01→11→21... and so on.
From 2010 onward, aluminum nipples were used, so the rim hole diameter changed slightly,
and it became R1R-CRB01.
From 2011 onward, the rim hole spacing became uneven with rest phases,
so it became R1R-CRB11.
From 2013 onward, the rim became shared with Racing Zero,
so it became R0R-CRB11 instead of R1R.
When two or more models share a rim,
the decals are sold separately to handle the distinction.
From 2015 onward, Racing 1 no longer exists. It was discontinued.
That's how the naming convention works.
For Racing Zero Nite, the rim specs are completely different from Racing Zero,
but they're distinguished by the color code in the part number.
The rear rim for Racing Zero Nite, which debuted in 2015,
is R0R-CRN01. For some reason, it has 01 at the end from the start.
The rear rim for the wide-rimmed Racing Zero Nite that debuted in 2017
has an advanced end digit: R0R-CRN11.
The 2017 Racing Zero Competizizone
differs from the standard Racing Zero in that the hub is CULT spec
and it has one red spoke in there for style points,
but actually, the Competizizone rim is 2WAY-FIT.
So the part number is R0R-2RB21.
Since the decals are sold separately, you just need to apply the Competizizone decals
to make it a Competizizone rim.
As for the red rim of this Japan limited model,
the part number is R0R-CRRKA.
The KA at the end stands for Kawashima Cycle Supply,
Japan's only Fulcrum distributor.
Campagnolo and Fulcrum are technically separate companies,
and their business strategies differ in various ways,
but at some point Fulcrum decided on "one distributor per country",
so in Japan the two Fulcrum distributors that existed until then became one.
This happened not just in Japan, but all over the world at the same time.
Campagnolo and Fulcrum put QR codes on their products,
and with these, you can reliably trace at least where the product was first wholesaled,
but to prevent diversion to overseas e-commerce dealers as much as possible,
it's better to have fewer initial channels, which is one reason for the one-distributor-per-country system.
That's why you don't see Speed 40 or 55 in overseas online shops as much as you do Bora.
The rim I received from the customer is definitely 2WAY-FIT,
but when I checked the part number, it's not a misreading—
it is indeed R0R-CRRKA,
which according to the naming convention would indicate a clincher rim
(it should be R0R-2RRKA if the rules were followed).
So when I ordered the rim, in addition to the part number,
I made sure to note
"It says CRR, but the specs should be a 2WAY-FIT rim."
I was anxious until I actually confirmed that the 2WAY-FIT rim arrived,
but it turned out to be unfounded worry.

I received a rear wheel from a customer for a Racing Zero (レーシングゼロ) Japan limited model.
While it doesn't have a tie-laced spoke design, the hub, spokes, and rim are all red,
matching the original first-generation Racing Zero color scheme.
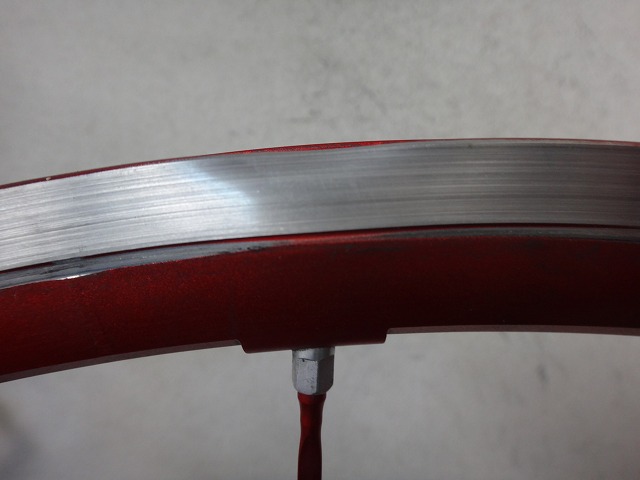
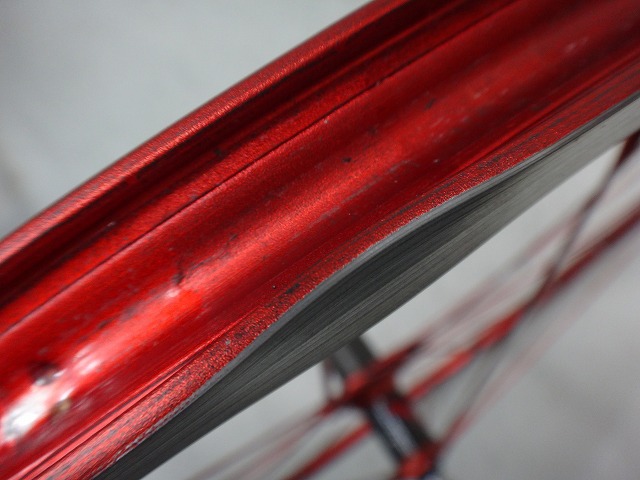
The bead hook was deformed due to buckling, so I had to replace the rim.

Before disassembling, I measured the first spoke tension on the non-drive side (H1ST) with a Hozan tension meter,
and it was hovering around 230 or just under 230.
The maximum value in the variation was around 230, with everything else over 220,
and averaging around 225 is pretty much the standard for a factory-built non-tie-laced wheel
(according to our shop's measurements).
If the average were 230, it would be quite tightly tensioned for a factory build,
but since this rear wheel has seen years of use, it should have sagged somewhat,
making it quite a tightly tensioned specimen overall.

There are many nipples on the verge of seizing. White powder comes off in chunks.
You can see in the image above how much is packed into the spoke wrench hole.
I put the difficult-to-turn nipples aside for later,
and prioritized loosening the ones that would move, removing the spokes,
then removing the hub from the spoke hook. This way,
I can "hold the nipple with a nipple wrench and turn it with a spoke wrench tool".
Also, in that state, since the reason the nipples are hard to turn is removed,
the spoke tension is eliminated, so the spoke (not the nipple, but the spoke) becomes easier to turn
than when the wheel is in its formed shape.
Even with that method, there were two nipples that absolutely wouldn't budge.

This one next to the valve hole won't budge at all.
If I forced it, I could clearly twist it off.

The other one got snapped off—you can barely see it at the edge of the image.
For both nipples, I applied a good amount of penetrating rust-preventative oil
and let it sit for a while, but this one still wouldn't budge.
The black mark on the spoke shows where the nipple was before I worked on it,
but it had already loosened that much before I even applied the oil.
It was impossible to loosen it further, yet I could still tighten it again.
Since it didn't matter if I scratched the spoke,
I managed to force it loose somehow.

The nipple next to the valve hole initially seemed completely seized,
but I managed to get it loose somehow.


Got it built.

It's a bit on the tight side, but not abnormally tight.
I didn't see what the original looked like,
but I positioned the hub body phase as seen through the valve hole
to be closest to the Fulcrum logo.

As you can see from the image of the buckled rim before the rebuild,
this rim is a 2WAY-FIT.
When ordering the rim, there were strong reasons to be skeptical,
so I ordered this rim with considerable anxiety.

I'll explain the naming convention for rim part numbers from Racing 1 through Racing 7.
For example, the rear rim for the first-generation Racing 1 clincher in black
would have the part number R1R-CRB.
Each letter and number means what's shown in the image above.
However, even for the same Racing 1 clincher black rim,
when the year (specs) change, a number is added to the end of the part number.
This number increases as 01→11→21... and so on.
From 2010 onward, aluminum nipples were used, so the rim hole diameter changed slightly,
and it became R1R-CRB01.
From 2011 onward, the rim hole spacing became uneven with rest phases,
so it became R1R-CRB11.
From 2013 onward, the rim became shared with Racing Zero,
so it became R0R-CRB11 instead of R1R.
When two or more models share a rim,
the decals are sold separately to handle the distinction.
From 2015 onward, Racing 1 no longer exists. It was discontinued.

That's how the naming convention works.
For Racing Zero Nite, the rim specs are completely different from Racing Zero,
but they're distinguished by the color code in the part number.
The rear rim for Racing Zero Nite, which debuted in 2015,
is R0R-CRN01. For some reason, it has 01 at the end from the start.
The rear rim for the wide-rimmed Racing Zero Nite that debuted in 2017
has an advanced end digit: R0R-CRN11.
The 2017 Racing Zero Competizizone
differs from the standard Racing Zero in that the hub is CULT spec
and it has one red spoke in there for style points,
but actually, the Competizizone rim is 2WAY-FIT.
So the part number is R0R-2RB21.
Since the decals are sold separately, you just need to apply the Competizizone decals
to make it a Competizizone rim.
As for the red rim of this Japan limited model,
the part number is R0R-CRRKA.
The KA at the end stands for Kawashima Cycle Supply,
Japan's only Fulcrum distributor.
and their business strategies differ in various ways,
but at some point Fulcrum decided on "one distributor per country",
so in Japan the two Fulcrum distributors that existed until then became one.
This happened not just in Japan, but all over the world at the same time.
Campagnolo and Fulcrum put QR codes on their products,
and with these, you can reliably trace at least where the product was first wholesaled,
but to prevent diversion to overseas e-commerce dealers as much as possible,
it's better to have fewer initial channels, which is one reason for the one-distributor-per-country system.
That's why you don't see Speed 40 or 55 in overseas online shops as much as you do Bora.
The rim I received from the customer is definitely 2WAY-FIT,
but when I checked the part number, it's not a misreading—
it is indeed R0R-CRRKA,
which according to the naming convention would indicate a clincher rim
(it should be R0R-2RRKA if the rules were followed).
So when I ordered the rim, in addition to the part number,
I made sure to note
"It says CRR, but the specs should be a 2WAY-FIT rim."
I was anxious until I actually confirmed that the 2WAY-FIT rim arrived,
but it turned out to be unfounded worry.