The drill roars to life!
The other day, I was assembling 9070 electronic shifting components on a certain frame,
and I'd assumed the frame would have provisions prepared for Shimano electronic components,
but it turned out to be an early prototype version of that frame,
so there were no pre-drilled holes. I had to machine it myself.
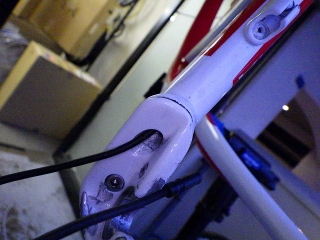
The image above shows the state after running the EW-SD50 (electronic cable) through the right chainstay.
With modern frames, the area around the bottom bracket shell is often a hollow cavity
where the chainstay, seat tube, and down tube all connect,
but this frame has a sealed aluminum tube running through the BB hole,
and there was a wall between the right chainstay and seat tube as well,
so I had to create separate holes behind and above the BB.
That was actually one of the reasons I burned out the motor on my mini rotary tool the other day.
Given the unique geometry of this frame's dropouts
and the fact that I needed to expand the diameter of existing holes
partway back into the chainstay,
a standard-length drill bit wouldn't work—the rotating part of the drill itself
would make contact with the frame.
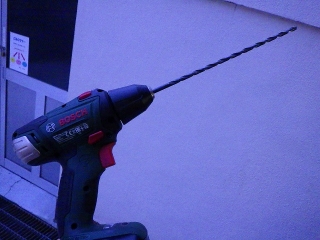
So I used this setup with an especially long drill bit—what I call the "Buntline Special."
I didn't prepare it specifically for this job.
Years ago, back when frames weren't equipped for electronic shifting,
I bought it to break through the bamboo-node-like internal walls
that ran down the middle of the chainstay on a Neil Pryde Alize (carbon frame).

The other day, I was assembling 9070 electronic shifting components on a certain frame,
and I'd assumed the frame would have provisions prepared for Shimano electronic components,
but it turned out to be an early prototype version of that frame,
so there were no pre-drilled holes. I had to machine it myself.
The image above shows the state after running the EW-SD50 (electronic cable) through the right chainstay.
With modern frames, the area around the bottom bracket shell is often a hollow cavity
where the chainstay, seat tube, and down tube all connect,
but this frame has a sealed aluminum tube running through the BB hole,
and there was a wall between the right chainstay and seat tube as well,
so I had to create separate holes behind and above the BB.
That was actually one of the reasons I burned out the motor on my mini rotary tool the other day.
Given the unique geometry of this frame's dropouts
and the fact that I needed to expand the diameter of existing holes
partway back into the chainstay,
a standard-length drill bit wouldn't work—the rotating part of the drill itself
would make contact with the frame.

So I used this setup with an especially long drill bit—what I call the "Buntline Special."
I didn't prepare it specifically for this job.
Years ago, back when frames weren't equipped for electronic shifting,
I bought it to break through the bamboo-node-like internal walls
that ran down the middle of the chainstay on a Neil Pryde Alize (carbon frame).