I've taken in a Nucleon from a customer (sort of).


For my own distinction, I call the first generation Nucleon just "Nucleon,"
and I call the Eurus from the steel spokes era
(including the silver rim limited edition)
"Eurus." Please don't mind my terminology.
The customer wants an inspection,
but it's because they're giving their Nucleon to an acquaintance
and want it serviced first.
However, there's quite a troublesome issue...

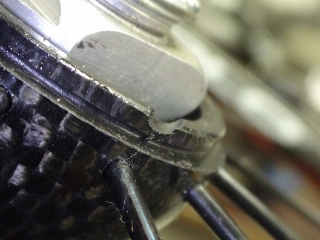
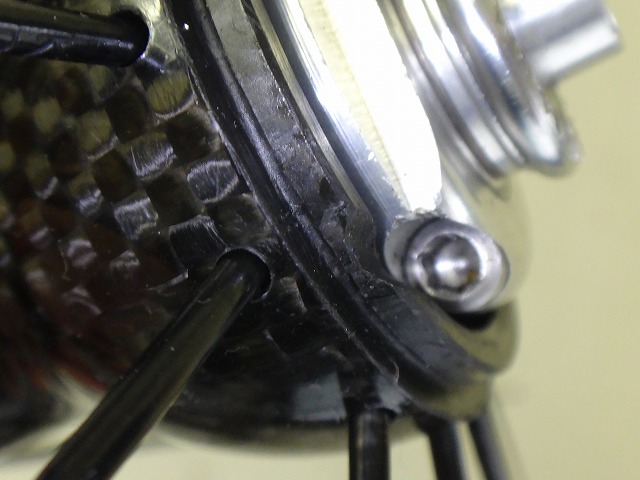
This Nucleon is a tubular setup, but they want to transition to tape application,
so they're asking me to remove the rim cement bed.

I showed the customer (sort of) how I removed just one spoke hole's worth
on the front wheel using acetone,
and explained to them that while it's "not impossible,
it's extremely time-consuming."
Since the current owner (a Freemason, apparently)
rather than the next owner is covering the cost,
I took the job.
A while back I posted an article about removing rim cement bed from a Bora rim,
and in the comments someone mentioned that
Effetto Mariposa—who makes sealants like Caffélatex
and tubular tape like Carogna—also makes a rim cement remover.

Actually, I have that in stock (left in the image above).
It was a gift from another customer.
It's quite effective too,
but this time I worked with acetone.
The one on the right is a Viva brand rim cement cleaner—
an older product with trichloroethylene as its main ingredient,
though the can label lists it as trichloroethylene.
As for Miyata's Chubera Tape (Miyata tubular tape),
they announced two years ago that production was being "suspended"
due to difficulty in sourcing materials,
but just recently, early this month, they finally announced
that production is being "discontinued."
Given current trends, even if tubular tape were made
in small batches, it would be hard to sell off
thousands or tens of thousands of units,
and keeping the price at the old 3,500 yen would be impossible,
so this might be a good opportunity.
I rarely include links outside the articles in this blog,
but here's the manufacturer's announcement about the "suspension"
(December 10, 2021) (here).
Actually, market inventory had been depleted
more than a year before that announcement.
It seems they reluctantly said "suspension" after hearing complaints
asking when they'd get stock back in.


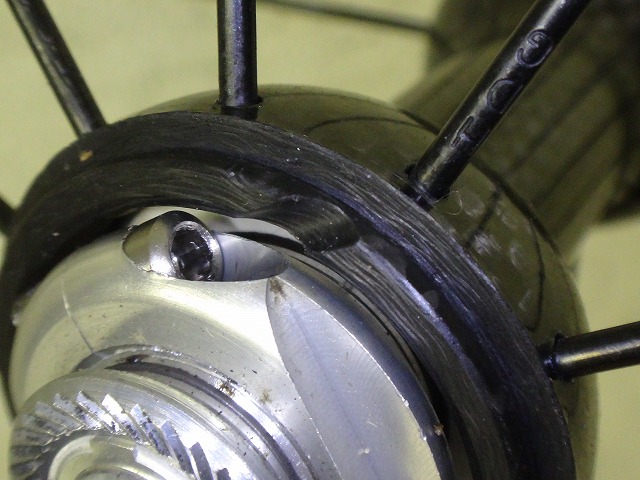
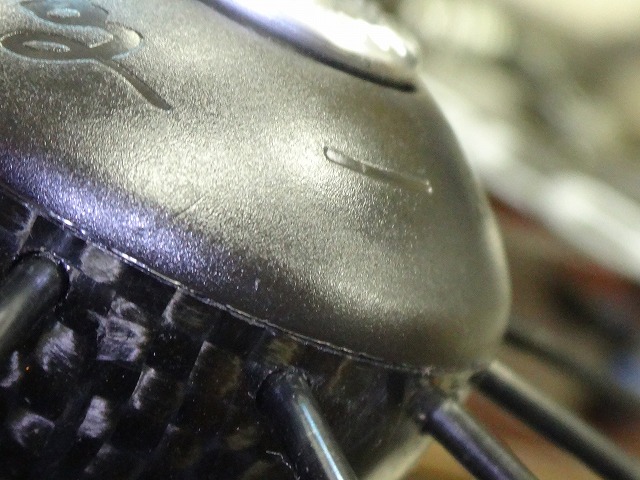
I adjusted the hub bearing preload, and I removed the dust cap
because you can't distinguish left from right just by looking
without taking it off.
When I checked the wheel center, the rim was shifted toward the right side.

↑About this much


I did lateral truing and center adjustment.

Next, the rear wheel.

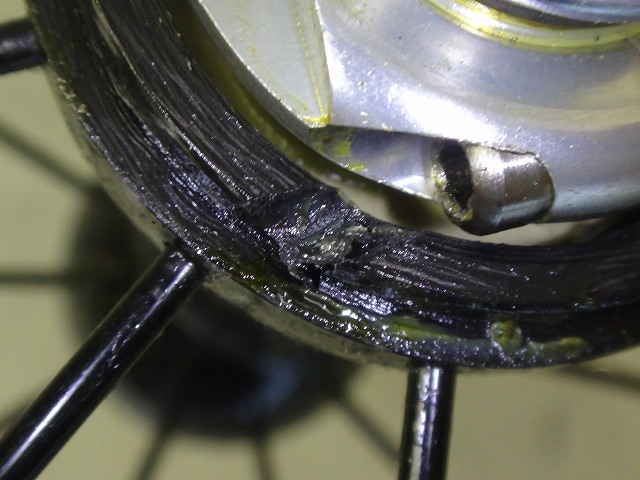
The rim cement has already been removed at this point.
Why's the focus on the hub again


There's almost no lateral runout, but the rim is shifted toward the non-freewheel side.
This is the result of fake truing.
Someone might say I can't be so definitive just because the rim's drift direction
is opposite to the typical wear pattern...

This rear wheel has radial runout that the front wheel didn't have.
Because the brake shoes were set inward on the freewheel-side brake zone,
there's a section on the outer edge where the shoes aren't making contact,
(the non-freewheel side didn't have this)
and when I count the concentric ring-like grooves in the image above,
there are six, but these vary between four and six depending on the phase.
I can't believe that would pass the manufacturer's shipping standards,
so it's reasonable to conclude this is the result of lateral-only fake truing.


It was a fairly tightly built wheel, so I adjusted it the rare way—loosening the tension.
Or rather, I basically just backed off the nipples that had been over-tightened.
By the time I finished lateral and radial truing, the center had naturally come into alignment.

I positioned the rear wheel valve hole phase straight up when viewed from the right side.

The Campagnolo text reads right-side-up.
If I were to flip the wheel while keeping the valve hole straight up,
the rim text would be upside-down "Nucleon."
This is the same label orientation as older Campagnolo rims.

So on the opposite side of the valve hole,
the Nucleon text reads right-side-up.

Similarly, I positioned the front wheel with the valve hole straight up

and similarly arranged it so Campagnolo reads right-side-up.
At this time, the front wheel's near side (from my perspective)
was the side without the bearing preload adjustment nut
from when I removed the dust cap earlier—
in other words, the right side—so there's no issue this time.

Looking at the valve hole opposite side,
both show Nucleon text right-side-up,

but if the front wheel were to be reversed relative to the rear,
changing the hub axle orientation
(just the axle assembly parts, without changing the original bearing preload)
would solve the problem.
With Hyperion or Bora hubs,
only one side of the hub body has a cutout for the wrench to access the bearing preload nut,
so left and right can't be swapped.


As for that cutout,

I've posted about it

many times before.
Even if I were to reverse the hub axle orientation,
I could theoretically still assemble it by inserting the ball point wrench at an angle,
since the fastening torque here isn't that high.
Also, this cutout is

hidden when the dust cap is installed,
so I've never done it, but if I got approval,
I could mill a new cutout.

↑This is the rear hub viewed from the right side,
and I set it so the Campagnolo marking on the C-ring
that seals the grease hole on the hub body
reads right-side-up
(it was reversed when I received it).

To match that, I also positioned the front hub so that when viewed from the right side
the Campagnolo text reads right-side-up,
with both front and rear bearing preload adjustment nuts
on the left side.
By checking either the valve hole label orientation
or the hub body marking, you can tell front and rear apart
without having to remove the front dust cap.
The front hub grease hole seal cap happened to be
oriented correctly from the start.
Just to be clear,
the front wheel uses radial spoking, so whether the label looks
upside-down or the bearing preload nut is on the left,
there's no difference in riding performance.
It's the same kind of "etiquette" as
positioning a clincher tire label either straight below the valve hole
or on the opposite side, depending on the wheel.


For my own distinction, I call the first generation Nucleon just "Nucleon,"
and I call the Eurus from the steel spokes era
(including the silver rim limited edition)
"Eurus." Please don't mind my terminology.
The customer wants an inspection,
but it's because they're giving their Nucleon to an acquaintance
and want it serviced first.
However, there's quite a troublesome issue...

This Nucleon is a tubular setup, but they want to transition to tape application,
so they're asking me to remove the rim cement bed.

I showed the customer (sort of) how I removed just one spoke hole's worth
on the front wheel using acetone,
and explained to them that while it's "not impossible,
it's extremely time-consuming."
Since the current owner (a Freemason, apparently)
rather than the next owner is covering the cost,
I took the job.
A while back I posted an article about removing rim cement bed from a Bora rim,
and in the comments someone mentioned that
Effetto Mariposa—who makes sealants like Caffélatex
and tubular tape like Carogna—also makes a rim cement remover.

Actually, I have that in stock (left in the image above).
It was a gift from another customer.
It's quite effective too,
but this time I worked with acetone.
The one on the right is a Viva brand rim cement cleaner—
an older product with trichloroethylene as its main ingredient,
though the can label lists it as trichloroethylene.
As for Miyata's Chubera Tape (Miyata tubular tape),
they announced two years ago that production was being "suspended"
due to difficulty in sourcing materials,
but just recently, early this month, they finally announced
that production is being "discontinued."
Given current trends, even if tubular tape were made
in small batches, it would be hard to sell off
thousands or tens of thousands of units,
and keeping the price at the old 3,500 yen would be impossible,
so this might be a good opportunity.
I rarely include links outside the articles in this blog,
but here's the manufacturer's announcement about the "suspension"
(December 10, 2021) (here).
Actually, market inventory had been depleted
more than a year before that announcement.
It seems they reluctantly said "suspension" after hearing complaints
asking when they'd get stock back in.


I adjusted the hub bearing preload, and I removed the dust cap
because you can't distinguish left from right just by looking
without taking it off.
When I checked the wheel center, the rim was shifted toward the right side.

↑About this much


I did lateral truing and center adjustment.

Next, the rear wheel.

The rim cement has already been removed at this point.


There's almost no lateral runout, but the rim is shifted toward the non-freewheel side.
This is the result of fake truing.
Someone might say I can't be so definitive just because the rim's drift direction
is opposite to the typical wear pattern...

This rear wheel has radial runout that the front wheel didn't have.
Because the brake shoes were set inward on the freewheel-side brake zone,
there's a section on the outer edge where the shoes aren't making contact,
(the non-freewheel side didn't have this)
and when I count the concentric ring-like grooves in the image above,
there are six, but these vary between four and six depending on the phase.
I can't believe that would pass the manufacturer's shipping standards,
so it's reasonable to conclude this is the result of lateral-only fake truing.


It was a fairly tightly built wheel, so I adjusted it the rare way—loosening the tension.
Or rather, I basically just backed off the nipples that had been over-tightened.
By the time I finished lateral and radial truing, the center had naturally come into alignment.

I positioned the rear wheel valve hole phase straight up when viewed from the right side.

The Campagnolo text reads right-side-up.
If I were to flip the wheel while keeping the valve hole straight up,
the rim text would be upside-down "Nucleon."
This is the same label orientation as older Campagnolo rims.

So on the opposite side of the valve hole,
the Nucleon text reads right-side-up.

Similarly, I positioned the front wheel with the valve hole straight up

and similarly arranged it so Campagnolo reads right-side-up.
At this time, the front wheel's near side (from my perspective)
was the side without the bearing preload adjustment nut
from when I removed the dust cap earlier—
in other words, the right side—so there's no issue this time.

Looking at the valve hole opposite side,
both show Nucleon text right-side-up,

but if the front wheel were to be reversed relative to the rear,
changing the hub axle orientation
(just the axle assembly parts, without changing the original bearing preload)
would solve the problem.
With Hyperion or Bora hubs,
only one side of the hub body has a cutout for the wrench to access the bearing preload nut,
so left and right can't be swapped.

As for that cutout,
I've posted about it
many times before.
Even if I were to reverse the hub axle orientation,
I could theoretically still assemble it by inserting the ball point wrench at an angle,
since the fastening torque here isn't that high.

Also, this cutout is
hidden when the dust cap is installed,
so I've never done it, but if I got approval,
I could mill a new cutout.

↑This is the rear hub viewed from the right side,
and I set it so the Campagnolo marking on the C-ring
that seals the grease hole on the hub body
reads right-side-up
(it was reversed when I received it).

To match that, I also positioned the front hub so that when viewed from the right side
the Campagnolo text reads right-side-up,
with both front and rear bearing preload adjustment nuts
on the left side.
By checking either the valve hole label orientation
or the hub body marking, you can tell front and rear apart
without having to remove the front dust cap.
The front hub grease hole seal cap happened to be
oriented correctly from the start.
Just to be clear,
the front wheel uses radial spoking, so whether the label looks
upside-down or the bearing preload nut is on the left,
there's no difference in riding performance.
It's the same kind of "etiquette" as
positioning a clincher tire label either straight below the valve hole
or on the opposite side, depending on the wheel.