Today I'm talking about the W-cog road wheel.
Among the components on my bike,
this one boasts exceptional story value (probably).
People often ask to take pictures of it.

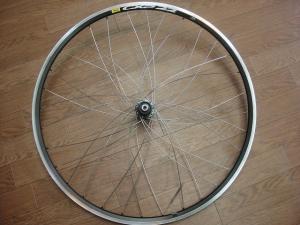
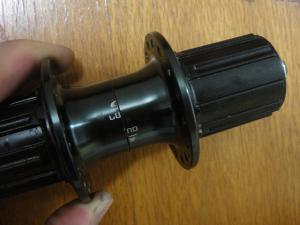
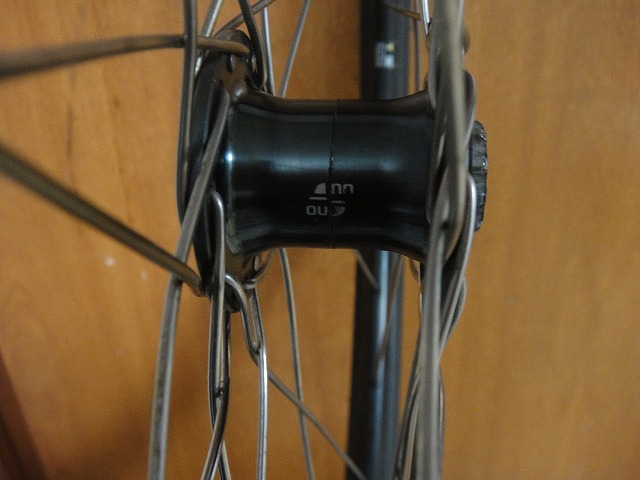
↑That's the one. It's a wheel with Shimano freehubs on both left and right sides.
Since it's built to precise dimensions, you can flip it and change the gear ratio.
This bike has a 46T single front chainring, and the rear sprockets are
14–25T and 12–30T configurations.
People often say "that must be heavy for nothing," but
there are various things you can only understand by actually building something like this,
so the pros and cons of this component itself aren't the issue.
First thing I discovered: Point 1.
I primarily use the 14–25T side, and when using that side,
the opposite sprocket is completely dead weight.
That 12–30T (CS-4600, Tiagra grade)
weighs 329g according to the catalog, 324g in actual measurement—quite heavy—but
perhaps because it's inside the hub shell, I can't feel the 300g+ weight increase at all.
When I actually swapped on just the right side (freewheel side only, though both sides are freewheel sides)
and compared it immediately by removing and reinstalling, it was impossible to tell clearly.
When I wrote about cycloid curves before, I said that pedaling lightness is determined by
the weight of the wheel's outer rim. In other words,
a slight weight increase in the inner hub area doesn't affect
the wheel's initial acceleration feel much at all.
If instead we injected 320cc of water into the rim and at decent speed
had the water stick to the inside outer surface of the rim, or
stuck 10 yen coins (10g each) at each nipple location
(32H means 320g total), then gaining 320g on the outer rim
would be immediately noticeable. Since you can feel a 50g rim difference,
320g more would be pure suffering.
If you remember the story "back in the day Gianni Motta used to practice with water in his tubes,"
you're quite a veteran cyclist.

Next, the second thing I discovered.
Because of the structure with freewheel bodies on both sides, the flange width is abnormally narrow,
and as I mentioned before about wheel left-right balance, with this narrow width
the lateral stiffness is seriously weak.

Feeling some guilt about that, at this point I've built it with a W-cross pattern.
In the photo above, where the spokes cross, I've laced the spokes
not just at the final crossing but also at the previous crossing point.
I wanted to reduce the apparent deformation of the spokes even slightly.
Also, since there's a possibility of flipping it and using it the other way, it's JIS lacing.
Before tensioning, it looks like this.
These days I use a method of lacing aero spokes without W-crossing.
Before Point 3 of what I discovered...
A quick note about what's generally called W-cog—track hubs.
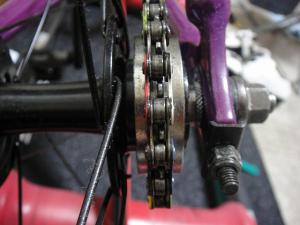
The photo above isn't fixed but a freewheel, yet in either case
the sprocket teeth are positioned quite far inside the frame.

The dropouts are also of the "forward-facing" type—the kind where you pull the wheel almost straight back to remove it—
so the sprocket almost never contacts the frame when removing or installing the wheel.
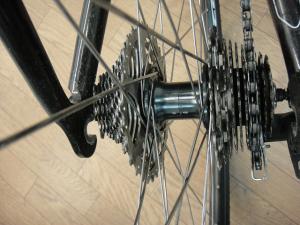
But with my "W-cog 20S" (self-named),
the sprocket tooth tips exist right up to the dropout edge.
Furthermore, when mounting the wheel with the "reverse-facing" dropouts common on road bikes,
there's a moment when you have to angle the rear wheel relative to the frame.
(You have to thread the sprocket past the derailleur to catch the chain)
On most wheels, the left side has no sprocket (laughs),
so I never worried about it before, but on this wheel,
the area near the left side's top gear scrapes against the left frame dropout.
I was considering a second version with Campagnolo on one side and Shimano on the other,
but this issue ruled that out.
I was thinking of making it for shop shifting adjustments, but with the possibility of frame damage,
I can't use it.
In summary, things I discovered only by actually building this type of hub:
Point 1: Even if the hub area is somewhat heavy, you barely feel it
Point 2: Lateral stiffness is seriously low
Point 3: When installing the wheel, the left side sprocket teeth hit the frame
How it's made
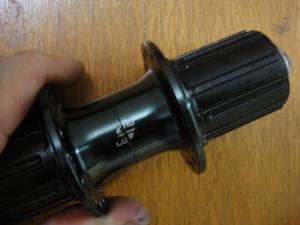
In this case I bought two 105 hubs,
cut them right down the middle, and assembled them. That's it.
Looking back now, I wish I'd used a silver hub for one side.
"Just assembly" is a bit of a lie—some processing is required.
Not necessary for all hubs, but for this one it's probably essential.
I won't say what it is here, but if you try it,
you'll follow the same path I did.
(Never mind the hecklers saying "nobody's doing that")
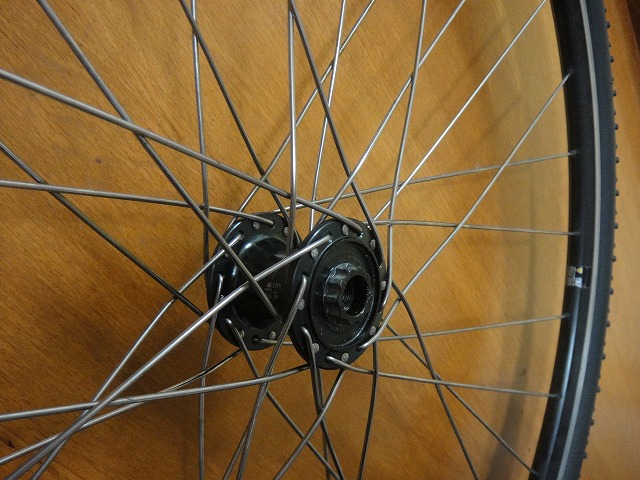
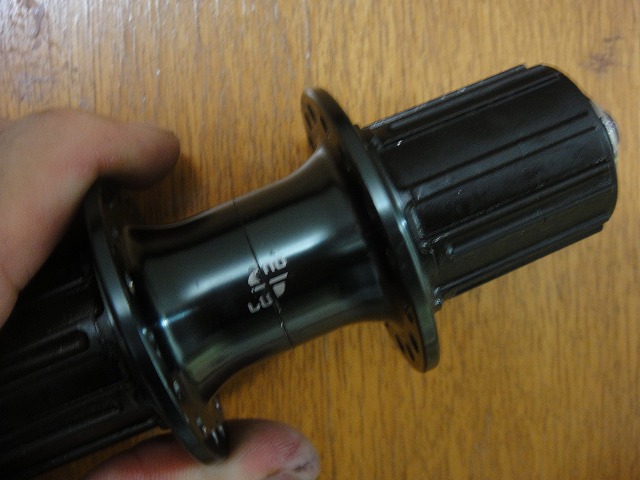
And this hub—the left and right hub shells aren't glued or welded.
As a bare hub, it spins like this.

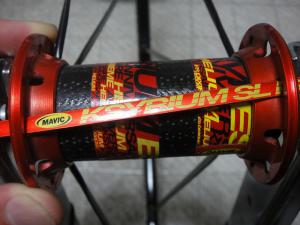
The Ksyrium front hub too—the aluminum flanges aren't glued to the carbon hub shell.
Once you build it as a wheel, the spoke holes on the rim side determine the phase,
so everything ends up in its proper place anyway. And with spoke tension,
the flanges clamp the hub shell, so that works out fine.
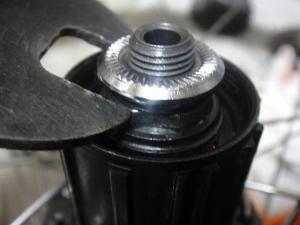
There's one more problem. Since both sides are the freewheel side,
you can't secure with the double-nut method using a standard hub wrench.
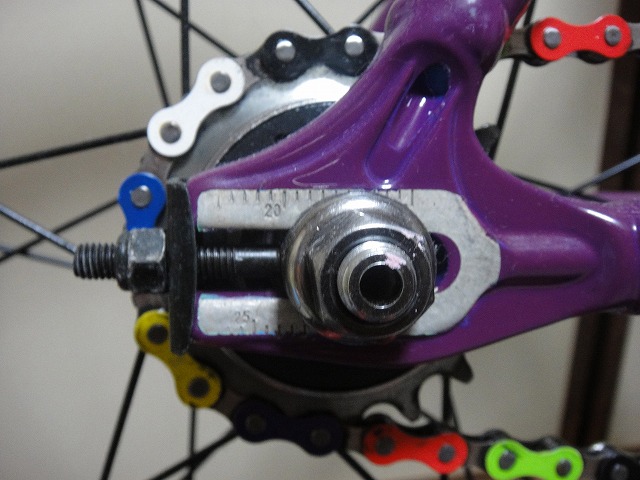
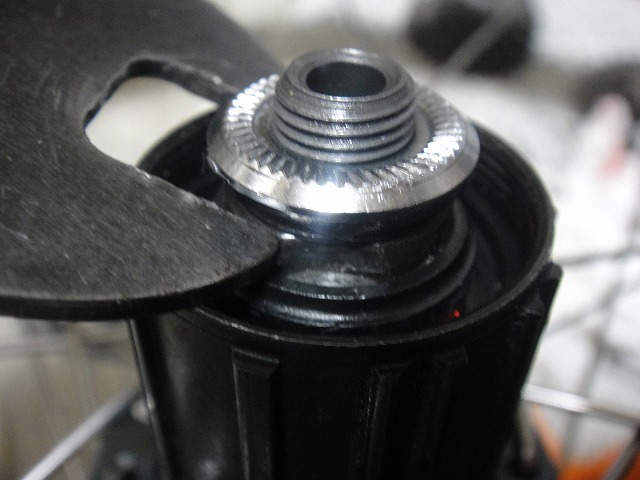
So I made a custom hub wrench just for this.
The image above is a regular hub wrench. With that, you can never reach the inner nut.
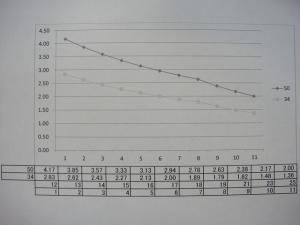
↑This is a simple graph I made showing
gear weights for a 50–34T front and 12–25T rear setup.
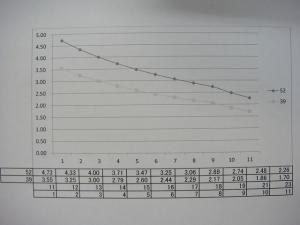
↑And similarly for a 52–39T with 11–23T.
There are various ways to read it, but for example, the 11th gear down from the 52T (the low gear)
is almost the same weight as the 8th gear on the 39T.
So with this gear combination,
the only lightness available only on the inner 39T
is the bottom 3 gears.
That's how I normally think about it, but
no matter what the front gear combination is, these lines never intersect.
Because there's only one sprocket.

So on my cyclocross bike it looks like this.
With 14–25T and 12–30T,
"the smaller top gear is the 12–30T side,
and the larger low gear is also the 12–30T side"—
an odd combination.
This is tremendously wasteful, and
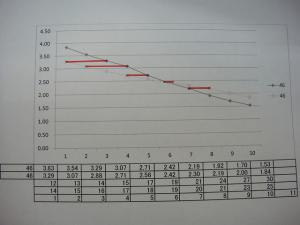
↑the points connected by red lines have the same weight.
5 gears overlap.
Despite calling it a 20S, it's really only 15 usable gears,
and since the 20T and 21T, 23T and 24T, etc. have similar weights,
it's like buying a "20-color colored pencil set" that turns out to be 20 pieces
but really only 15 colors, and those 15 colors include 3 nearly identical color pairs.
To use the 14–25T on the right and 12–30T on the left, shifting gradually
lighter while minimizing right-left flips, you'd go:
Left 1st (12T)
Left 2nd (13T)
Left 3rd (14T)
Left 4th (15T)
Flip
Right 3rd (16T)
Right 4th (17T)
Right 5th (18T)
Right 6th (19T)
Right 7th (20T)
Right 8th (21T)
Right 9th (23T)
Flip
Left 8th (24T)
Flip
Right 10th (25T)
Flip
Left 9th (27T)
Left 10th (30T)
Then you'd have a 15-speed setup, but the back half flips every gear,
consecutively—and in a race that's instant DNF with wheel-on/off time loss (skipping the 25T on the right side helps a bit).
So I thought:
if I put a sprocket suited to my legs and the course only on the right side,
and instead of putting gears on the left side, spread the hub flanges as wide as possible,
that would mean better lateral stiffness and lighter weight—resulting in
a wheel with better overall performance.
That's the conclusion I reached.
Among the components on my bike,
this one boasts exceptional story value (probably).
People often ask to take pictures of it.

↑That's the one. It's a wheel with Shimano freehubs on both left and right sides.
Since it's built to precise dimensions, you can flip it and change the gear ratio.
This bike has a 46T single front chainring, and the rear sprockets are
14–25T and 12–30T configurations.
People often say "that must be heavy for nothing," but
there are various things you can only understand by actually building something like this,
so the pros and cons of this component itself aren't the issue.
First thing I discovered: Point 1.
I primarily use the 14–25T side, and when using that side,
the opposite sprocket is completely dead weight.
That 12–30T (CS-4600, Tiagra grade)
weighs 329g according to the catalog, 324g in actual measurement—quite heavy—but
perhaps because it's inside the hub shell, I can't feel the 300g+ weight increase at all.
When I actually swapped on just the right side (freewheel side only, though both sides are freewheel sides)
and compared it immediately by removing and reinstalling, it was impossible to tell clearly.
When I wrote about cycloid curves before, I said that pedaling lightness is determined by
the weight of the wheel's outer rim. In other words,
a slight weight increase in the inner hub area doesn't affect
the wheel's initial acceleration feel much at all.
If instead we injected 320cc of water into the rim and at decent speed
had the water stick to the inside outer surface of the rim, or
stuck 10 yen coins (10g each) at each nipple location
(32H means 320g total), then gaining 320g on the outer rim
would be immediately noticeable. Since you can feel a 50g rim difference,
320g more would be pure suffering.
If you remember the story "back in the day Gianni Motta used to practice with water in his tubes,"
you're quite a veteran cyclist.
Next, the second thing I discovered.
Because of the structure with freewheel bodies on both sides, the flange width is abnormally narrow,
and as I mentioned before about wheel left-right balance, with this narrow width
the lateral stiffness is seriously weak.
Feeling some guilt about that, at this point I've built it with a W-cross pattern.
In the photo above, where the spokes cross, I've laced the spokes
not just at the final crossing but also at the previous crossing point.
I wanted to reduce the apparent deformation of the spokes even slightly.
Also, since there's a possibility of flipping it and using it the other way, it's JIS lacing.

Before tensioning, it looks like this.
These days I use a method of lacing aero spokes without W-crossing.

Before Point 3 of what I discovered...
A quick note about what's generally called W-cog—track hubs.
The photo above isn't fixed but a freewheel, yet in either case
the sprocket teeth are positioned quite far inside the frame.
The dropouts are also of the "forward-facing" type—the kind where you pull the wheel almost straight back to remove it—
so the sprocket almost never contacts the frame when removing or installing the wheel.

But with my "W-cog 20S" (self-named),
the sprocket tooth tips exist right up to the dropout edge.
Furthermore, when mounting the wheel with the "reverse-facing" dropouts common on road bikes,
there's a moment when you have to angle the rear wheel relative to the frame.
(You have to thread the sprocket past the derailleur to catch the chain)
On most wheels, the left side has no sprocket (laughs),
so I never worried about it before, but on this wheel,
the area near the left side's top gear scrapes against the left frame dropout.
I was considering a second version with Campagnolo on one side and Shimano on the other,
but this issue ruled that out.
I was thinking of making it for shop shifting adjustments, but with the possibility of frame damage,
I can't use it.
In summary, things I discovered only by actually building this type of hub:
Point 1: Even if the hub area is somewhat heavy, you barely feel it
Point 2: Lateral stiffness is seriously low
Point 3: When installing the wheel, the left side sprocket teeth hit the frame
How it's made
In this case I bought two 105 hubs,
cut them right down the middle, and assembled them. That's it.
Looking back now, I wish I'd used a silver hub for one side.
"Just assembly" is a bit of a lie—some processing is required.
Not necessary for all hubs, but for this one it's probably essential.
I won't say what it is here, but if you try it,
you'll follow the same path I did.
(Never mind the hecklers saying "nobody's doing that")

And this hub—the left and right hub shells aren't glued or welded.
As a bare hub, it spins like this.
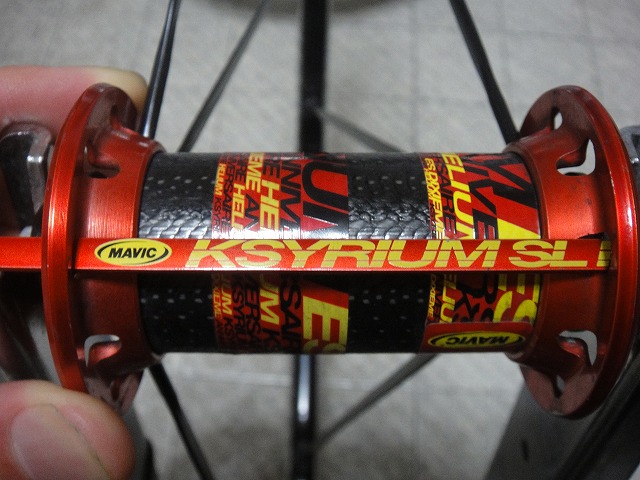
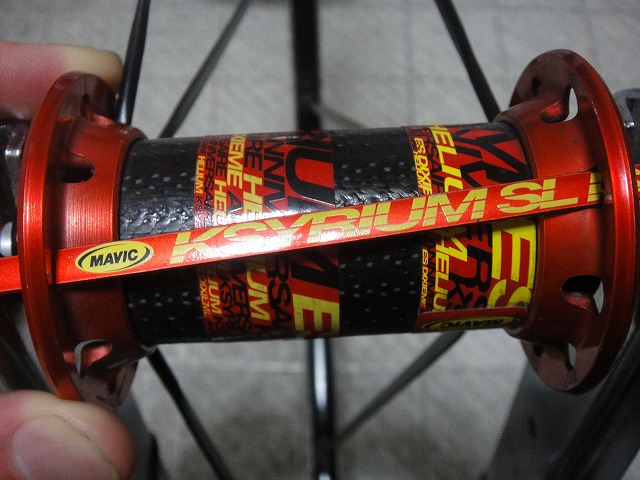
The Ksyrium front hub too—the aluminum flanges aren't glued to the carbon hub shell.
Once you build it as a wheel, the spoke holes on the rim side determine the phase,
so everything ends up in its proper place anyway. And with spoke tension,
the flanges clamp the hub shell, so that works out fine.
There's one more problem. Since both sides are the freewheel side,
you can't secure with the double-nut method using a standard hub wrench.
So I made a custom hub wrench just for this.
The image above is a regular hub wrench. With that, you can never reach the inner nut.

↑This is a simple graph I made showing
gear weights for a 50–34T front and 12–25T rear setup.
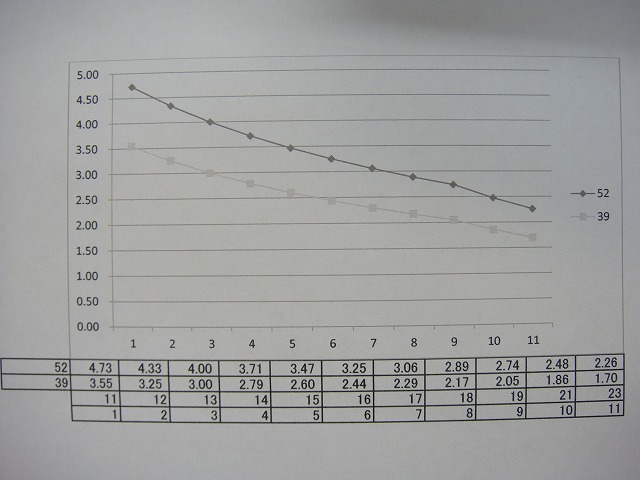
↑And similarly for a 52–39T with 11–23T.
There are various ways to read it, but for example, the 11th gear down from the 52T (the low gear)
is almost the same weight as the 8th gear on the 39T.
So with this gear combination,
the only lightness available only on the inner 39T
is the bottom 3 gears.
That's how I normally think about it, but
no matter what the front gear combination is, these lines never intersect.
Because there's only one sprocket.
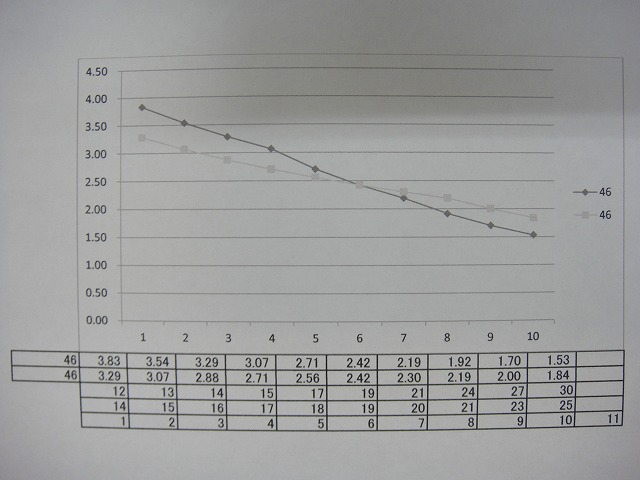
So on my cyclocross bike it looks like this.
With 14–25T and 12–30T,
"the smaller top gear is the 12–30T side,
and the larger low gear is also the 12–30T side"—
an odd combination.
This is tremendously wasteful, and
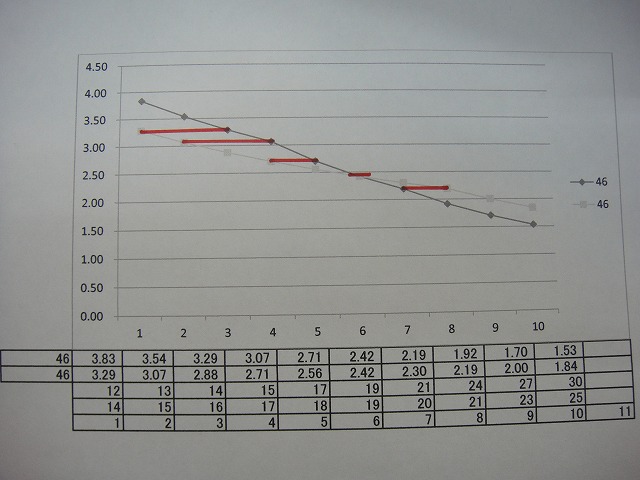
↑the points connected by red lines have the same weight.
5 gears overlap.
Despite calling it a 20S, it's really only 15 usable gears,
and since the 20T and 21T, 23T and 24T, etc. have similar weights,
it's like buying a "20-color colored pencil set" that turns out to be 20 pieces
but really only 15 colors, and those 15 colors include 3 nearly identical color pairs.
To use the 14–25T on the right and 12–30T on the left, shifting gradually
lighter while minimizing right-left flips, you'd go:
Left 1st (12T)
Left 2nd (13T)
Left 3rd (14T)
Left 4th (15T)
Flip
Right 3rd (16T)
Right 4th (17T)
Right 5th (18T)
Right 6th (19T)
Right 7th (20T)
Right 8th (21T)
Right 9th (23T)
Flip
Left 8th (24T)
Flip
Right 10th (25T)
Flip
Left 9th (27T)
Left 10th (30T)
Then you'd have a 15-speed setup, but the back half flips every gear,
consecutively—and in a race that's instant DNF with wheel-on/off time loss (skipping the 25T on the right side helps a bit).
So I thought:
if I put a sprocket suited to my legs and the course only on the right side,
and instead of putting gears on the left side, spread the hub flanges as wide as possible,
that would mean better lateral stiffness and lighter weight—resulting in
a wheel with better overall performance.
That's the conclusion I reached.