Another day, another wheel (and so on).
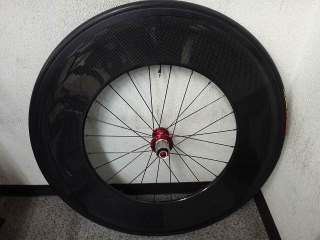
A customer brought in a rear wheel built with a 120mm-high tubular rim.
It's a trike rear wheel—and by trike (three-wheeler) I mean
a recumbent with two front wheels and one rear wheel.
The customer gave me permission, or rather they actually wanted me to,
so I'll say it: this wheel was built by HC Works,
a totally incompetent shop that mainly handles recumbents and trikes.
I'll go into what makes them so incompetent as I go,
but since there might be other wheels out there with similar nonsense,
I'm also writing this as a public service announcement.
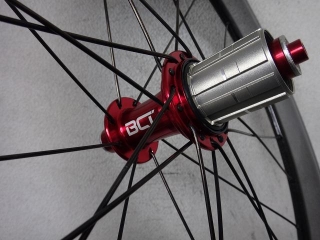
A BCT brand 2:1 lacing hub, 24H,
all-black Campagnolo #14 spokes. That's 40-spoke lacing in terms of how it reads.
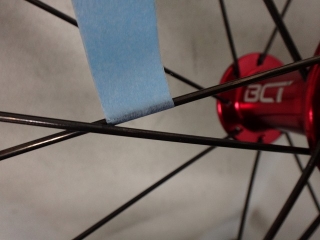
With this rim being so tall, the spokes are naturally shorter.
In terms of structure inboard of the rim holes,
it's basically the same as a 20-inch HE low-profile rim (spoke length nearly identical).
When spokes get this short, once you get a certain amount of tension,
their deflection when you squeeze them becomes almost zero—
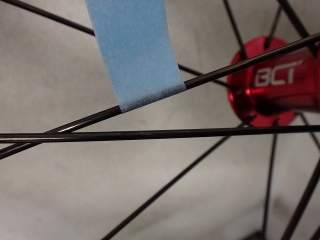
—but this one is abnormally slack from the freewheel side.
There's almost no runout or centering error.
It looks like it was built just with a light tightening from the provisional assembly stage.
Later on, when I did a partial disassembly,
I could loosen all the nipples by two turns and then hand-turn them loose from there.
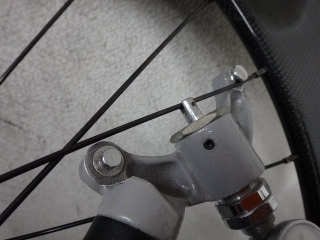
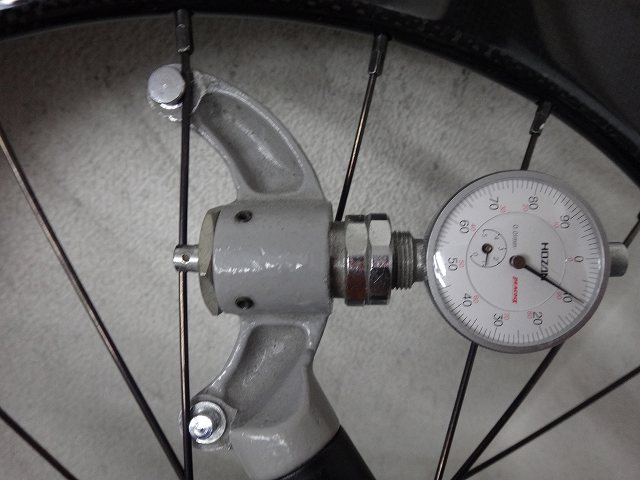
When I press the probe of a Hozan spoke tension meter...
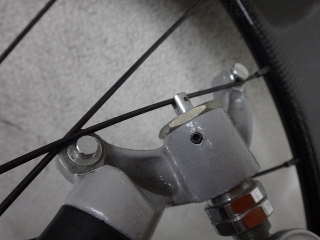
...the spoke deflects like this.
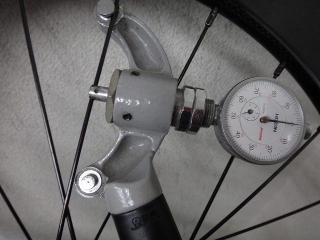
I checked all the spokes on the freewheel side.
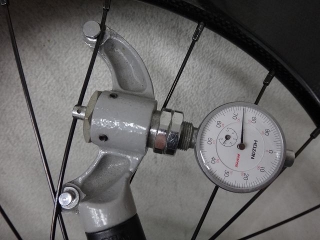
The H1ST reading here is 74. The adjacent one was 72.
Most places are under 80, with the highest spots around 90.
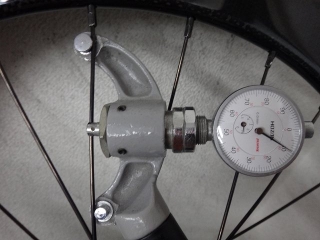
The highest point came out to 109.5.
The lower the tension, the more spoke tension varies.
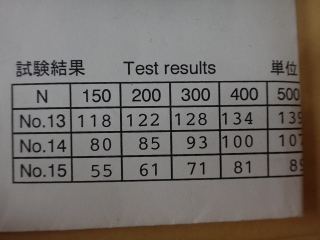
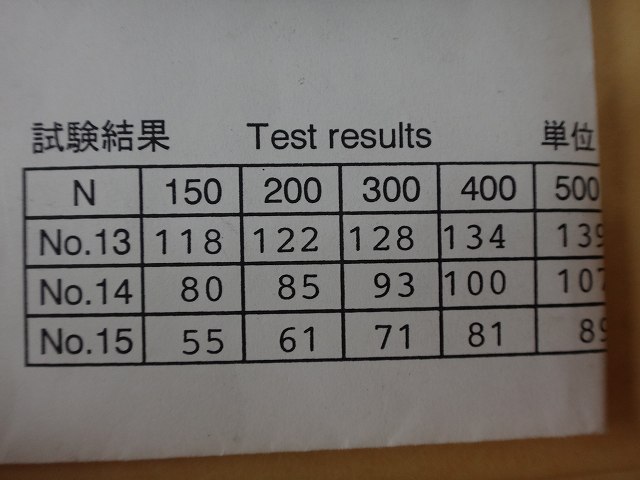
The relationship between H1ST and second ST for plain spokes
isn't especially a trade secret, so I'll show the chart too,
but H1ST readings under 80 mean second ST is under 150N
and reads as "too low to measure."
With H1ST at the highest point of 109.5, we get around 500N,
but only the two spokes in the final crossing were over 100.
Just to be clear, that's not the main point of this post.
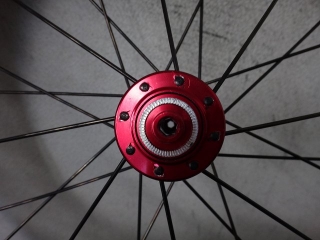
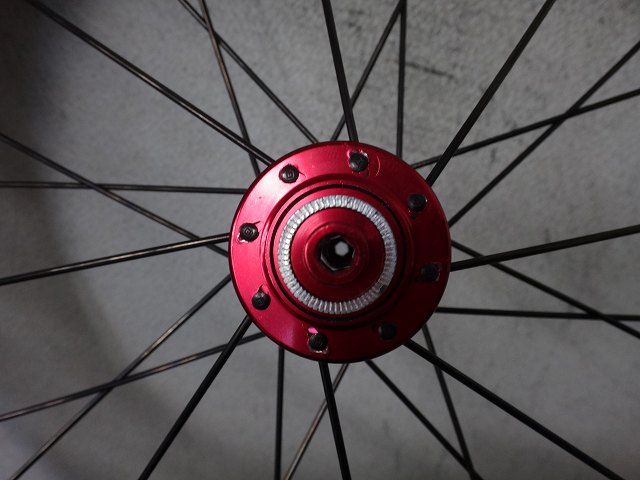
The non-freewheel side 0-cross lacing on this rear wheel isn't radial.
It's got a phase shift—a twist.
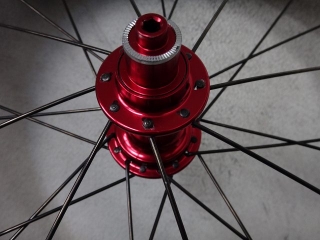
↑It's easier to see if you tilt it
It's hard to imagine they wouldn't have noticed this by the time they finished building the wheel,
so for HC Works, this must be "normal."
I'm expecting them to say something like "this hub and this rim always come out like this,"
so I'm going to preemptively refute that with evidence below.
With small-wheel builds, there are cases with 36H hubs and 24H rims
where you're forced into left-right equal lacing
(like when building with Alfine internal-hub driveline),
and in those cases phase shift does occur.
But this rear wheel can be built without phase shift.
Colima makes an MCC wheel—it's got 0-cross carbon spokes on both sides, front and rear, left and right.
The front is radial,
but the rear has spoke trajectories tilted in the porcupine direction on both sides.
Since it's a drive wheel, they're probably thinking about the force direction
when the freewheel body gets heavily torqued under pedaling.
If this rear wheel absolutely had to be built this way,
I'd say the non-freewheel 0-cross should be tilted porcupine-direction,
but in reality it's the opposite.
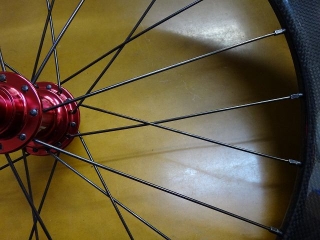
At first I thought the non-freewheel spokes were
"just shifted one hole over to the adjacent hole,"
but that's not it.
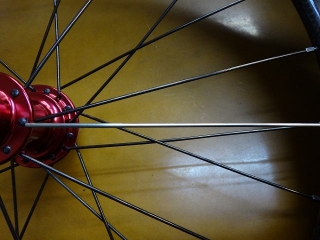
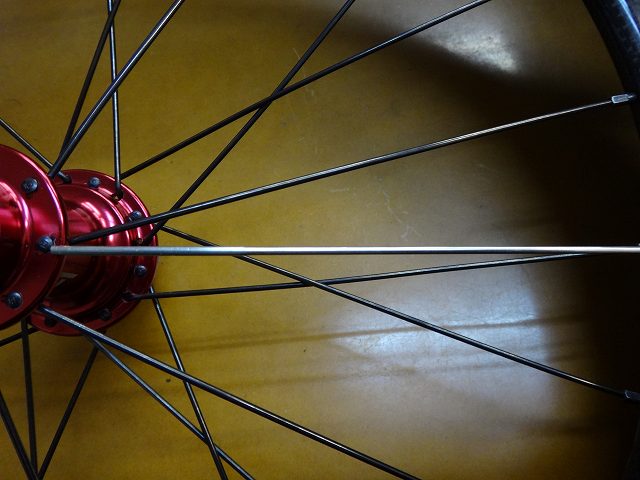
If I place a silver spoke radially from the 0-cross flange hole...
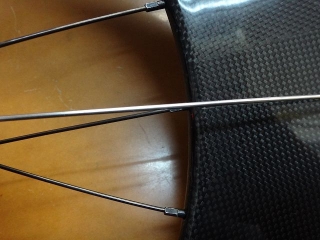
...the rim hole along that radial line is already occupied by a freewheel-side spoke.
Up to this point you might think "maybe this wheel really can only be built this way,"
but that's not true at all.
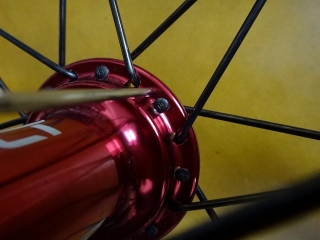
The freewheel side is 4-cross (2 crossings),
and if I place a silver spoke parallel to the hub axle
from the phase right below the final (second) crossing...
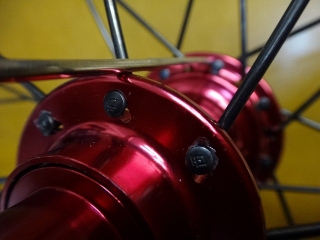
...the non-freewheel phase aligns with the flange hole.
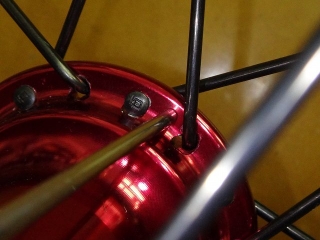
Do the same thing below the first crossing and

...the non-freewheel phase lands right in the middle between flange holes.
The spoke in the above image is silver, not red—that's just the hub color showing through. Just so you know.
This means the hub has a phase pattern where
every other flange hole on the non-freewheel side is blocked off,
as if halved from a generic 32H hub.
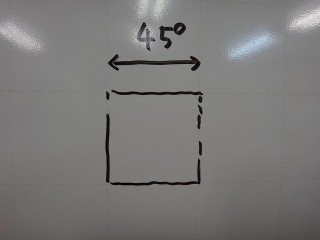
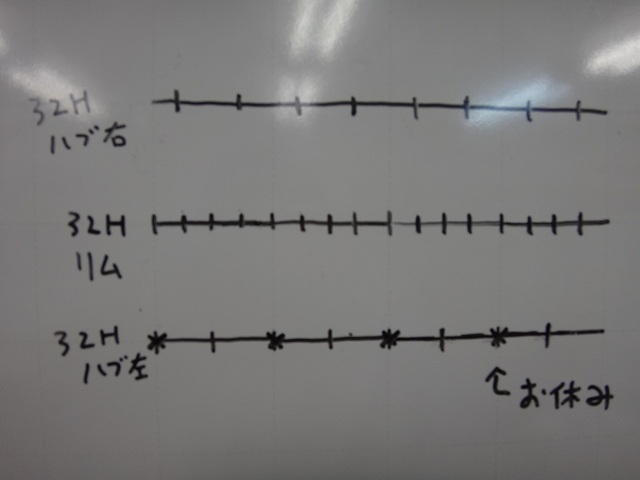
Our whiteboard has a blank side and a graph-paper side.
The graph-paper side is good for fairly accurate freehand drawing.
If I set each square to represent 45° of wheel geometry,
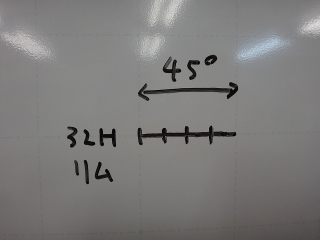
then 45° of a 32H rim is four rim holes.

I extended that to 180°.
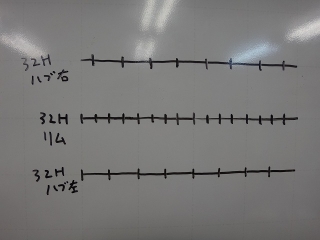
From there, I drew a hub-to-rim-to-hub wheel-building diagram
using a standard 32H hub pattern.
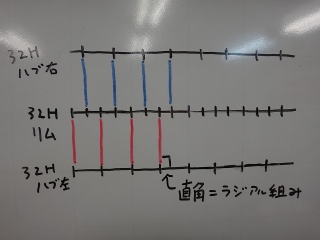
I'll try 0-cross lacing on both sides.
When spoke trajectories don't cause phase shift
and run perpendicular to the rim and hub lines on the diagram,
those 0-cross spokes are on radial lines,
so they're radial lacing.
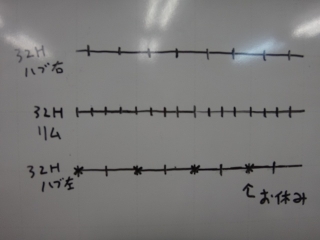
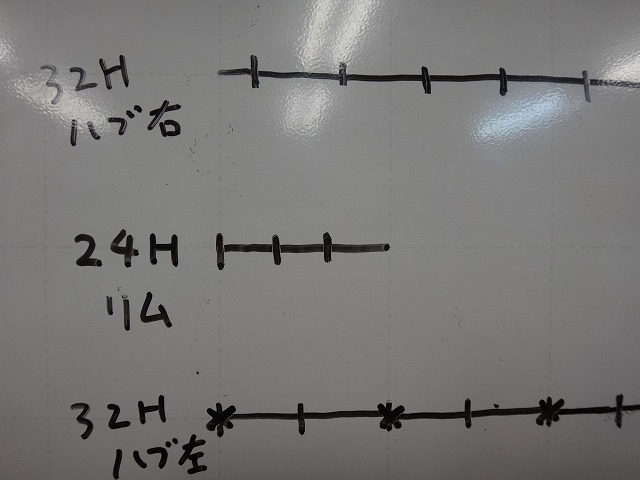
I erased the spokes.
This hub has every other flange hole on the non-freewheel side blocked off,
so I'll block those in the diagram too.
Now the hub is 16:8H / 24H total
(the diagram only shows 180° of it).
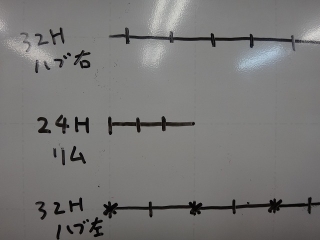
I'm changing the rim to 24H. 45° of a 24H rim is three holes.
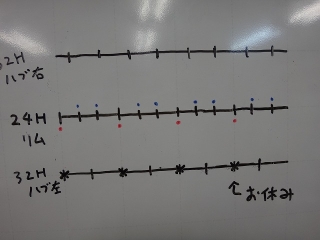
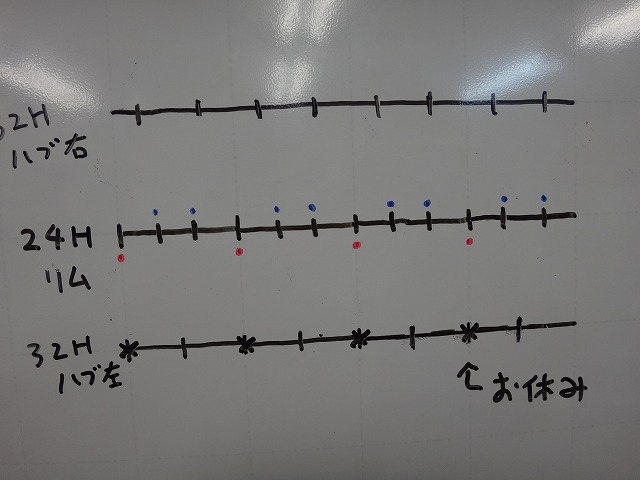
I added the 2:1 lacing side distribution to the 24H rim holes.
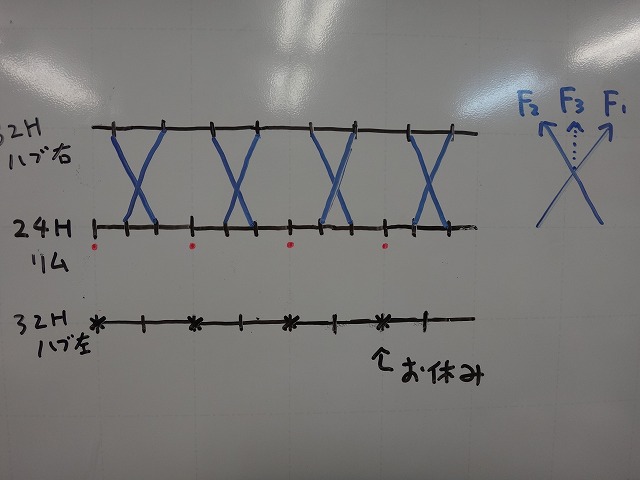
Here's where the fundamental error occurs: the rim and left flange hole phases aren't aligned with radial lacing on the non-freewheel side as the given priority.
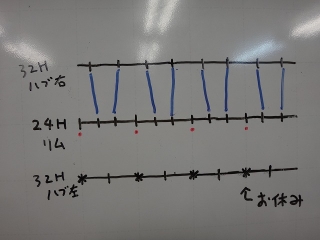
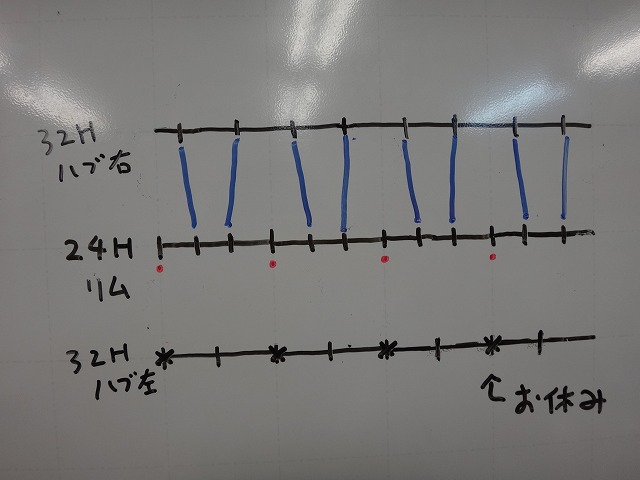
I laced the freewheel side at 0-cross.
All spokes deviate from the radial line,
but they alternate, deviating at the same angle in opposite directions,
so
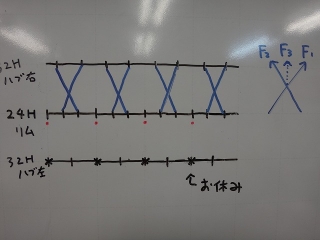
when you add tangential lacing, the combined direction of the final crossing's two spokes
aligns with the radial line, so no phase shift occurs.
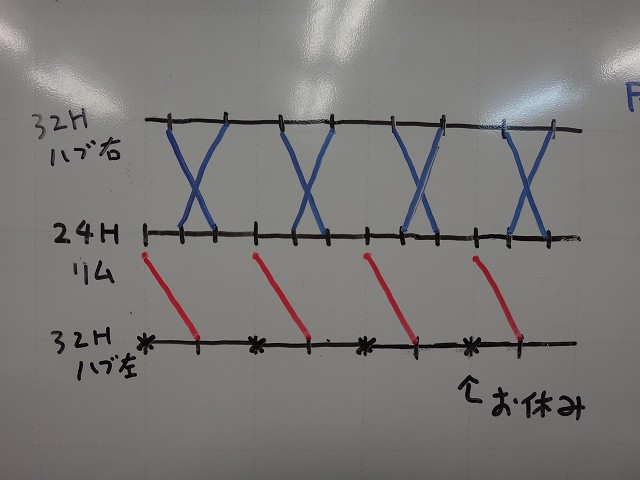
From here, if I connect the remaining non-freewheel hub holes to rim holes...
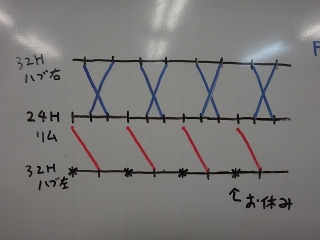
...I get this.
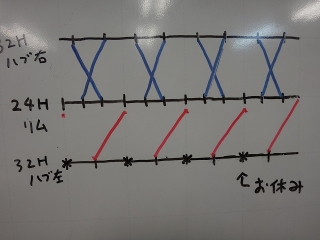
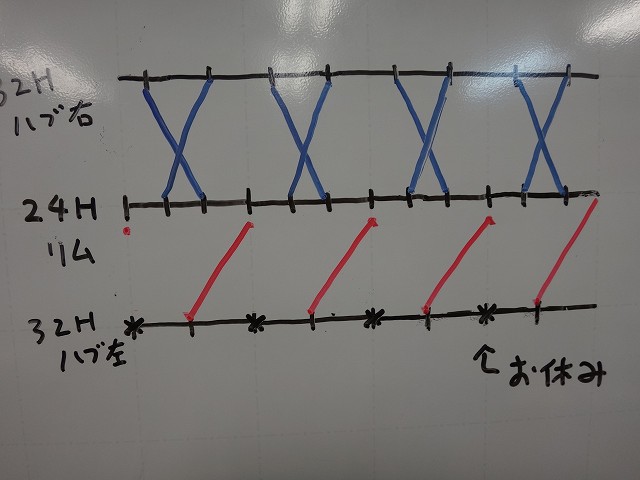
Or this—just the porcupine direction reverses.
This is the initial state from the top.
By the way, if we only had the freewheel-side tangential lacing at this point,
there'd be no phase shift,
but once we add the non-freewheel spokes, the tangential lacing twists along with the phase shift.
In both the diagram and the actual initial state
the 2:1 lacing was XI (cross-in-cross-in),
but whether the non-freewheel radial spokes pass through the freewheel final crossing
in an XI or Ж (zhe) pattern, the wheel can be built without phase shift.
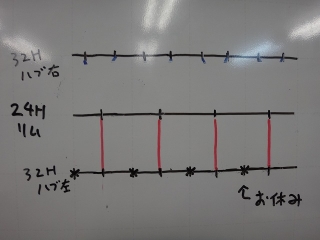
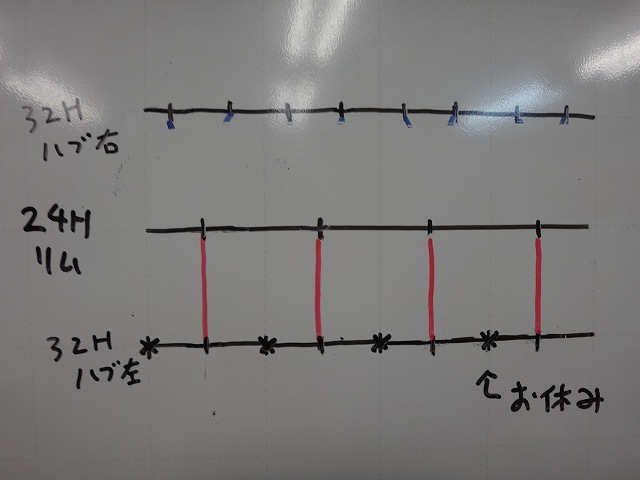
Of the three parallel lines, the top and bottom (hub lines) don't move,
but the middle (rim line) can be freely shifted left and right.
I'd already drawn the spokes with "non-freewheel radial lacing as the given"
against the 24H rim.
At that point I'd only drawn the rim holes where those spokes go.
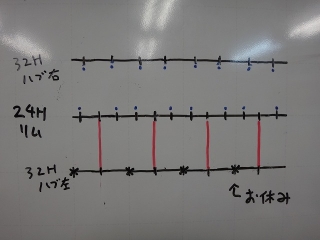
I added the rim holes for the freewheel spokes.
Two holes, dividing the gaps between the non-freewheel holes into thirds.
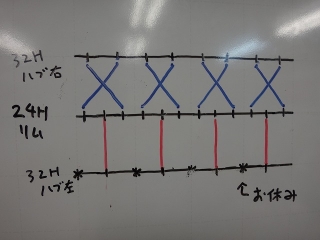
I drew the freewheel spokes.
No phase shift, and the non-freewheel spokes stay radial.
The diagram above is Ж lacing, but
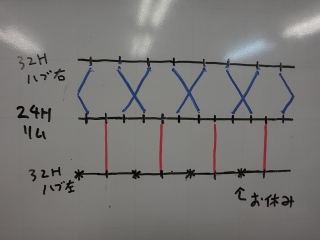
it can also be XI lacing.
Personally I prefer a wider final-crossing angle,
so I'd probably go Ж.
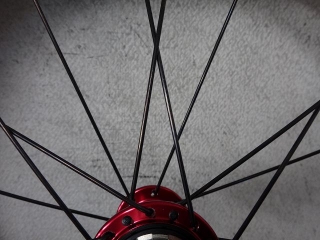
I completely released the spoke tension.
With tension gone, the freewheel spokes are now clearly twisting from the non-freewheel twist,
and you can see the final crossing getting kinked.
If we removed the non-freewheel spokes from here,
the freewheel tangential lacing wouldn't develop any twist.
From here I'll remove the freewheel nipples once,
but I'm not removing any spokes threaded through the flange holes—they stay put.
I'm converting to a 2:1 lacing without phase shift using the same materials.
The required spoke length will change,
but since this is provisional assembly, no problem.
As I'll write later, even before that the spoke length itself was wrong
(seriously, how did they figure out the length for those twisted non-freewheel spokes...?).
"Removing all freewheel nipples" corresponds to
"establishing non-freewheel radial lacing as the priority" in the diagram above.
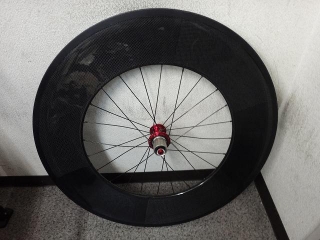
Done with provisional assembly.

Ж lacing.
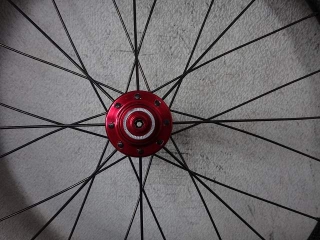
No phase shift,
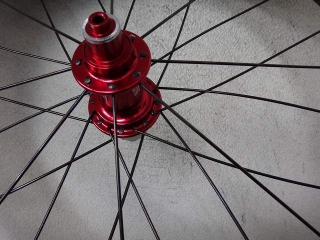
and the non-freewheel 0-cross is radial lacing.
Now you get it, you incompetent moron.
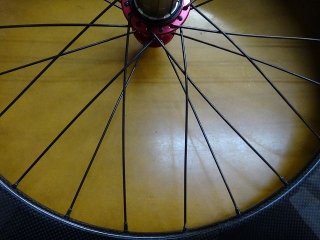
If you wanted to convert this to XI lacing instead,
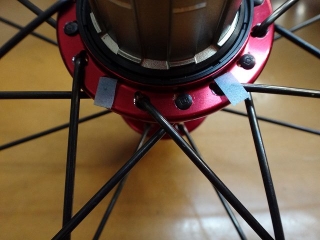
for example, with 4-cross lacing, from the flange hole marked with tape
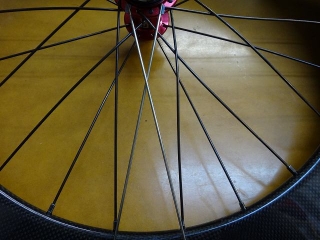
...you'd do it like this.
As I mentioned, I'm finicky about final-crossing angle width,
so if I were doing this I'd probably go 6-cross Ж.
Also, between the original lacing and this Ж re-lacing,
the freewheel inpoke/outpoke pattern is Italian-laced,
but with the XI lacing in the image above, inpoke and outpoke reverse,
so if you wanted to avoid that, you'd have to remove the spokes from the hub.
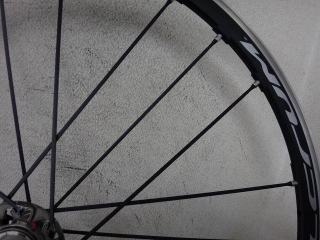
↑This is a Racing Zero rear wheel with a sleep phase,
and it's XI-laced.
Back when Fulcrum had evenly-spaced rim holes, Ж was also an option,
but with sleep phases, it's basically always XI.
Unlike this case, the sleep phase is on the rim holes,
so the choice of Ж or XI from the non-freewheel spoke direction
doesn't change the final crossing angle on the freewheel side.

This rear wheel is "a 28H non-freewheel radial 2:1 lacing wheel
with half the non-freewheel spokes removed—21H total"
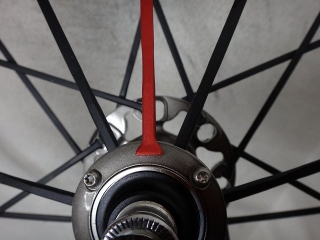
If you got the sleep phase direction wrong,
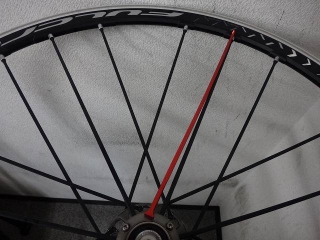
↑the spoke trajectory would be either this

↑or this.
The situation is a bit different,
but the current case is similar.

From this state, if the left flange's sleep phase reverses,
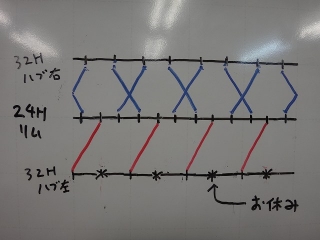
it ends up like this.
Jumping back in the timeline,
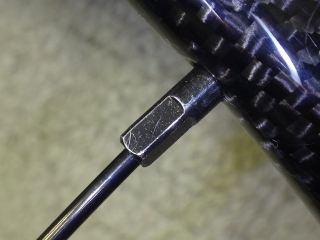
the original wheel had long (16mm) brass nipples.
When the customer asked the shop about it,
they said "the rim holes are thick, so you need these,"
but 12mm nipples work just fine—the hex flats come out completely.
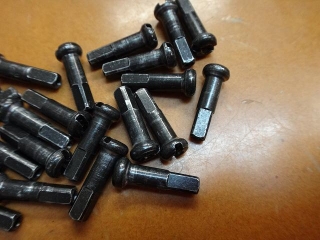
With 12mm, 14mm, and 16mm nipples, the thread count
is technically different,
but compared to the difference in nipple length it's negligible.
I determine spoke length based on the outside end face of the nipple,
so I basically never change spoke length based on nipple length.
What I'm saying is: the difference in nipple length has virtually no effect
in covering up wrong spoke length.
I shone a light inside the rim and saw
the original wheel's spoke length was clearly too short.
Normally I'd pull out a 1 or 2 pair or 3 or 6 individual spokes from the rim
(ones that haven't been loosened at all) and photograph them,
like I always do for 2:1 lacing,
but with this rim being so tall it wasn't feasible.
Plus I wanted to prove the conversion to proper 2:1 lacing
without changing any materials,
so I skipped that this time.
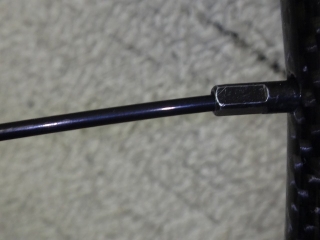
It's possible that with 12mm nipples on the original wheel
you'd see spoke threads poking out of the nipple.
It was that short.
So the 16mm nipples had the "benefit" (if you can call it that)
of hiding that! Well, that was completely unhelpful to learn!
Also, the image above hasn't been touched since I received it,
and the spoke trajectory makes a sharp bend right where it exits the nipple.
This happened at multiple points.
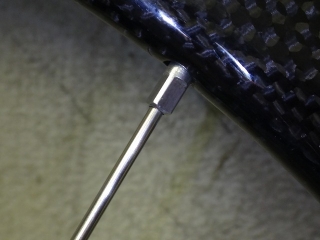
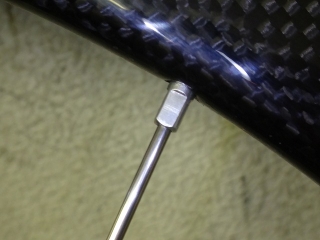
↑12mm nipples, but you get plenty of hex-grip clearance.
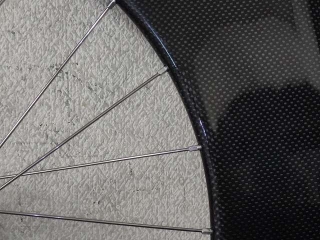
This is after rebuilding (timeline jump).
There are no points where the spoke trajectory bends sharply
where it exits the nipple.
So this rim doesn't need 16mm nipples—
in fact, they're worse.
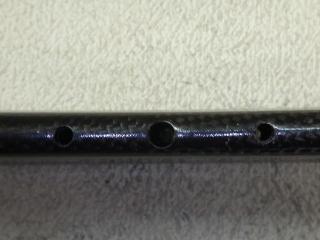
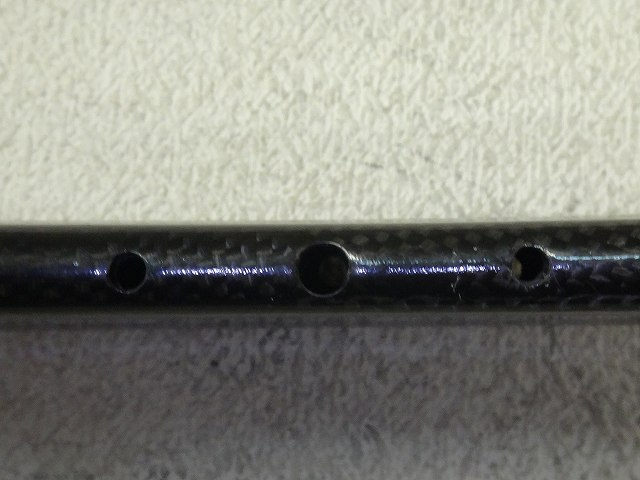
The rim holes show some runout.
At least, they don't appear to be centered on the rim.
But they're not alternating left-right either, and they're not
arranged as right-right-left or center-center-left for 2:1 lacing.
Looking at either side of the valve hole in the image above,
it almost looks like a reverse-bed rim.
The conclusion: it's just loose tolerance, not intentional hole positioning.
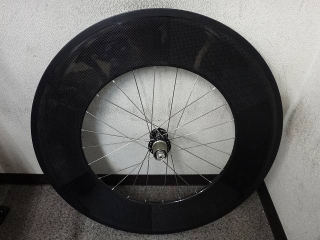
And so, done building.
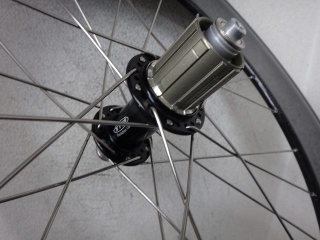
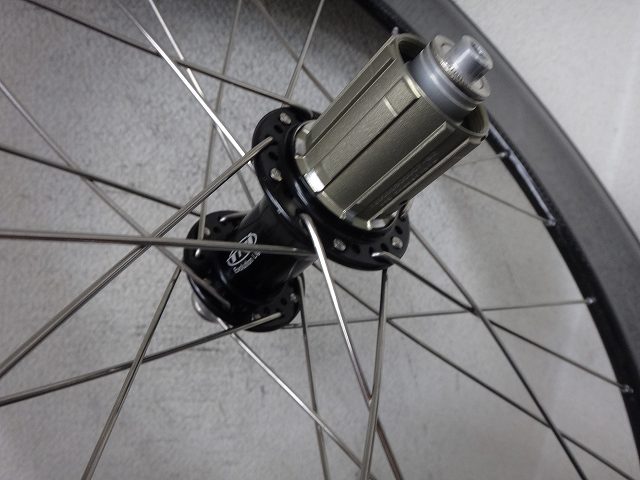
Evolight hub, 24H, all Campagnolo #14 spokes, 46-spoke lacing.
Truing is next.
Since the rim wasn't clearly marked as 2:1,
I went with left-right equal lacing instead.
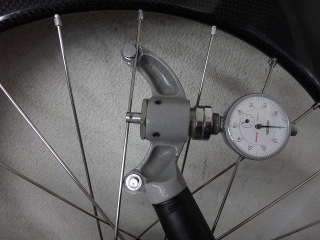
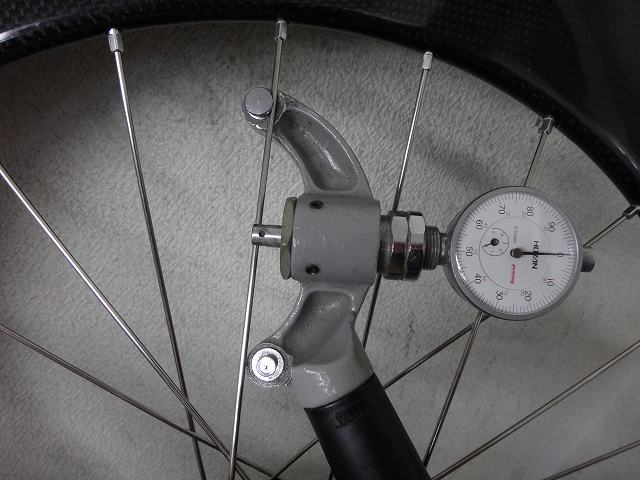
The relationship between plain spokes and H1ST
isn't a trade secret, so here we go!
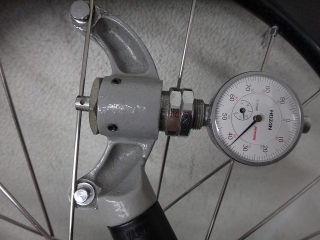
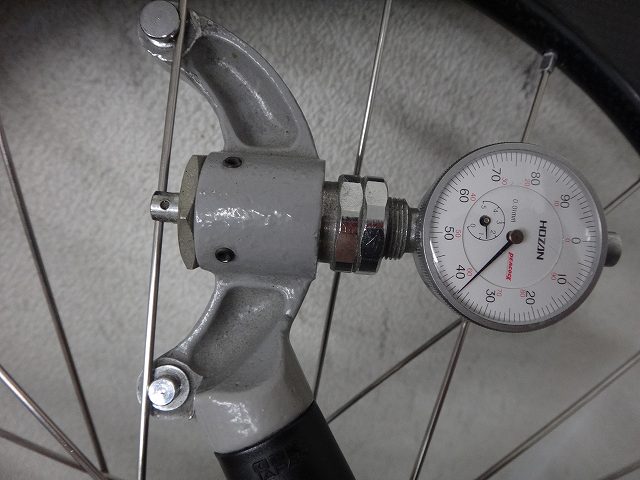
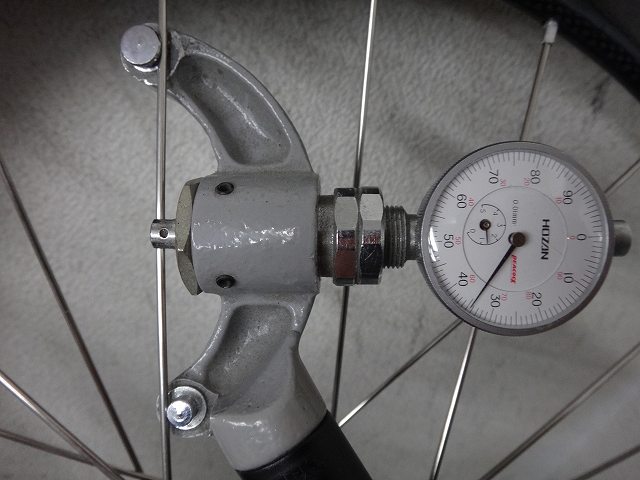
Just under 137!

134.5!
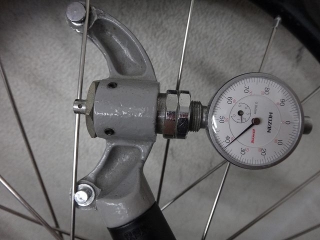
Just under 138!
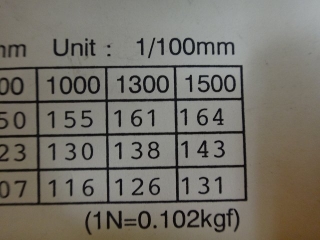
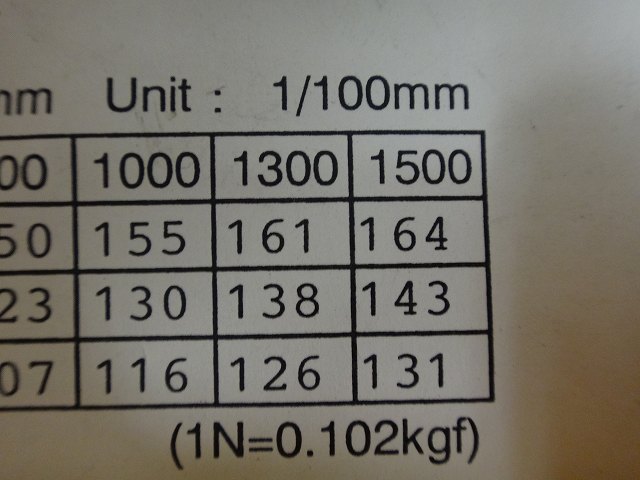
So just under 1300N.
The numbers table above gets rough toward the end,
but you can read precise values off the graph table if needed.
H1ST of 143 gives 1500N, which exceeds most rim tolerances.
The H1ST difference between 1000N, 1300N, and 1500N
isn't as dramatic at higher tensions as it is at low tensions.
Pressing the tension meter is like
an extremely repeatable form of spoke-squeezing,
and with #14 plain spokes, once H1ST exceeds 130,
the deflection against squeezing barely changes
(meaning the feel when riding is basically the same).
Beyond that, higher tension just increases rim-hole failure risk.
So wheels shouldn't be cranked to maximum tension indiscriminately.
However, with large-flange freewheel hubs on rear wheels,
the non-freewheel second ST changes quite a bit between
freewheel-side 1000N and 1300N, so watch out for that.
What's that? You want me to show tension meter readings on the non-freewheel side too?
That's trade-secret material, old timer. Hehehehe.
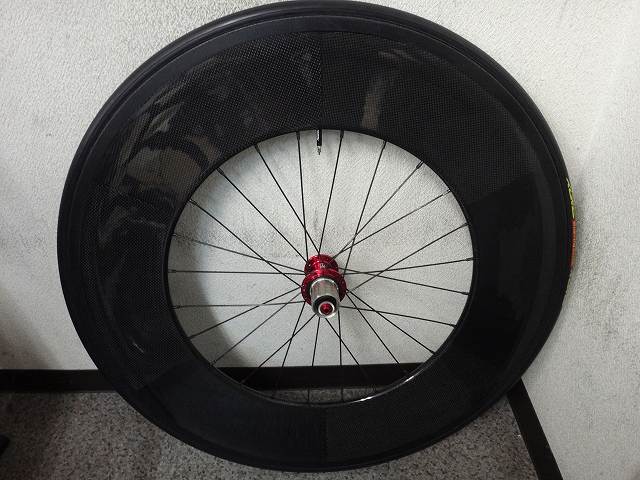
A customer brought in a rear wheel built with a 120mm-high tubular rim.
It's a trike rear wheel—and by trike (three-wheeler) I mean
a recumbent with two front wheels and one rear wheel.
The customer gave me permission, or rather they actually wanted me to,
so I'll say it: this wheel was built by HC Works,
a totally incompetent shop that mainly handles recumbents and trikes.
I'll go into what makes them so incompetent as I go,
but since there might be other wheels out there with similar nonsense,
I'm also writing this as a public service announcement.
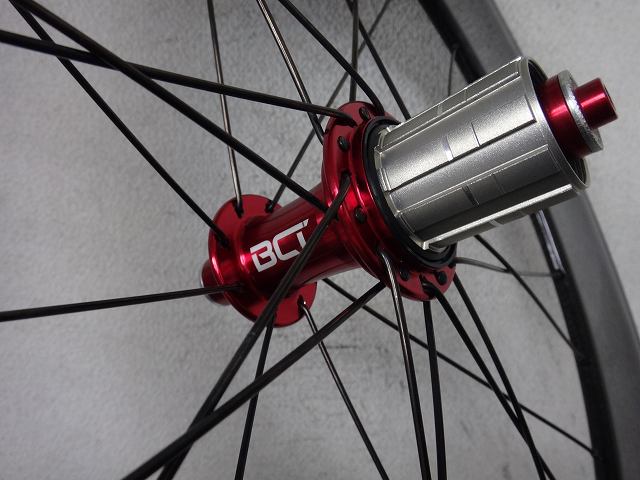
A BCT brand 2:1 lacing hub, 24H,
all-black Campagnolo #14 spokes. That's 40-spoke lacing in terms of how it reads.
With this rim being so tall, the spokes are naturally shorter.
In terms of structure inboard of the rim holes,
it's basically the same as a 20-inch HE low-profile rim (spoke length nearly identical).
When spokes get this short, once you get a certain amount of tension,
their deflection when you squeeze them becomes almost zero—
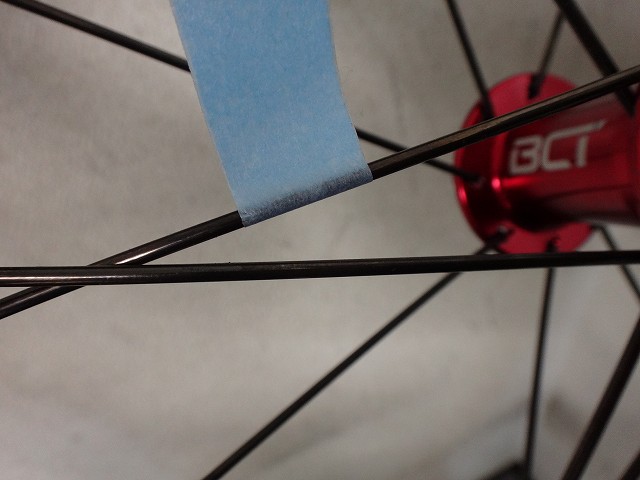
—but this one is abnormally slack from the freewheel side.
There's almost no runout or centering error.
It looks like it was built just with a light tightening from the provisional assembly stage.
Later on, when I did a partial disassembly,
I could loosen all the nipples by two turns and then hand-turn them loose from there.
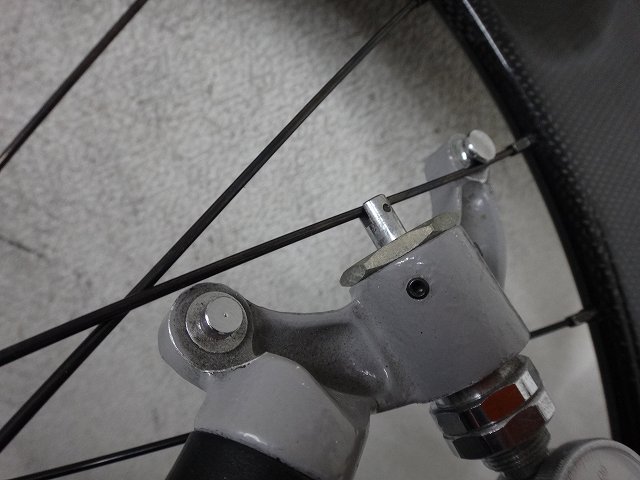
When I press the probe of a Hozan spoke tension meter...
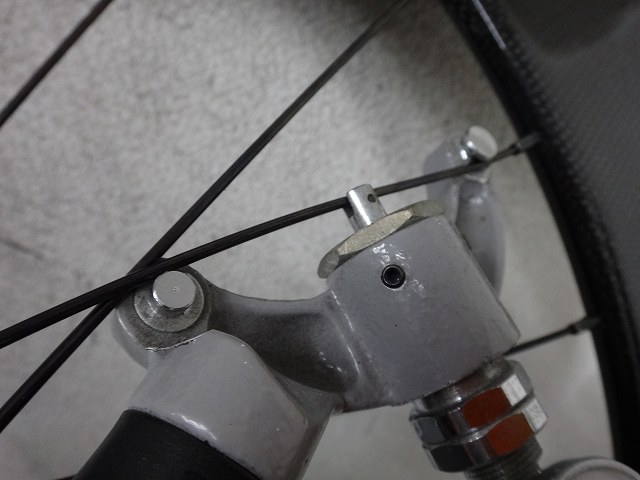
...the spoke deflects like this.
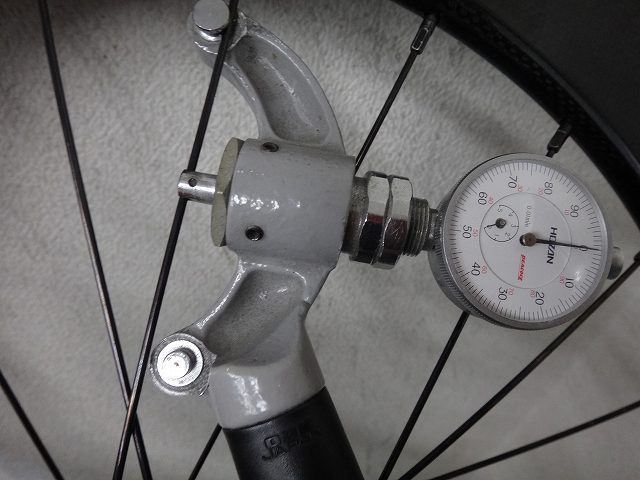
I checked all the spokes on the freewheel side.

The H1ST reading here is 74. The adjacent one was 72.
Most places are under 80, with the highest spots around 90.
The highest point came out to 109.5.
The lower the tension, the more spoke tension varies.
The relationship between H1ST and second ST for plain spokes
isn't especially a trade secret, so I'll show the chart too,
but H1ST readings under 80 mean second ST is under 150N
and reads as "too low to measure."
With H1ST at the highest point of 109.5, we get around 500N,
but only the two spokes in the final crossing were over 100.
Just to be clear, that's not the main point of this post.
The non-freewheel side 0-cross lacing on this rear wheel isn't radial.
It's got a phase shift—a twist.

↑It's easier to see if you tilt it
It's hard to imagine they wouldn't have noticed this by the time they finished building the wheel,
so for HC Works, this must be "normal."
I'm expecting them to say something like "this hub and this rim always come out like this,"
so I'm going to preemptively refute that with evidence below.
With small-wheel builds, there are cases with 36H hubs and 24H rims
where you're forced into left-right equal lacing
(like when building with Alfine internal-hub driveline),
and in those cases phase shift does occur.
But this rear wheel can be built without phase shift.
Colima makes an MCC wheel—it's got 0-cross carbon spokes on both sides, front and rear, left and right.
The front is radial,
but the rear has spoke trajectories tilted in the porcupine direction on both sides.
Since it's a drive wheel, they're probably thinking about the force direction
when the freewheel body gets heavily torqued under pedaling.
If this rear wheel absolutely had to be built this way,
I'd say the non-freewheel 0-cross should be tilted porcupine-direction,
but in reality it's the opposite.

At first I thought the non-freewheel spokes were
"just shifted one hole over to the adjacent hole,"
but that's not it.
If I place a silver spoke radially from the 0-cross flange hole...

...the rim hole along that radial line is already occupied by a freewheel-side spoke.
Up to this point you might think "maybe this wheel really can only be built this way,"
but that's not true at all.

The freewheel side is 4-cross (2 crossings),
and if I place a silver spoke parallel to the hub axle
from the phase right below the final (second) crossing...
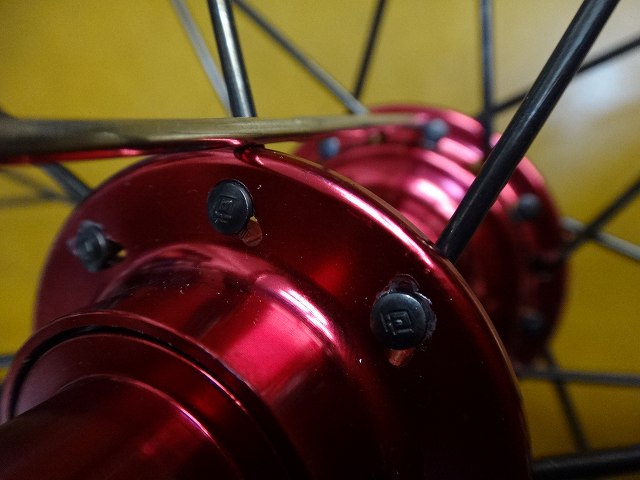
...the non-freewheel phase aligns with the flange hole.
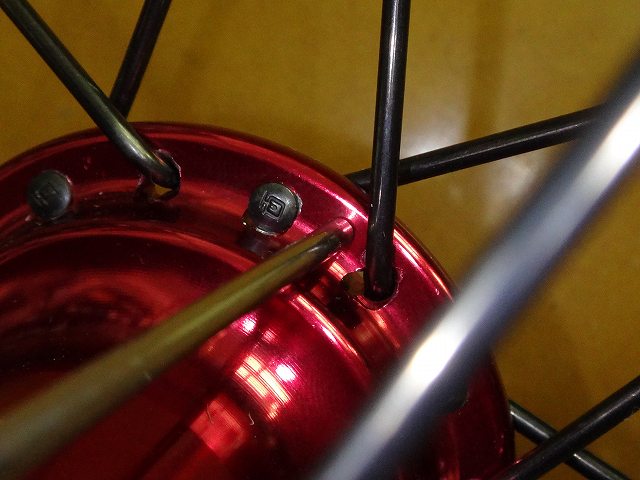
Do the same thing below the first crossing and
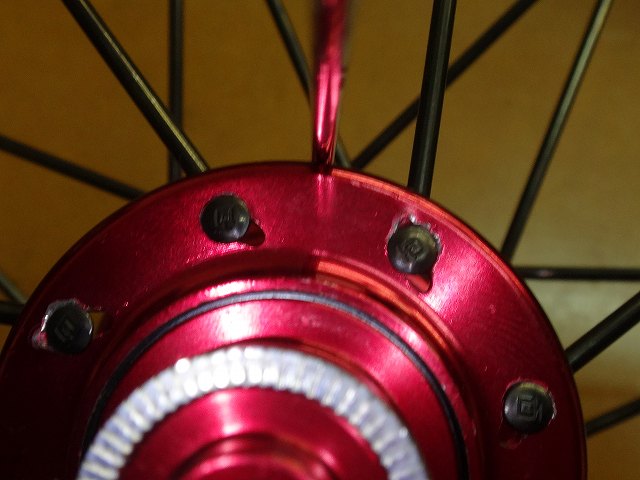
...the non-freewheel phase lands right in the middle between flange holes.
The spoke in the above image is silver, not red—that's just the hub color showing through. Just so you know.
This means the hub has a phase pattern where
every other flange hole on the non-freewheel side is blocked off,
as if halved from a generic 32H hub.
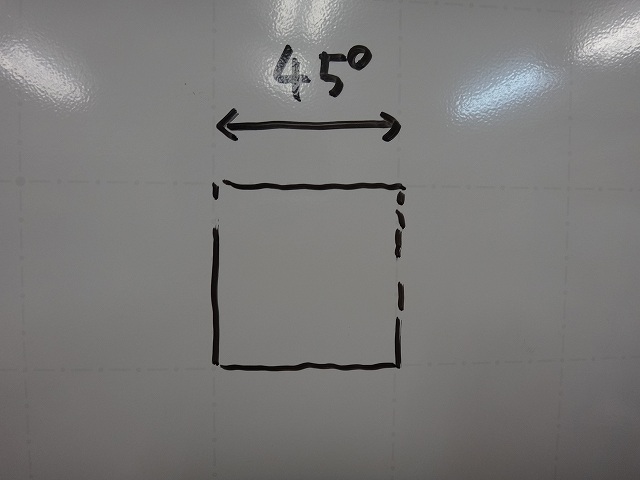
Our whiteboard has a blank side and a graph-paper side.
The graph-paper side is good for fairly accurate freehand drawing.
If I set each square to represent 45° of wheel geometry,
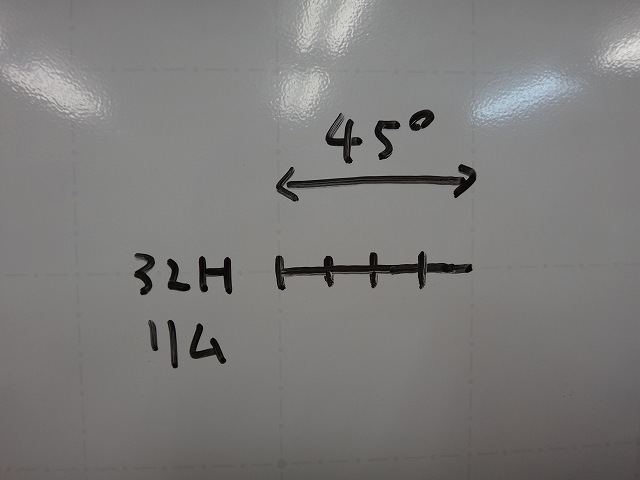
then 45° of a 32H rim is four rim holes.
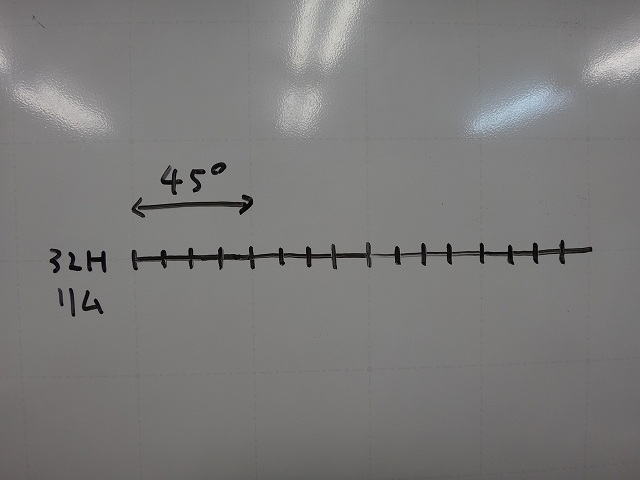
I extended that to 180°.
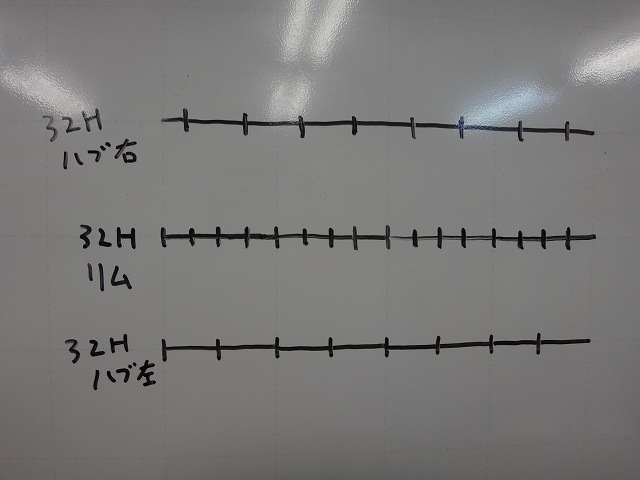
From there, I drew a hub-to-rim-to-hub wheel-building diagram
using a standard 32H hub pattern.
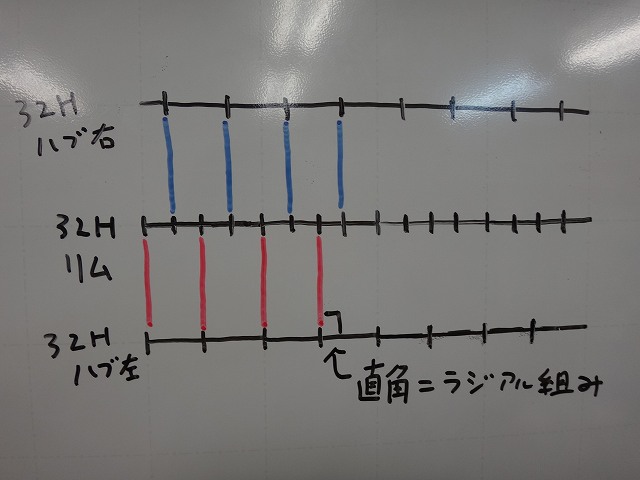
I'll try 0-cross lacing on both sides.
When spoke trajectories don't cause phase shift
and run perpendicular to the rim and hub lines on the diagram,
those 0-cross spokes are on radial lines,
so they're radial lacing.
I erased the spokes.
This hub has every other flange hole on the non-freewheel side blocked off,
so I'll block those in the diagram too.
Now the hub is 16:8H / 24H total
(the diagram only shows 180° of it).
I'm changing the rim to 24H. 45° of a 24H rim is three holes.
I added the 2:1 lacing side distribution to the 24H rim holes.
Here's where the fundamental error occurs: the rim and left flange hole phases aren't aligned with radial lacing on the non-freewheel side as the given priority.
I laced the freewheel side at 0-cross.
All spokes deviate from the radial line,
but they alternate, deviating at the same angle in opposite directions,
so
when you add tangential lacing, the combined direction of the final crossing's two spokes
aligns with the radial line, so no phase shift occurs.
From here, if I connect the remaining non-freewheel hub holes to rim holes...
...I get this.
Or this—just the porcupine direction reverses.
This is the initial state from the top.
By the way, if we only had the freewheel-side tangential lacing at this point,
there'd be no phase shift,
but once we add the non-freewheel spokes, the tangential lacing twists along with the phase shift.
In both the diagram and the actual initial state
the 2:1 lacing was XI (cross-in-cross-in),
but whether the non-freewheel radial spokes pass through the freewheel final crossing
in an XI or Ж (zhe) pattern, the wheel can be built without phase shift.
Of the three parallel lines, the top and bottom (hub lines) don't move,
but the middle (rim line) can be freely shifted left and right.
I'd already drawn the spokes with "non-freewheel radial lacing as the given"
against the 24H rim.
At that point I'd only drawn the rim holes where those spokes go.
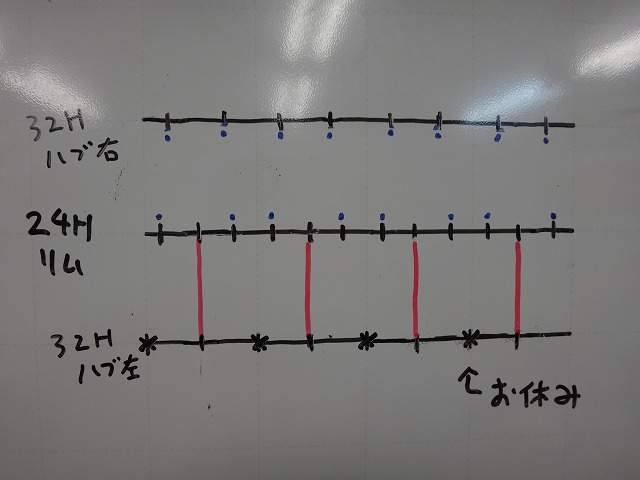
I added the rim holes for the freewheel spokes.
Two holes, dividing the gaps between the non-freewheel holes into thirds.
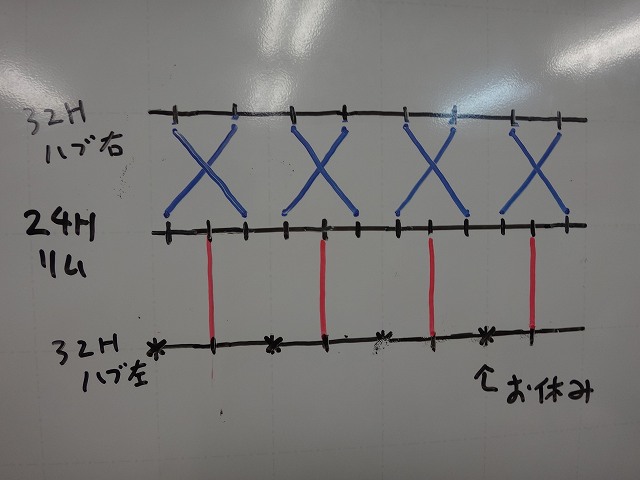
I drew the freewheel spokes.
No phase shift, and the non-freewheel spokes stay radial.
The diagram above is Ж lacing, but

it can also be XI lacing.
Personally I prefer a wider final-crossing angle,
so I'd probably go Ж.
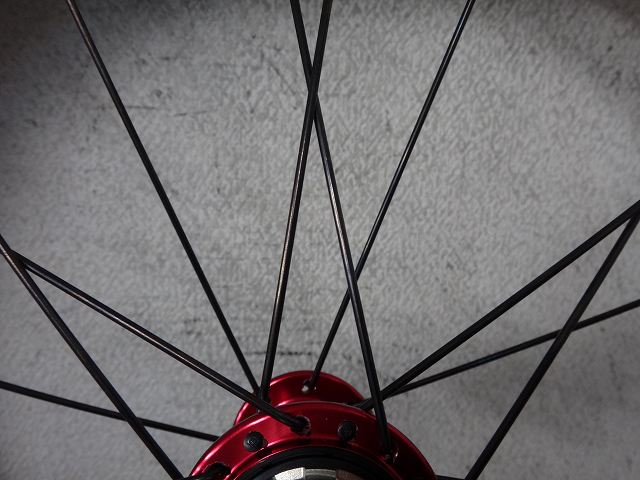
I completely released the spoke tension.
With tension gone, the freewheel spokes are now clearly twisting from the non-freewheel twist,
and you can see the final crossing getting kinked.
If we removed the non-freewheel spokes from here,
the freewheel tangential lacing wouldn't develop any twist.
From here I'll remove the freewheel nipples once,
but I'm not removing any spokes threaded through the flange holes—they stay put.
I'm converting to a 2:1 lacing without phase shift using the same materials.
The required spoke length will change,
but since this is provisional assembly, no problem.
As I'll write later, even before that the spoke length itself was wrong
(seriously, how did they figure out the length for those twisted non-freewheel spokes...?).
"Removing all freewheel nipples" corresponds to
"establishing non-freewheel radial lacing as the priority" in the diagram above.
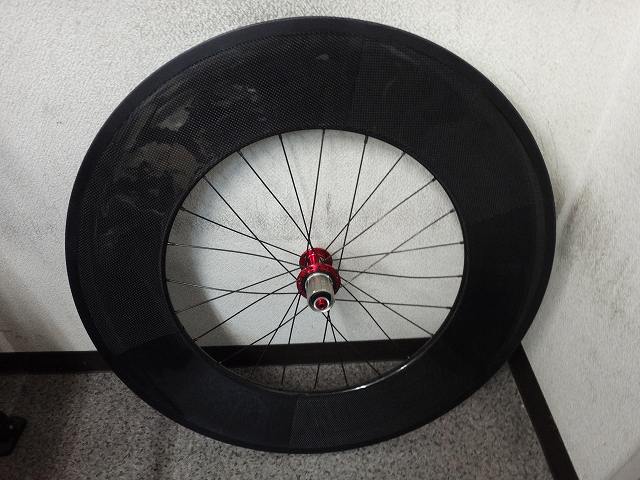
Done with provisional assembly.
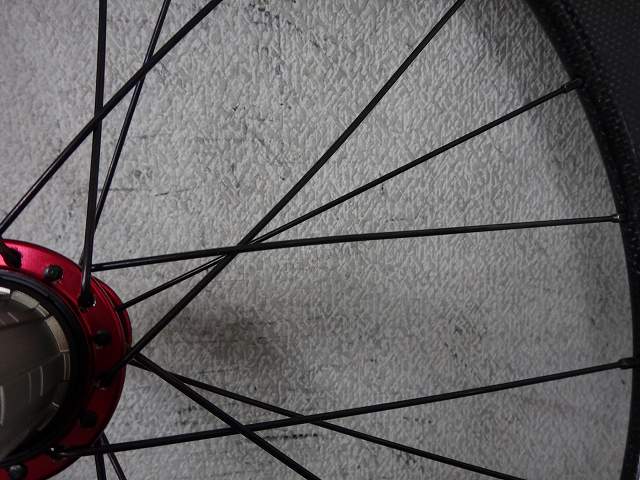
Ж lacing.
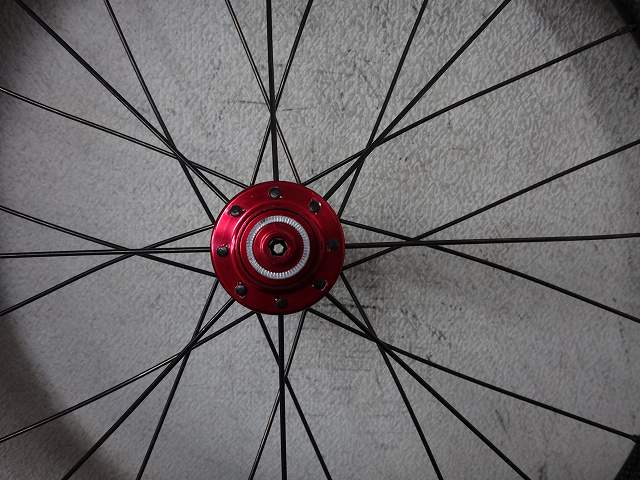
No phase shift,
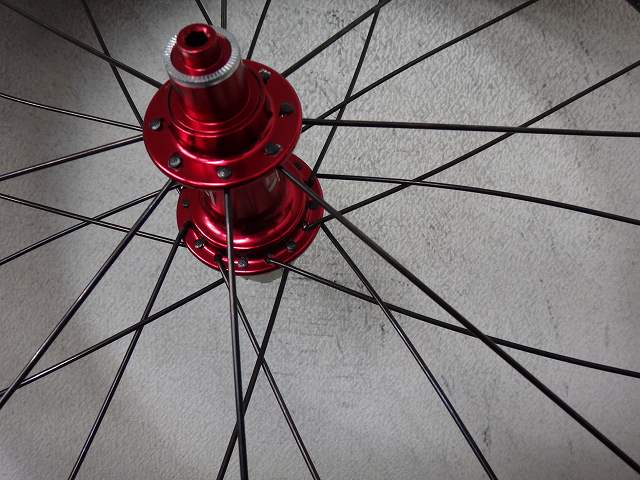
and the non-freewheel 0-cross is radial lacing.
Now you get it, you incompetent moron.
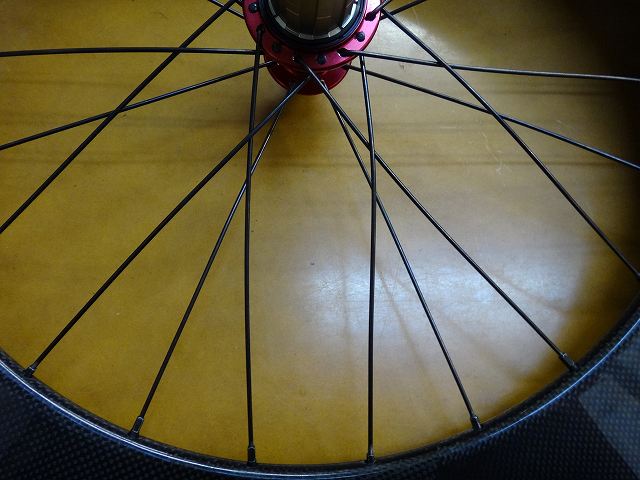
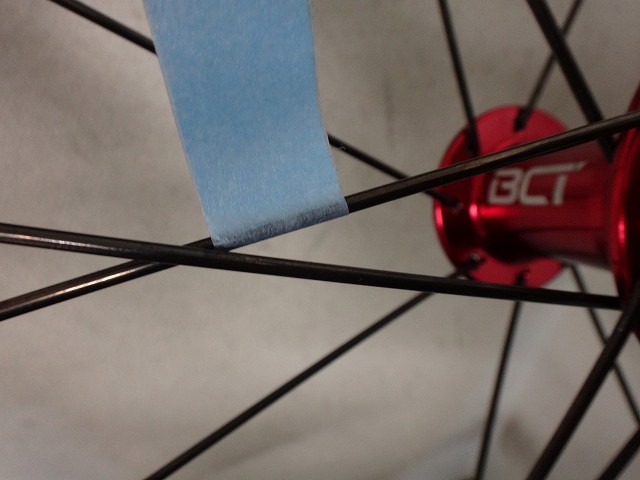
If you wanted to convert this to XI lacing instead,
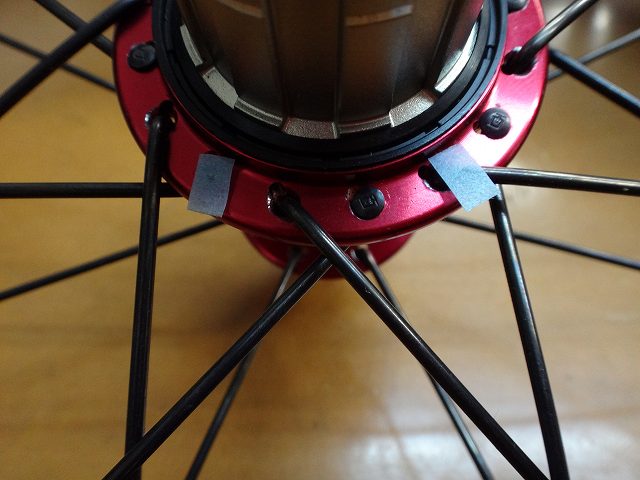
for example, with 4-cross lacing, from the flange hole marked with tape
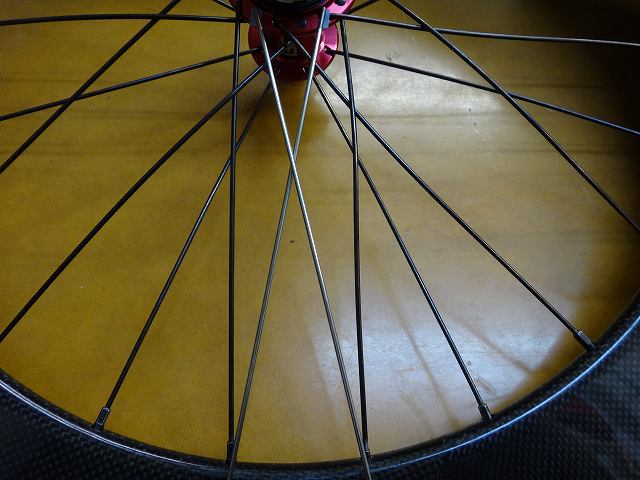
...you'd do it like this.
As I mentioned, I'm finicky about final-crossing angle width,
so if I were doing this I'd probably go 6-cross Ж.
Also, between the original lacing and this Ж re-lacing,
the freewheel inpoke/outpoke pattern is Italian-laced,
but with the XI lacing in the image above, inpoke and outpoke reverse,
so if you wanted to avoid that, you'd have to remove the spokes from the hub.
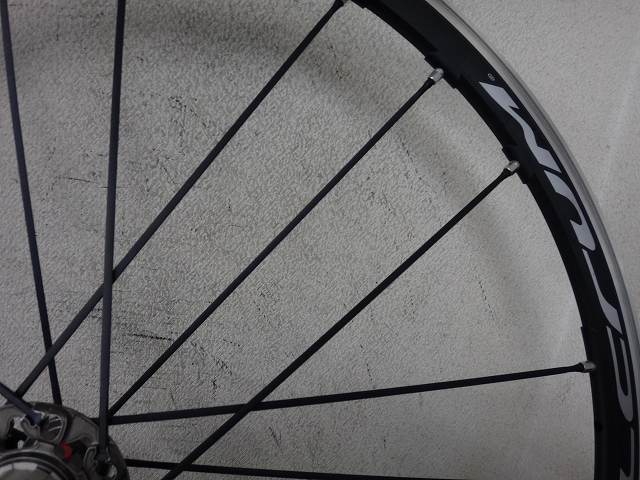
↑This is a Racing Zero rear wheel with a sleep phase,
and it's XI-laced.
Back when Fulcrum had evenly-spaced rim holes, Ж was also an option,
but with sleep phases, it's basically always XI.
Unlike this case, the sleep phase is on the rim holes,
so the choice of Ж or XI from the non-freewheel spoke direction
doesn't change the final crossing angle on the freewheel side.
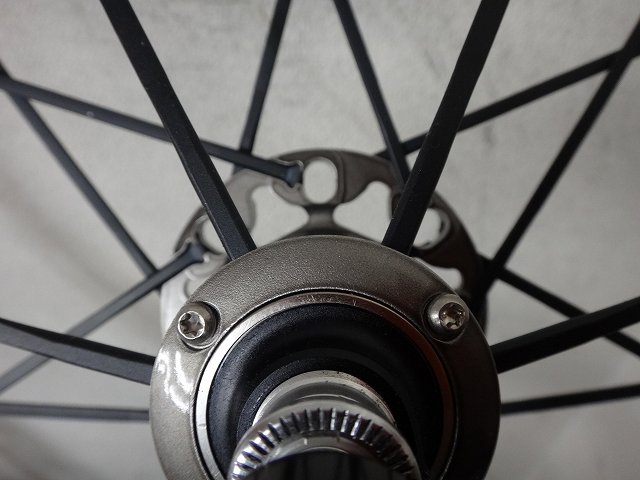
This rear wheel is "a 28H non-freewheel radial 2:1 lacing wheel
with half the non-freewheel spokes removed—21H total"
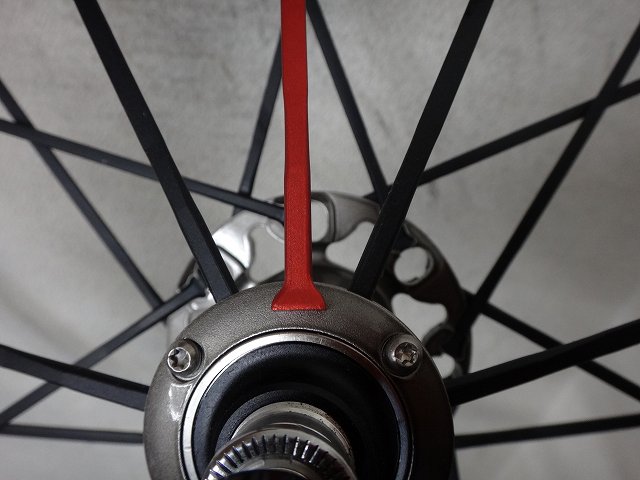
If you got the sleep phase direction wrong,

↑the spoke trajectory would be either this
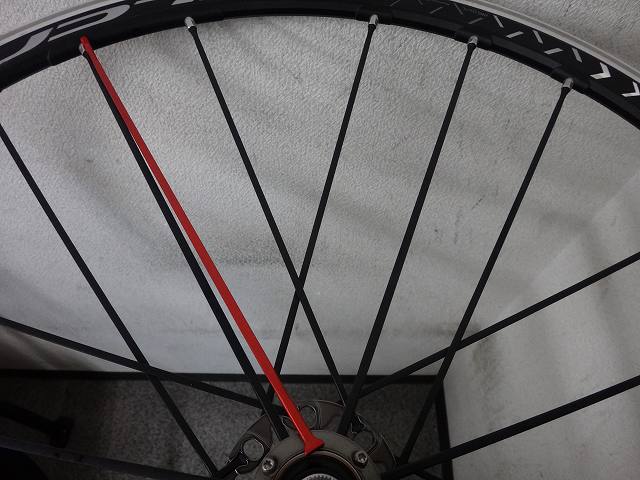
↑or this.
The situation is a bit different,
but the current case is similar.
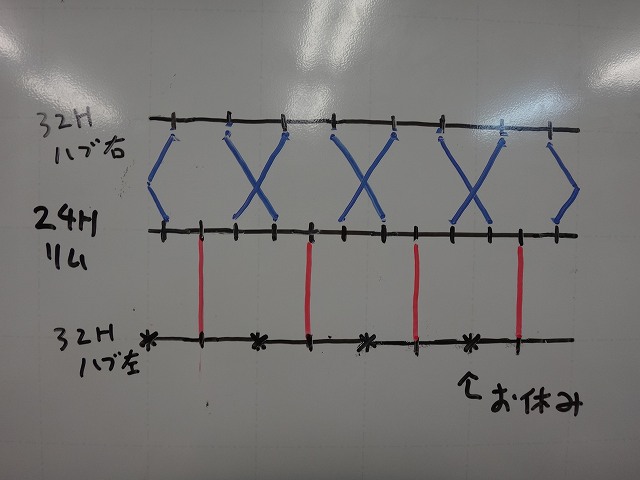
From this state, if the left flange's sleep phase reverses,

it ends up like this.
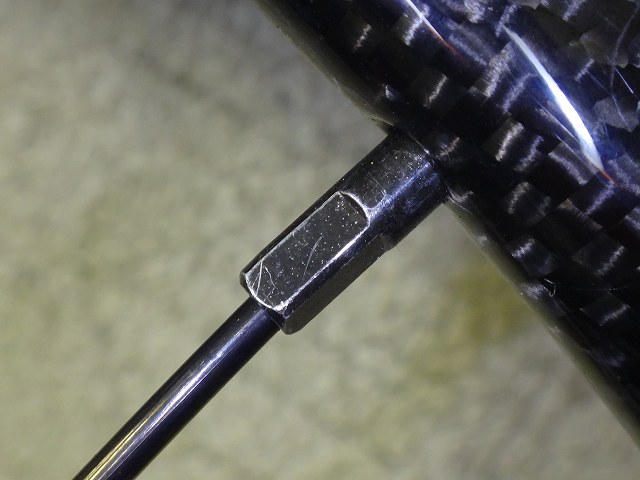
Jumping back in the timeline,
the original wheel had long (16mm) brass nipples.
When the customer asked the shop about it,
they said "the rim holes are thick, so you need these,"
but 12mm nipples work just fine—the hex flats come out completely.
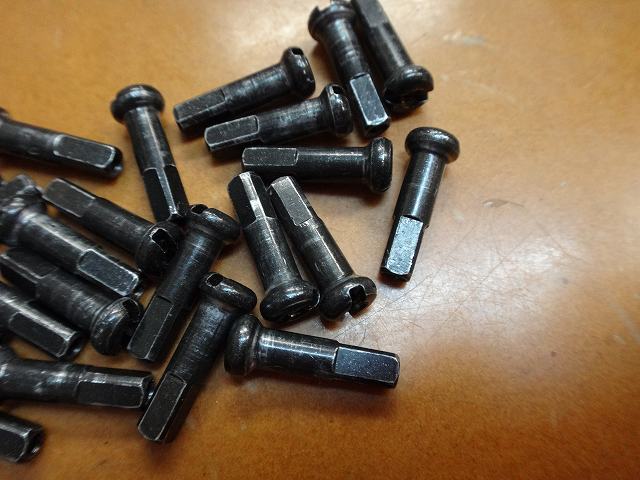
With 12mm, 14mm, and 16mm nipples, the thread count
is technically different,
but compared to the difference in nipple length it's negligible.
I determine spoke length based on the outside end face of the nipple,
so I basically never change spoke length based on nipple length.
What I'm saying is: the difference in nipple length has virtually no effect
in covering up wrong spoke length.
I shone a light inside the rim and saw
the original wheel's spoke length was clearly too short.
Normally I'd pull out a 1 or 2 pair or 3 or 6 individual spokes from the rim
(ones that haven't been loosened at all) and photograph them,
like I always do for 2:1 lacing,
but with this rim being so tall it wasn't feasible.
Plus I wanted to prove the conversion to proper 2:1 lacing
without changing any materials,
so I skipped that this time.
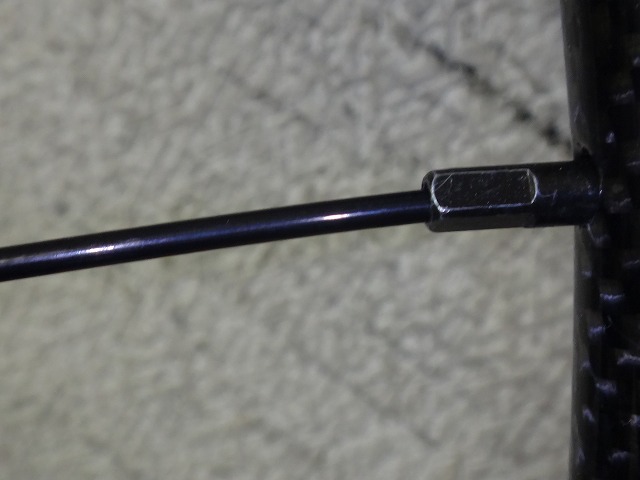
It's possible that with 12mm nipples on the original wheel
you'd see spoke threads poking out of the nipple.
It was that short.
So the 16mm nipples had the "benefit" (if you can call it that)
of hiding that! Well, that was completely unhelpful to learn!
Also, the image above hasn't been touched since I received it,
and the spoke trajectory makes a sharp bend right where it exits the nipple.
This happened at multiple points.

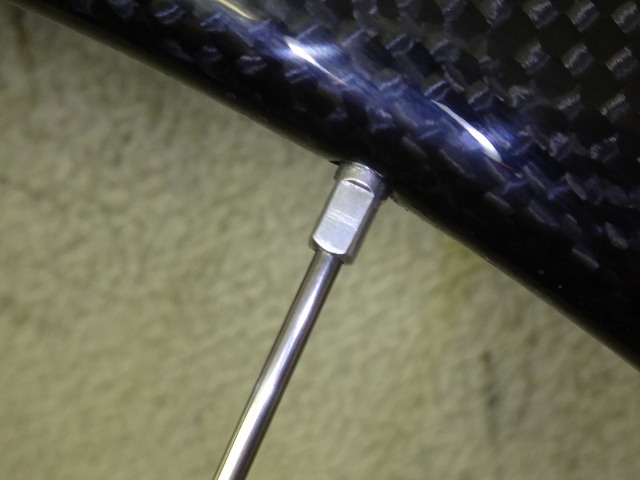
↑12mm nipples, but you get plenty of hex-grip clearance.
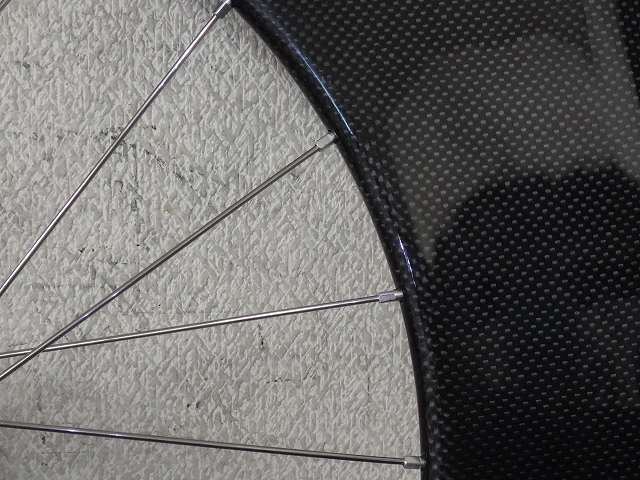
This is after rebuilding (timeline jump).
There are no points where the spoke trajectory bends sharply
where it exits the nipple.
So this rim doesn't need 16mm nipples—
in fact, they're worse.
The rim holes show some runout.
At least, they don't appear to be centered on the rim.
But they're not alternating left-right either, and they're not
arranged as right-right-left or center-center-left for 2:1 lacing.
Looking at either side of the valve hole in the image above,
it almost looks like a reverse-bed rim.
The conclusion: it's just loose tolerance, not intentional hole positioning.

And so, done building.
Evolight hub, 24H, all Campagnolo #14 spokes, 46-spoke lacing.
Truing is next.
Since the rim wasn't clearly marked as 2:1,
I went with left-right equal lacing instead.
The relationship between plain spokes and H1ST
isn't a trade secret, so here we go!
Just under 137!
134.5!

Just under 138!
So just under 1300N.
The numbers table above gets rough toward the end,
but you can read precise values off the graph table if needed.
H1ST of 143 gives 1500N, which exceeds most rim tolerances.
The H1ST difference between 1000N, 1300N, and 1500N
isn't as dramatic at higher tensions as it is at low tensions.
Pressing the tension meter is like
an extremely repeatable form of spoke-squeezing,
and with #14 plain spokes, once H1ST exceeds 130,
the deflection against squeezing barely changes
(meaning the feel when riding is basically the same).
Beyond that, higher tension just increases rim-hole failure risk.
So wheels shouldn't be cranked to maximum tension indiscriminately.
However, with large-flange freewheel hubs on rear wheels,
the non-freewheel second ST changes quite a bit between
freewheel-side 1000N and 1300N, so watch out for that.
What's that? You want me to show tension meter readings on the non-freewheel side too?
That's trade-secret material, old timer. Hehehehe.