Another day, another wheel (and so on).

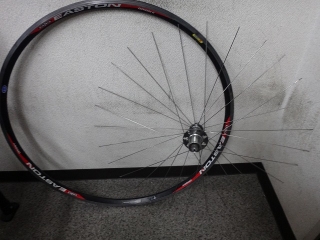
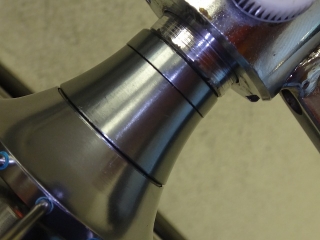
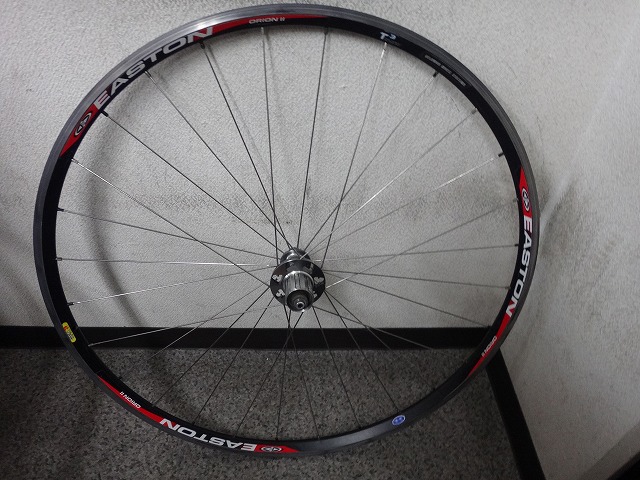
A customer brought in an Easton Orion II rear wheel for service.
Easton acquired Velomax and started their wheel business,
and in the very early days the rims had dual branding as "Easton Velomax,"
but this one is from when they transitioned to Easton branding only.
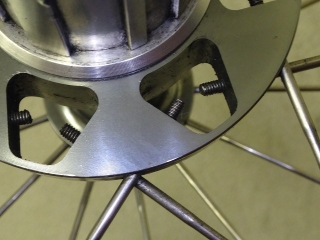
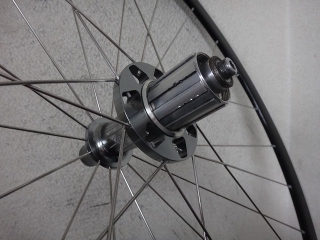
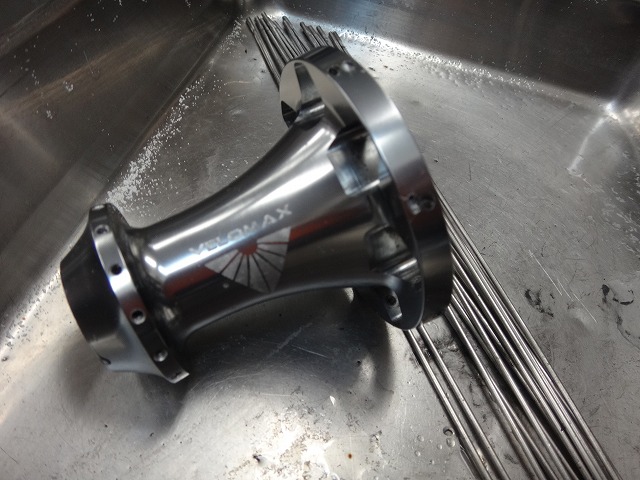
However, the hub isn't an Easton R4 hub—
it's a Velomax hub with double-threaded spoke design,
and the hub shell still bears the Velomax marking.
As I've mentioned many times before,
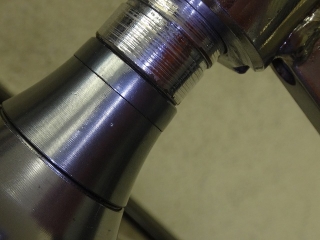
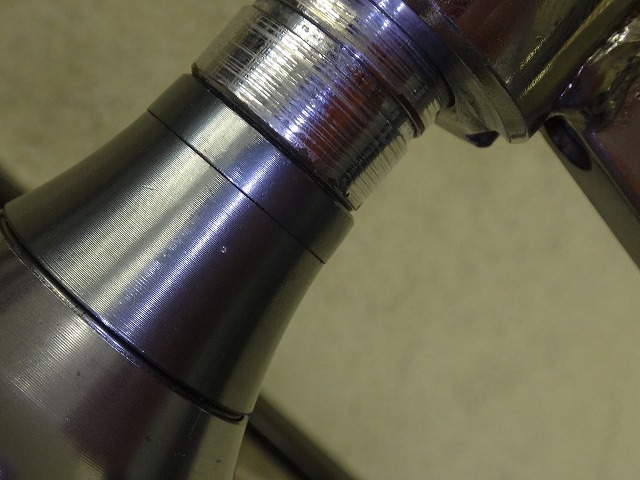
Velomax rear wheels have alternating silver and black nipples,
and it's not just the color that differs—the material is different too.
The freewheel side is brass, the non-freewheel side is black aluminum,
and the manual explicitly states that when adjusting trueness,
you should only adjust the black aluminum nipples on the non-freewheel side.
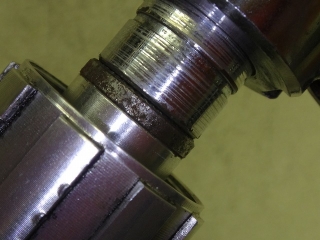
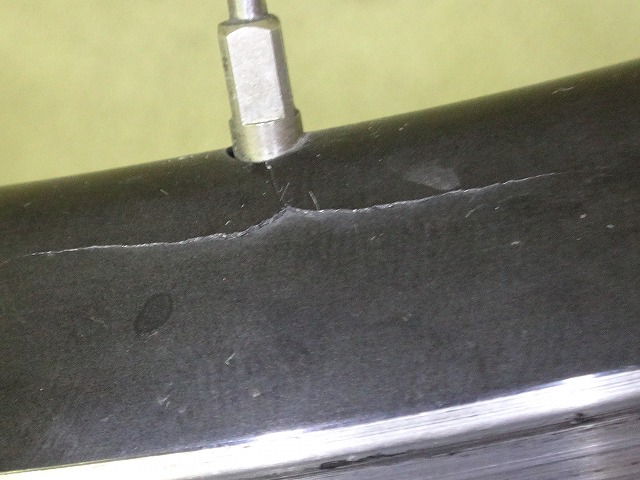
This wheel came in because
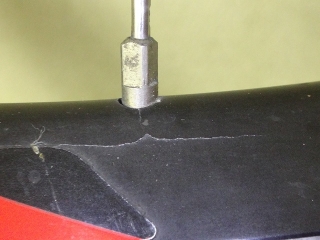
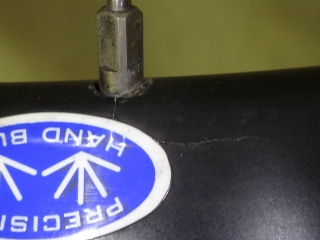
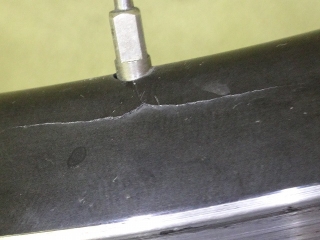
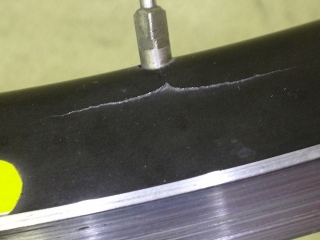
there were Kaiser whisker-shaped cracks at several spoke holes on the freewheel side of the rim.
That's why the rim needed replacement.
Stansmtb ZTR Alpha 340 rims also frequently develop Kaiser whisker cracks,
which are caused by the rim's thinness and lightness combined with
a brittleness from the forging process—they're inherently fragile.
But with Velomax rear wheels, these cracks occur for a simple reason:
the spoke tension is just too high.
Since spoke pinch-point failure doesn't occur,
when you crank up the spoke tension without hesitation,
the first thing that fails is neither the spokes nor the hub—
so you can tension them to quite extreme levels if you want.
With equal-number spokes on both sides in a radial pattern on the non-freewheel side,
the non-freewheel side tension should loosen up significantly,
but Velomax rear wheels aren't particularly slack on that side.
Even with a high-low flange hub and offset rim providing some relief,
the left-right tension difference should be substantial.
Yet by tensioning the freewheel side abnormally high, they manage—
albeit inefficiently—to keep the non-freewheel side quite tight as well.
I mentioned earlier that you shouldn't adjust the brass nipples on the freewheel side,
but honestly, those nipples barely turn anyway.
When building the wheel, they clearly position the right flange directly under the rim,
tensioning the freewheel side to maximum first, then using the non-freewheel side
for final centering adjustment. I do build wheels that way too,
but I don't tension the freewheel side nearly as much as Velomax does.
Well, I don't use radial patterns on the non-freewheel side either, so there's no need to.
When I loosened the nipples in reverse order and disassembled the wheel,
I found no threadlocker compound on the spoke threads at the rim.
Once freed from tension, the nipples spin smoothly by hand.
This means that even the non-freewheel side nipples—
let alone the freewheel side—are nearly seized not from any chemical adhesive,
but purely from spoke tension alone
(though sand and dust packed around the nipple seat does play a small role).

Also, Velomax wheel spokes are quite long.
I had to loosen other areas to pull out a nipple that hadn't been loosened at all.
Even so, once I cracked the nipple wrench around the nipple seat area
to break the corrosion pattern like opening a lock,
the nipple then spins smoothly by hand.
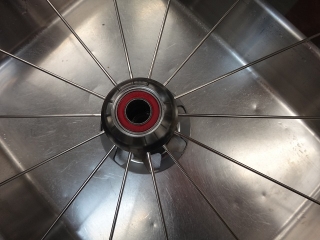
I separated the rim from the "uni" (the hub plus spokes assembly).
If the new rim were the one from a Nomu Lab Wheel No. 5,
I could probably build the wheel with the uni in its current state,
but if I tension the non-freewheel side to a non-slack level,
I'm afraid the rim holes will crack again.
So I decided to rebuild with a Nomu Lab Wheel No. 1 rim instead.
For that, I need to cut the spoke length, which means
temporarily removing the spokes from the hub.
The spoke threads at the hub side have threadlocker compound applied.
The spoke thread length at the hub side
is the same as standard spokes.
The threads protruding through the hub flange interior
are insurance for recovery in case of spoke breakage.
The manual says if the spoke at the hub doesn't turn,
heat the flange with a lighter to melt the adhesive—
but I've never done that.
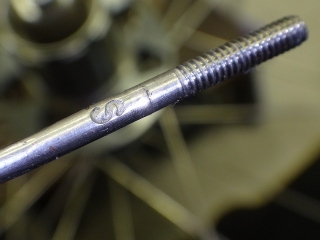
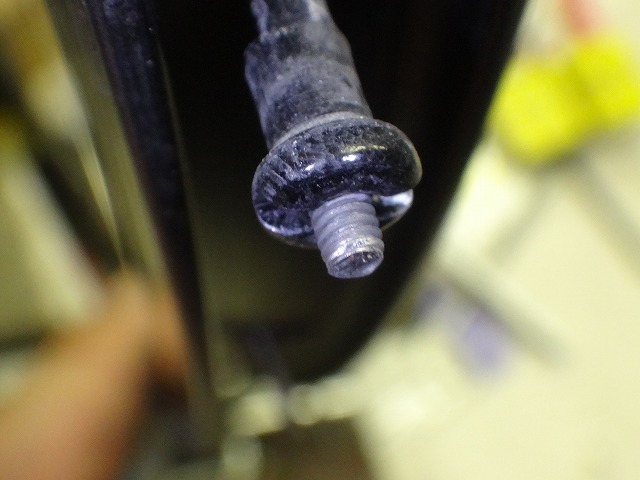
Every spoke has an "S" stamp near the threaded section on the rim side.
Supposedly this indicates directional orientation,
and the thread length on this end is also the same as standard spokes.
So the amount of thread extending from the nipple earlier was clearly too long.

The hub-side spoke isn't loose enough to turn easily.
I've established a method—not in the Velomax manual—
for removing spokes very efficiently.
I should probably teach Velomax, but they've gone out of business,
and Easton has also discontinued wheels with double-threaded spoke design,
so the knowledge has been lost to history.
I cut the non-freewheel side spokes and threaded them back through the hub.
I cut them on the side opposite the "S" stamp (the hub side),
keeping the "S" stamp oriented toward the rim.
The spoke threads at the hub flange are
positioned inside the left bearing of the hub body,
so if a spoke breaks and needs to be recovered,
the bearing would need to come off.
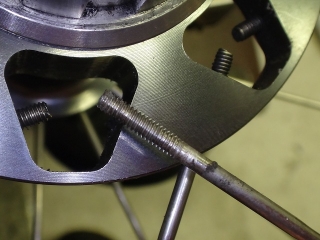
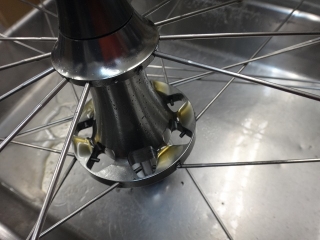
Now that I have the hub shaft removed, I can see inside.
The spoke tip appears nearly flush with the hub shaft,
and I've actually made it slightly shorter than the factory original.
I also threaded through the cut freewheel side spokes.
The threads on this side don't slide easily through the nipples.
This is also something I've developed my own method for—
not mentioned in any manual.
I don't know if Velomax's original manufacturing line
might have used essentially the same approach, but
if so, I suppose you could call it "reinventing the wheel."
Literally.

↑I first trued the wheel with the freewheel side significantly offset,
then finished it with final tightening on the non-freewheel side.
You might think that's an extreme process, but
I believe Velomax themselves used an even more
extreme procedure than this.
There's no other way they could have achieved such high tension.
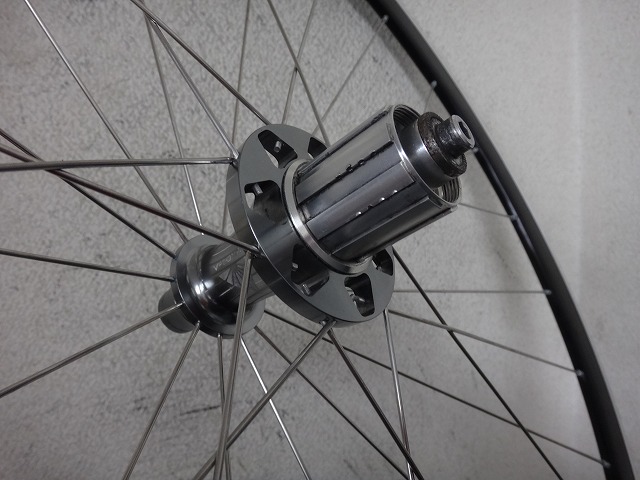
The wheel is centered.
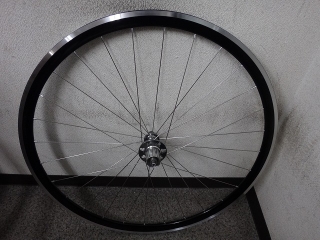
It's built.
Unlike the Orion II, I wove the final cross on the freewheel side
(also described as "taking a bind").
I didn't tension the spokes to the same level as the original wheel.
It's not impossible, but there's a high risk the rim would crack the same way.
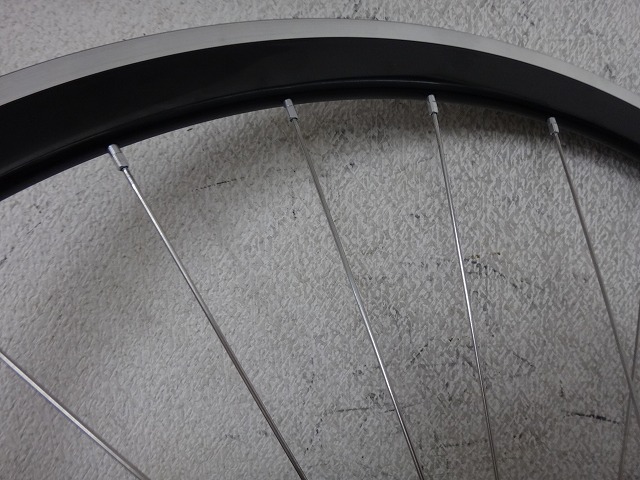
Since the new Nomu Lab Wheel No. 1 rim isn't an offset rim,
with lower freewheel side tension than before,
I can't match the original wheel's spoke deformation resistance on the non-freewheel side.
The only advantage is a taller rim profile, which makes the spokes shorter,
but the reduction in spoke length isn't dramatic enough to be transformative.
So as a workaround, I wove the final cross.
Thanks to the new rim's superior resistance to deformation compared to the original,
I'm hoping the wheel won't feel noticeably looser than the original.

Unlike Velomax, I didn't use brass nipples on the freewheel side—
I used aluminum nipples throughout.
As I mentioned, if you needed to tension it that much,
the rim holes would crack soon enough anyway.

↑That's the actual measured weight of the original rim.
It's about the same as or slightly heavier than the Nomu Lab Wheel No. 5 rim,
which makes it quite light for an aluminum rim.
The brake zone shows no wear or deformation,
so even new it probably wouldn't exceed 390 grams.
Yeah, no wonder that rim cracked with that much tension.
A customer brought in an Easton Orion II rear wheel for service.
Easton acquired Velomax and started their wheel business,
and in the very early days the rims had dual branding as "Easton Velomax,"
but this one is from when they transitioned to Easton branding only.

However, the hub isn't an Easton R4 hub—
it's a Velomax hub with double-threaded spoke design,
and the hub shell still bears the Velomax marking.

As I've mentioned many times before,
Velomax rear wheels have alternating silver and black nipples,
and it's not just the color that differs—the material is different too.
The freewheel side is brass, the non-freewheel side is black aluminum,
and the manual explicitly states that when adjusting trueness,
you should only adjust the black aluminum nipples on the non-freewheel side.
This wheel came in because


there were Kaiser whisker-shaped cracks at several spoke holes on the freewheel side of the rim.
That's why the rim needed replacement.
Stansmtb ZTR Alpha 340 rims also frequently develop Kaiser whisker cracks,
which are caused by the rim's thinness and lightness combined with
a brittleness from the forging process—they're inherently fragile.
But with Velomax rear wheels, these cracks occur for a simple reason:
the spoke tension is just too high.
Since spoke pinch-point failure doesn't occur,
when you crank up the spoke tension without hesitation,
the first thing that fails is neither the spokes nor the hub—
so you can tension them to quite extreme levels if you want.
With equal-number spokes on both sides in a radial pattern on the non-freewheel side,
the non-freewheel side tension should loosen up significantly,
but Velomax rear wheels aren't particularly slack on that side.
Even with a high-low flange hub and offset rim providing some relief,
the left-right tension difference should be substantial.
Yet by tensioning the freewheel side abnormally high, they manage—
albeit inefficiently—to keep the non-freewheel side quite tight as well.
I mentioned earlier that you shouldn't adjust the brass nipples on the freewheel side,
but honestly, those nipples barely turn anyway.
When building the wheel, they clearly position the right flange directly under the rim,
tensioning the freewheel side to maximum first, then using the non-freewheel side
for final centering adjustment. I do build wheels that way too,
but I don't tension the freewheel side nearly as much as Velomax does.
Well, I don't use radial patterns on the non-freewheel side either, so there's no need to.
When I loosened the nipples in reverse order and disassembled the wheel,
I found no threadlocker compound on the spoke threads at the rim.
Once freed from tension, the nipples spin smoothly by hand.
This means that even the non-freewheel side nipples—
let alone the freewheel side—are nearly seized not from any chemical adhesive,
but purely from spoke tension alone
(though sand and dust packed around the nipple seat does play a small role).
Also, Velomax wheel spokes are quite long.
I had to loosen other areas to pull out a nipple that hadn't been loosened at all.
Even so, once I cracked the nipple wrench around the nipple seat area
to break the corrosion pattern like opening a lock,
the nipple then spins smoothly by hand.

I separated the rim from the "uni" (the hub plus spokes assembly).
If the new rim were the one from a Nomu Lab Wheel No. 5,
I could probably build the wheel with the uni in its current state,
but if I tension the non-freewheel side to a non-slack level,
I'm afraid the rim holes will crack again.
So I decided to rebuild with a Nomu Lab Wheel No. 1 rim instead.
For that, I need to cut the spoke length, which means
temporarily removing the spokes from the hub.
The spoke threads at the hub side have threadlocker compound applied.

The spoke thread length at the hub side
is the same as standard spokes.
The threads protruding through the hub flange interior
are insurance for recovery in case of spoke breakage.
The manual says if the spoke at the hub doesn't turn,
heat the flange with a lighter to melt the adhesive—
but I've never done that.

Every spoke has an "S" stamp near the threaded section on the rim side.
Supposedly this indicates directional orientation,
and the thread length on this end is also the same as standard spokes.
So the amount of thread extending from the nipple earlier was clearly too long.

The hub-side spoke isn't loose enough to turn easily.
I've established a method—not in the Velomax manual—
for removing spokes very efficiently.
I should probably teach Velomax, but they've gone out of business,
and Easton has also discontinued wheels with double-threaded spoke design,
so the knowledge has been lost to history.

I cut the non-freewheel side spokes and threaded them back through the hub.
I cut them on the side opposite the "S" stamp (the hub side),
keeping the "S" stamp oriented toward the rim.
The spoke threads at the hub flange are
positioned inside the left bearing of the hub body,
so if a spoke breaks and needs to be recovered,
the bearing would need to come off.

Now that I have the hub shaft removed, I can see inside.
The spoke tip appears nearly flush with the hub shaft,
and I've actually made it slightly shorter than the factory original.

I also threaded through the cut freewheel side spokes.
The threads on this side don't slide easily through the nipples.
This is also something I've developed my own method for—
not mentioned in any manual.
I don't know if Velomax's original manufacturing line
might have used essentially the same approach, but
if so, I suppose you could call it "reinventing the wheel."

↑I first trued the wheel with the freewheel side significantly offset,
then finished it with final tightening on the non-freewheel side.
You might think that's an extreme process, but
I believe Velomax themselves used an even more
extreme procedure than this.
There's no other way they could have achieved such high tension.

The wheel is centered.

It's built.
Unlike the Orion II, I wove the final cross on the freewheel side
(also described as "taking a bind").
I didn't tension the spokes to the same level as the original wheel.
It's not impossible, but there's a high risk the rim would crack the same way.
Since the new Nomu Lab Wheel No. 1 rim isn't an offset rim,
with lower freewheel side tension than before,
I can't match the original wheel's spoke deformation resistance on the non-freewheel side.
The only advantage is a taller rim profile, which makes the spokes shorter,
but the reduction in spoke length isn't dramatic enough to be transformative.
So as a workaround, I wove the final cross.
Thanks to the new rim's superior resistance to deformation compared to the original,
I'm hoping the wheel won't feel noticeably looser than the original.
Unlike Velomax, I didn't use brass nipples on the freewheel side—
I used aluminum nipples throughout.
As I mentioned, if you needed to tension it that much,
the rim holes would crack soon enough anyway.

↑That's the actual measured weight of the original rim.
It's about the same as or slightly heavier than the Nomu Lab Wheel No. 5 rim,
which makes it quite light for an aluminum rim.
The brake zone shows no wear or deformation,
so even new it probably wouldn't exceed 390 grams.
Yeah, no wonder that rim cracked with that much tension.