This morning, I went out riding around Mizuma (水間) knowing it would rain,
but before that.
The IRC tubeless tire I'd mounted on the wheel got a flat on the third day.
The image date is July 8th, so I installed it on July 6th.
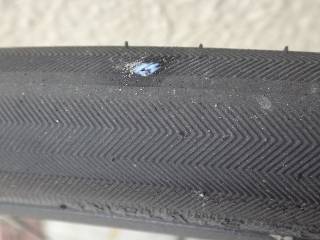
The center line on the tire is still visible
and the tread hasn't worn at all.
Sealant is seeping out from the hole.
I noticed this at home,
the air pressure was so low it could cause rim strikes on bumps,
but adding air riskily could open the wound further and cause problems,
so I carefully rode my commute as-is.

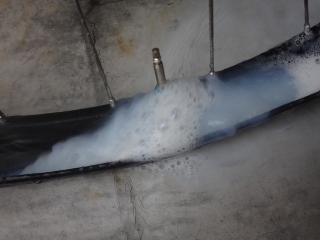
As I added air, the wound opened right before reaching 4 psi
and air started leaking dramatically.

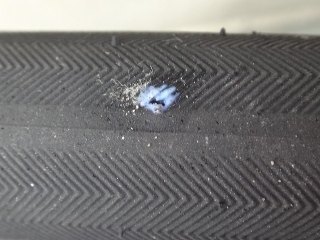
↑When I sprayed water on it, it looked like this
Water got on my camera lens.
Since I inflated it to the point where the wound opened,
after that it couldn't even maintain that pressure
and the bead seal was lost,
with sealant seeping from between the rim and tire.
Because of this fear, I couldn't add air pressure to the normal level
for a tire that's slow-leaking while the sealant is still working,
when I'm out and about.

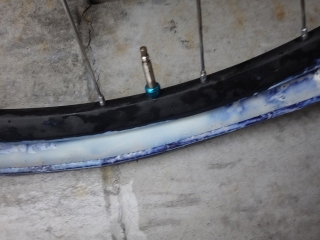
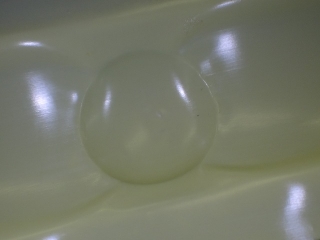
I removed the tire and washed off the sealant.
The puncture hole is in the center of the image.

↑This one
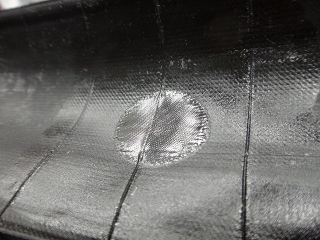
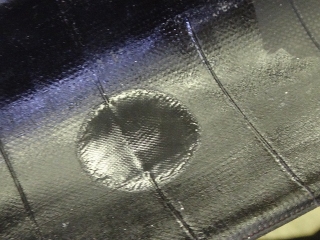
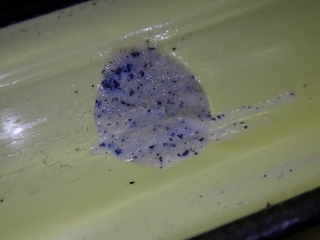
I applied a super-thin patch from the inside.
After that, there was no air leakage from this spot,
and there were no notable air leaks characteristic of tubeless tires either.
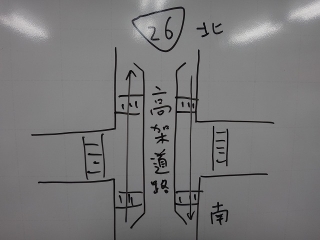
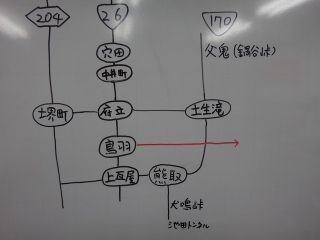
On a different note, south of Izumi-Otsu on National Route 26
there's a nearly identical-shaped elevated expressway
running north-south,
and at the intersections of the side roads, you typically hit red lights.
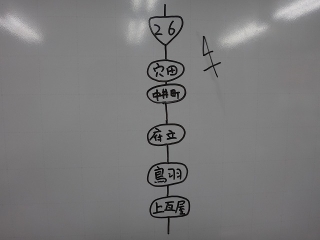
From north to south, by intersection name they are:
Anada (穴田), Nakaichō (中井町),
Prefectural Izumi High School East (府立和泉高校東), Toba (鳥羽),
and Kamikawaya (上瓦屋).
There's no elevated road like this further south.
Anada and Nakaichō are close together, but
between Anada and Prefectural, Prefectural and Toba, and Toba and Kamikawaya
I'm not sure of the exact distance, but it's about 10-15 minutes cycling time,
and you almost certainly hit red lights, giving it a feeling like railway stations.

The old Route 26 south of the Ōhama intersection in Sakai
is now Prefectural Road 204, running almost parallel to Route 26.
The major intersections on Route 26 typically connect to Road 204 via east-west roads
in a ladder pattern, but
the Road 204 intersection connecting to the Prefectural High School intersection is Sakaimachi (堺町),
and because of the fewer signals and the road's width and condition,
when traveling between Roads 204 and 26, I often use
the Sakaimachi-to-Prefectural route.
On my commute home, when I want to just ride distance without much elevation gain
and take a long way around, I often run
a route at night where I turn at Sakaimachi from Road 204,
then turn again at Prefectural to head home.
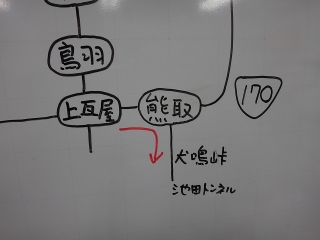
At Kamikawaya I turn left onto Route 170 (Outer Ring),
and at the Kumatori (熊取) intersection shortly after,
turning right leads to a pass with Inunaki Hot Spring and Jintsu Hot Spring.
You could call it Inunaki Pass, but that's not the official name.
The highest point is almost at the Ikeda Tunnel,
and when you exit, you're in Wakayama Prefecture, though the prefectural border is actually
about 2km before the tunnel.
This is a pass I climb fairly often, and

July 20 (Wed) around 11 PM
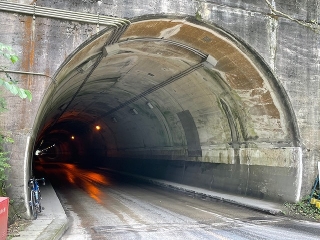
July 27 (Wed) around 11 AM
It was drizzling on the Osaka side and the road was wet,
but it seemed to be raining harder on the Wakayama side with oncoming vehicles soaked,
and the tunnel's exit (from the Wakayama side perspective) had wet pavement,
so I didn't go down to the other side and headed back.
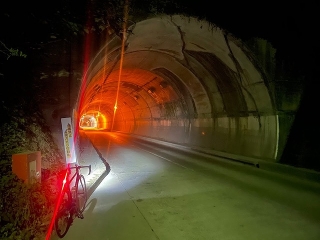
August 11 (Thu) around 12:30 AM
More accurately, the date changed while I was riding rather than being Thursday night proper—
I left home on Wednesday.
This time I entered Wakayama Prefecture from Kazahuki Pass
and returned to Osaka Prefecture through the Ikeda Tunnel. The image above is from the Wakayama side.
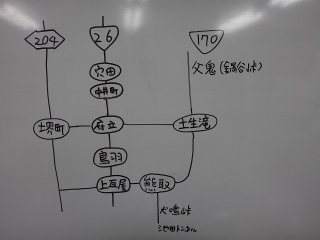
Heading east from the Prefectural intersection and climbing,
I cross the Outer Ring at an intersection called Habutaki (土生滝).
Turning left here, in about 15 minutes I reach the base of Nabeya Pass,
and I can return to Sakai City via Senboku.
I sometimes make my night-practice long-way-home via the Habutaki route.
This is the map in my head, but
Today I rode from Toba toward the Outer Ring.
Only the Toba overpass doesn't pass directly over the intersection, so
from the north, you turn left before the overpass.
I knew this road itself passes the Mizuma Athletic Grounds and connects to places like Katsuragi Mountain,
but just riding mostly straight
(there's a left turn where the road ahead is a highway entrance, and
a left turn to head toward Kishiwada because turning right goes to Katsuragi),
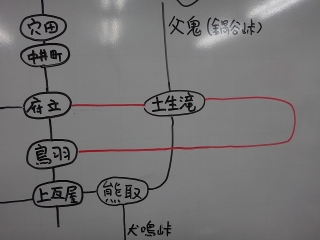
I discovered for the first time today that it reaches Habutaki!
I checked the red line section from the image above
on POLAR's analysis software map and got
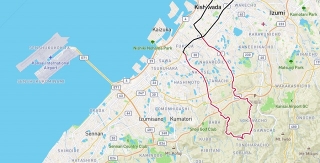
↑this.
The black line section is Route 26 on the way out,
and Road 204 on the way back, turning at Prefectural and coming via Sakaimachi.
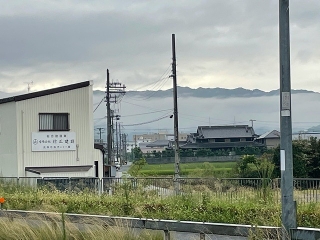
↑right after turning at Toba
The mist on the mountains has settled in a way that looks like the cloud ceiling has lowered.

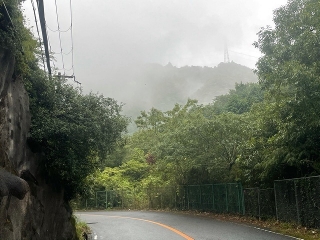
Maybe because the weather was bad,
I barely passed any cars.
With just over an hour from home, to find a road with such a nice atmosphere.
Well, with the time it takes from home, I'd be at the base of either Nabeya Pass or the Ikeda Tunnel,
so it's about the same.
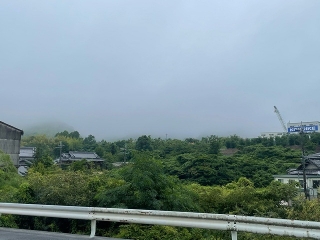
↑the mountain ridge was barely visible to the naked eye, but
in the image it's almost impossible to see.
It was constant drizzle and mist.
There wasn't a single clearly steep climb over 10% on the way,
with climbs in the pattern of up 10, down 3, repeating,
and while climbing overall, with plenty of descending too,
I couldn't even tell where the highest point was.
Anyway, the tire from the beginning got a flat somewhere on this route.
I felt a slow leak, so at a red light I pushed the rear tire
and it was around 5 psi (originally 7 psi), but
the sealant sealed the hole, and from there for a while
it barely leaked, so I kept riding, then
suddenly not long after, the pressure dropped dramatically to about 2 psi,
and I inflated once with an inflator to about 5 psi (probably).
From then until I got home and arrived at the shop, I didn't add any air at all.
I only run tubeless on the rear wheel, but
from experience, flats almost only happen in the rain.
Roughly speaking, 9 out of 10 times are in the rain.
There's a possibility that "a hole had actually punctured earlier, but
sealant from Imaje had sealed the wound, which then opened
as the sealant dissolved with rain moisture."
Today when the air suddenly dropped, it was during heavy rain
and the road was completely wet.
I made it to the shop.
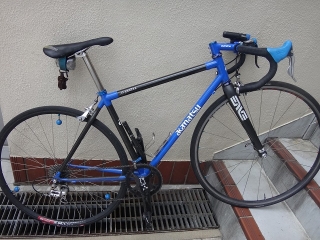
Oh, I recently switched to a custom stem and
it's really good.
The frame is actually off-the-shelf (not custom-ordered), so
I can't achieve the handlebar drop I want,
and even with a slammed stem, it doesn't quite match
my size-ordered bikes, but
it's much better.
The one I had before was
a 73° so-called flat stem.
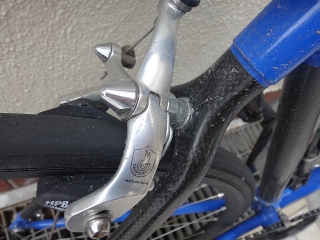
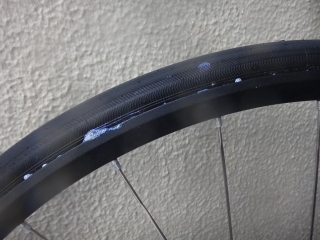
↑the particular dirtiness that comes from riding in the rain
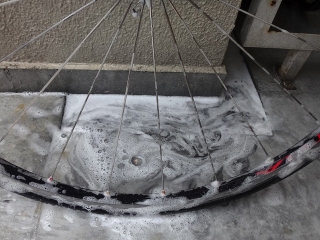
I also washed the bike while I was at it.
Since I only brake with the front,
only the front wheel gets quite dirty.
It's a disc brake with a 630mm rotor squeezed by rubber pads,
and I like that it doesn't have the nasty structure of
a dish on the front wheel or holes drilled in the left fork blade.

I inflated the wet rear wheel with a floor pump
and located the puncture.
I could hear air leaking.
The hole was small; the wound opened around 6 psi.
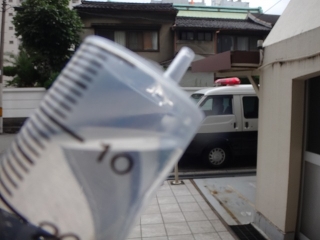
I prepared to capture an image of syringe water hitting air from the puncture hole,
but
the image above feels like a situation where I shouldn't be showing off the syringe.

Whoosh!
I took the tire halfway off the rim.
Imaje sealant is washable with water,
the usual thing.
Since the tire is being discarded anyway, it doesn't matter,
but the rim will obviously continue to be used, so
there's meaning in the fact that sticky gum-like residue
doesn't remain on the rim, or at least I'd like to say that.
However, when I completely removed the tire,
a portion of the rim tape peeled up, so the rim tape needed replacement.
Still, since sealant residue doesn't accumulate inside the bead hooks,
the fact that sealant buildup on the rim is almost nonexistent
has meaning for long-term use.
For DT rims, the rim's allowable air pressure is determined by
exactly one thing: "rim inner width."
The intended use of that rim is irrelevant.
If the inner width is the same, whether road or MTB,
the allowable air pressure is determined from a single sheet
the manufacturer publishes.
So my rear wheel's XR331 rim
is intended by the manufacturer for MTB use,
but has nearly the same inner width as road rims, so
the sticker on the rim says
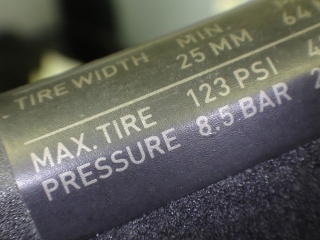
↑with a tube and 25C tire, max 8.5 psi,

↑tubeless it's 7 psi.
I don't make decisions like "it's an MTB rim so let's keep MAX at 4 psi,"
which works in my favor.
Actually, I run it at exactly 7 psi.
As I've written before,
the XR331 rim has the property that when the rim tape caves in from air pressure,
it contacts
the reverse-torx-shaped edge of the Squolx nipple
specified for use with the rim.
With single-layer rim tape, the tape tears, so
for XR331 rims with Stans rim tape,
double-layer wrapping is essential.
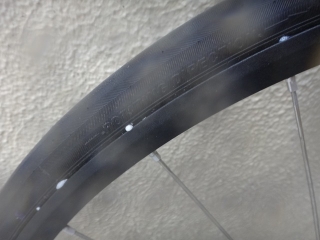
Even so, as shown in the image above, when it caves in,
it makes contact with the nipple,
but the rim tape doesn't tear.
Imaje sealant sometimes gets into this cave and hardens.
I've wondered whether the nipple is puncturing and creating a hole that the sealant then seals?
But about 4 rim holes in a row have done this, while
others haven't, so
it might be that sealant drips into the cave during a specific phase
(near the top?) when it starts to harden.
Sealant hardening is probably faster than rim tape caving,
but it's possible to reuse rim tape with existing caves
while replacing the tire and sealant.
However, given sealant's mechanism of action, it shouldn't harden without a hole.
But then I can't explain why this happens in about 4 holes continuously.
I haven't been so careless as to intend double wrapping but only get 5/6 of a wrap on the second layer,
leaving about 4 hours out of 24 as single-layer.

Even looking at rim holes where sealant has hardened in the rim tape cave,
there's no sealant leaking into the rim.
For the tire, as I mentioned at the beginning,
it's possible to seal the puncture hole with a patch from the inside,
but the tread is worn, so I decided to replace it.
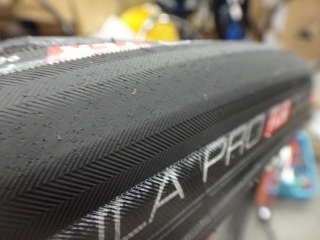
This tire is an IRC Formula Pro Tubeless Ready S-Light,
a 23C variant available only in S-Light.
Rated at 205g, and
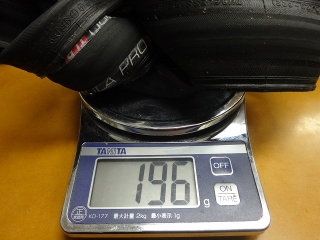
↑this worn-out one
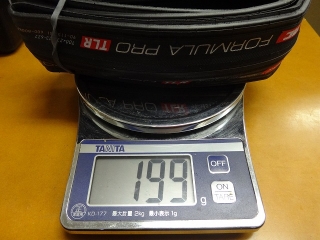
↑the next new one
happened to be two lightweight individuals in a row.
Even if 205g, if I keep sealant to around 40ml,
tire plus sealant can stay under 250g.
This is lighter than most tubular wheels,
and while lightweight clincher plus polyurethane tube combinations under 250g do exist,
to my knowledge there isn't one that matches
this tire's corner confidence.
Also, if you don't want nasty experiences with tubeless-specific issues
like air leaks or bead unseating,
IRC is the only choice for tires.
I won't say flats never happen or beads always pop right up,
but I've never had an extremely unpleasant experience with those things.
Plus, the ease of mounting
but before that.

The IRC tubeless tire I'd mounted on the wheel got a flat on the third day.
The image date is July 8th, so I installed it on July 6th.
The center line on the tire is still visible
and the tread hasn't worn at all.

Sealant is seeping out from the hole.
I noticed this at home,
the air pressure was so low it could cause rim strikes on bumps,
but adding air riskily could open the wound further and cause problems,
so I carefully rode my commute as-is.

As I added air, the wound opened right before reaching 4 psi
and air started leaking dramatically.

↑When I sprayed water on it, it looked like this


Water got on my camera lens.
Since I inflated it to the point where the wound opened,
after that it couldn't even maintain that pressure
and the bead seal was lost,
with sealant seeping from between the rim and tire.
Because of this fear, I couldn't add air pressure to the normal level
for a tire that's slow-leaking while the sealant is still working,
when I'm out and about.

I removed the tire and washed off the sealant.
The puncture hole is in the center of the image.

↑This one


I applied a super-thin patch from the inside.
After that, there was no air leakage from this spot,
and there were no notable air leaks characteristic of tubeless tires either.

On a different note, south of Izumi-Otsu on National Route 26
there's a nearly identical-shaped elevated expressway
running north-south,
and at the intersections of the side roads, you typically hit red lights.

From north to south, by intersection name they are:
Anada (穴田), Nakaichō (中井町),
Prefectural Izumi High School East (府立和泉高校東), Toba (鳥羽),
and Kamikawaya (上瓦屋).
There's no elevated road like this further south.
Anada and Nakaichō are close together, but
between Anada and Prefectural, Prefectural and Toba, and Toba and Kamikawaya
I'm not sure of the exact distance, but it's about 10-15 minutes cycling time,
and you almost certainly hit red lights, giving it a feeling like railway stations.

The old Route 26 south of the Ōhama intersection in Sakai
is now Prefectural Road 204, running almost parallel to Route 26.
The major intersections on Route 26 typically connect to Road 204 via east-west roads
in a ladder pattern, but
the Road 204 intersection connecting to the Prefectural High School intersection is Sakaimachi (堺町),
and because of the fewer signals and the road's width and condition,
when traveling between Roads 204 and 26, I often use
the Sakaimachi-to-Prefectural route.
On my commute home, when I want to just ride distance without much elevation gain
and take a long way around, I often run
a route at night where I turn at Sakaimachi from Road 204,
then turn again at Prefectural to head home.

At Kamikawaya I turn left onto Route 170 (Outer Ring),
and at the Kumatori (熊取) intersection shortly after,
turning right leads to a pass with Inunaki Hot Spring and Jintsu Hot Spring.
You could call it Inunaki Pass, but that's not the official name.
The highest point is almost at the Ikeda Tunnel,
and when you exit, you're in Wakayama Prefecture, though the prefectural border is actually
about 2km before the tunnel.
This is a pass I climb fairly often, and

July 20 (Wed) around 11 PM

July 27 (Wed) around 11 AM
It was drizzling on the Osaka side and the road was wet,
but it seemed to be raining harder on the Wakayama side with oncoming vehicles soaked,
and the tunnel's exit (from the Wakayama side perspective) had wet pavement,
so I didn't go down to the other side and headed back.

August 11 (Thu) around 12:30 AM
More accurately, the date changed while I was riding rather than being Thursday night proper—
I left home on Wednesday.
This time I entered Wakayama Prefecture from Kazahuki Pass
and returned to Osaka Prefecture through the Ikeda Tunnel. The image above is from the Wakayama side.

Heading east from the Prefectural intersection and climbing,
I cross the Outer Ring at an intersection called Habutaki (土生滝).
Turning left here, in about 15 minutes I reach the base of Nabeya Pass,
and I can return to Sakai City via Senboku.
I sometimes make my night-practice long-way-home via the Habutaki route.
This is the map in my head, but

Today I rode from Toba toward the Outer Ring.
Only the Toba overpass doesn't pass directly over the intersection, so
from the north, you turn left before the overpass.
I knew this road itself passes the Mizuma Athletic Grounds and connects to places like Katsuragi Mountain,
but just riding mostly straight
(there's a left turn where the road ahead is a highway entrance, and
a left turn to head toward Kishiwada because turning right goes to Katsuragi),

I discovered for the first time today that it reaches Habutaki!
I checked the red line section from the image above
on POLAR's analysis software map and got

↑this.
The black line section is Route 26 on the way out,
and Road 204 on the way back, turning at Prefectural and coming via Sakaimachi.

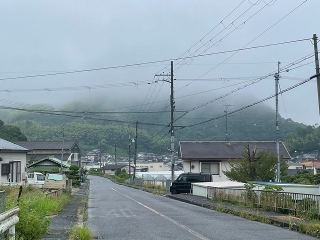
↑right after turning at Toba
The mist on the mountains has settled in a way that looks like the cloud ceiling has lowered.


Maybe because the weather was bad,
I barely passed any cars.
With just over an hour from home, to find a road with such a nice atmosphere.
Well, with the time it takes from home, I'd be at the base of either Nabeya Pass or the Ikeda Tunnel,
so it's about the same.

↑the mountain ridge was barely visible to the naked eye, but
in the image it's almost impossible to see.

It was constant drizzle and mist.
There wasn't a single clearly steep climb over 10% on the way,
with climbs in the pattern of up 10, down 3, repeating,
and while climbing overall, with plenty of descending too,
I couldn't even tell where the highest point was.
Anyway, the tire from the beginning got a flat somewhere on this route.
I felt a slow leak, so at a red light I pushed the rear tire
and it was around 5 psi (originally 7 psi), but
the sealant sealed the hole, and from there for a while
it barely leaked, so I kept riding, then
suddenly not long after, the pressure dropped dramatically to about 2 psi,
and I inflated once with an inflator to about 5 psi (probably).
From then until I got home and arrived at the shop, I didn't add any air at all.
I only run tubeless on the rear wheel, but
from experience, flats almost only happen in the rain.
Roughly speaking, 9 out of 10 times are in the rain.
There's a possibility that "a hole had actually punctured earlier, but
sealant from Imaje had sealed the wound, which then opened
as the sealant dissolved with rain moisture."
Today when the air suddenly dropped, it was during heavy rain
and the road was completely wet.

I made it to the shop.
Oh, I recently switched to a custom stem and
it's really good.
The frame is actually off-the-shelf (not custom-ordered), so
I can't achieve the handlebar drop I want,
and even with a slammed stem, it doesn't quite match
my size-ordered bikes, but
it's much better.
The one I had before was
a 73° so-called flat stem.

↑the particular dirtiness that comes from riding in the rain

I also washed the bike while I was at it.
Since I only brake with the front,
only the front wheel gets quite dirty.
It's a disc brake with a 630mm rotor squeezed by rubber pads,
and I like that it doesn't have the nasty structure of
a dish on the front wheel or holes drilled in the left fork blade.

I inflated the wet rear wheel with a floor pump
and located the puncture.
I could hear air leaking.
The hole was small; the wound opened around 6 psi.

I prepared to capture an image of syringe water hitting air from the puncture hole,
but
the image above feels like a situation where I shouldn't be showing off the syringe.

Whoosh!

I took the tire halfway off the rim.

Imaje sealant is washable with water,
the usual thing.
Since the tire is being discarded anyway, it doesn't matter,
but the rim will obviously continue to be used, so
there's meaning in the fact that sticky gum-like residue
doesn't remain on the rim, or at least I'd like to say that.
However, when I completely removed the tire,
a portion of the rim tape peeled up, so the rim tape needed replacement.
Still, since sealant residue doesn't accumulate inside the bead hooks,
the fact that sealant buildup on the rim is almost nonexistent
has meaning for long-term use.
For DT rims, the rim's allowable air pressure is determined by
exactly one thing: "rim inner width."
The intended use of that rim is irrelevant.
If the inner width is the same, whether road or MTB,
the allowable air pressure is determined from a single sheet
the manufacturer publishes.
So my rear wheel's XR331 rim
is intended by the manufacturer for MTB use,
but has nearly the same inner width as road rims, so
the sticker on the rim says

↑with a tube and 25C tire, max 8.5 psi,

↑tubeless it's 7 psi.
I don't make decisions like "it's an MTB rim so let's keep MAX at 4 psi,"
which works in my favor.
Actually, I run it at exactly 7 psi.

As I've written before,
the XR331 rim has the property that when the rim tape caves in from air pressure,
it contacts
the reverse-torx-shaped edge of the Squolx nipple
specified for use with the rim.
With single-layer rim tape, the tape tears, so
for XR331 rims with Stans rim tape,
double-layer wrapping is essential.
Even so, as shown in the image above, when it caves in,
it makes contact with the nipple,
but the rim tape doesn't tear.

Imaje sealant sometimes gets into this cave and hardens.
I've wondered whether the nipple is puncturing and creating a hole that the sealant then seals?
But about 4 rim holes in a row have done this, while
others haven't, so
it might be that sealant drips into the cave during a specific phase
(near the top?) when it starts to harden.
Sealant hardening is probably faster than rim tape caving,
but it's possible to reuse rim tape with existing caves
while replacing the tire and sealant.
However, given sealant's mechanism of action, it shouldn't harden without a hole.
But then I can't explain why this happens in about 4 holes continuously.
I haven't been so careless as to intend double wrapping but only get 5/6 of a wrap on the second layer,
leaving about 4 hours out of 24 as single-layer.

Even looking at rim holes where sealant has hardened in the rim tape cave,
there's no sealant leaking into the rim.

For the tire, as I mentioned at the beginning,
it's possible to seal the puncture hole with a patch from the inside,
but the tread is worn, so I decided to replace it.
This tire is an IRC Formula Pro Tubeless Ready S-Light,
a 23C variant available only in S-Light.
Rated at 205g, and

↑this worn-out one

↑the next new one
happened to be two lightweight individuals in a row.
Even if 205g, if I keep sealant to around 40ml,
tire plus sealant can stay under 250g.
This is lighter than most tubular wheels,
and while lightweight clincher plus polyurethane tube combinations under 250g do exist,
to my knowledge there isn't one that matches
this tire's corner confidence.
Also, if you don't want nasty experiences with tubeless-specific issues
like air leaks or bead unseating,
IRC is the only choice for tires.
I won't say flats never happen or beads always pop right up,
but I've never had an extremely unpleasant experience with those things.
Plus, the ease of mounting
Products Mentioned in This Article
* Amazon affiliate links — prices may vary
Original Japanese post: のむラボ日記 #6357