There's still more inpoke stuff I haven't covered yet,
so I'll keep working through it bit by bit.
Today's topic is how to thread spokes when doing radial lacing.
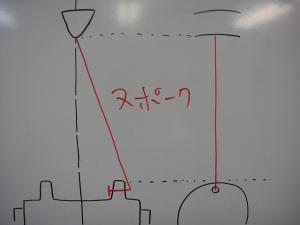
First, since it's been a while, I should clarify the terminology.
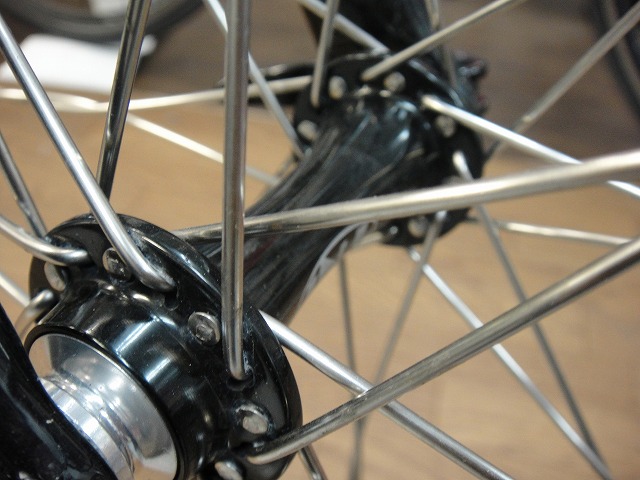
In this blog, spokes threaded from inside the hub flange outward are called
"inpoke,"
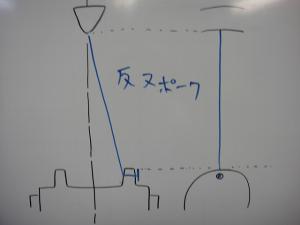
and spokes threaded from outside the hub flange inward are called
"outpoke."

↑In tangential lacing, the spokes passing through the flange alternate between inpoke and outpoke,
but in radial lacing, you use either only inpoke or only outpoke.
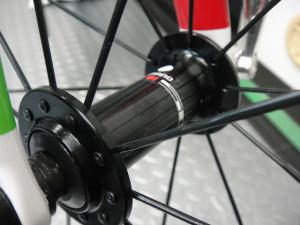
↑This is a Shimano WH-R501, built with outpoke radial lacing.
Virtually all factory-built wheels with butted spokes using radial lacing,
with only tiny exceptions, are built as "outpoke radial."
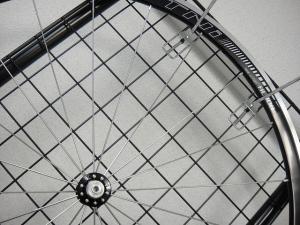
Yesterday's Tni wheel (thanks for all the inquiries) is
a standard build, so I kept things understated with outpoke radial lacing.
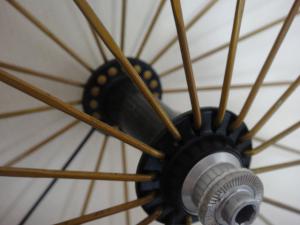
I said "kept things understated," but when I build radial wheels,
I sometimes use "inpoke radial" lacing.
It's not the standard method, but compared to outpoke radial,
there are both merits and demerits, and I choose inpoke radial when
weighing those factors suggests it's the better option.
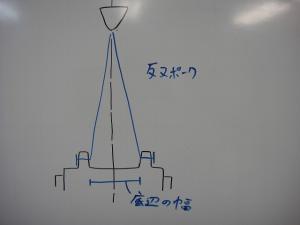
Whether inpoke or outpoke, I base lateral stiffness calculations on
the root of the spoke—specifically where the spoke exits the hub flange.
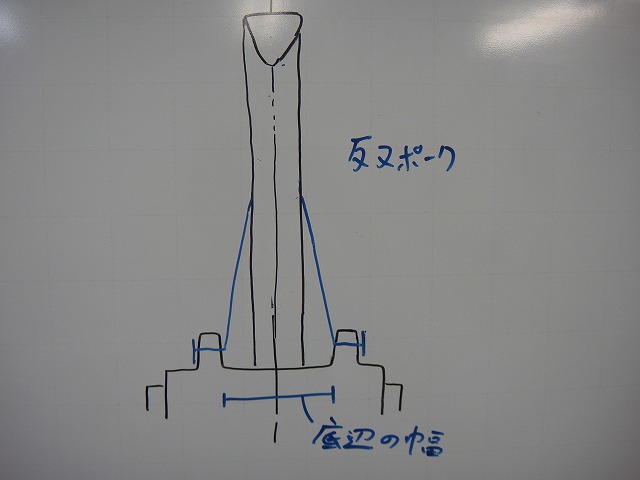
Outpoke has a narrower base width, so it offers less lateral stiffness
compared to inpoke (in my assessment).
This is the stiffness characteristic of outpoke radial from a structural standpoint, but
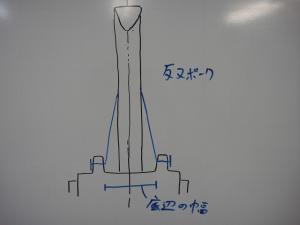
let's look at it from an aerodynamic perspective too.
The rim-side portion of spokes is hidden by the rim or tire,
and outpoke radial has a smaller frontal projection area,
making it aerodynamically advantageous.
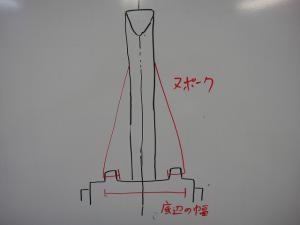
With inpoke radial, by contrast, more of the spoke is exposed compared to outpoke radial.
That's aerodynamically worse. However, because the spoke flex point
has a wider base, it offers better lateral stiffness.
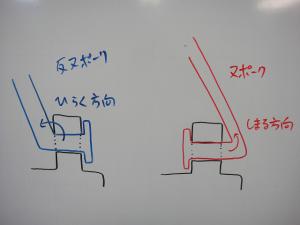
Also, with outpoke, the spoke neck opens outward as it exits the flange.
Inpoke, by contrast, bends inward. And here's the key:
inpoke is less likely to suffer spoke neck breakage.
This is the primary reason I sometimes build wheels with inpoke radial lacing.
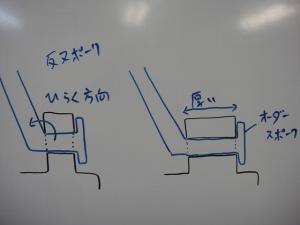
Some factory-built wheels with butted spokes use outpoke radial lacing
but mitigate spoke neck breakage risk by using
custom spokes with extra-long necks matched to very thick flange widths.
Rolf Prima is like this—they use
custom White Industries hubs (with custom hole phasing for pair spoking)
and Sapim spokes in custom dimensions. Real attention to detail.
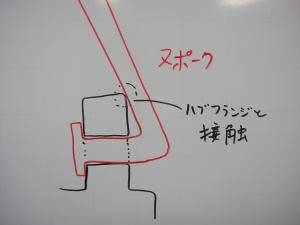
The (probably) biggest reason manufacturers avoid inpoke radial
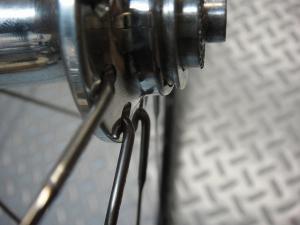
is the risk of spoke-to-hub-flange interference depending on flange geometry (especially height).
The contact shown above can never happen with outpoke radial.

The severity of this problem varies with rim height.
With low rims, inpokes extend at a steeper angle toward the rim,
so flange contact is less likely,
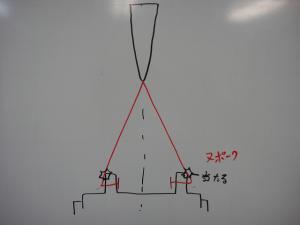
but as rim height increases, the spoke angle becomes shallower,
and flange contact problems occur.
Even when I want to use inpoke radial, if the rim height is too tall,
I often give up and go with outpoke radial instead.

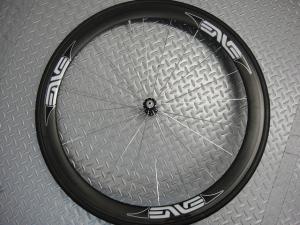
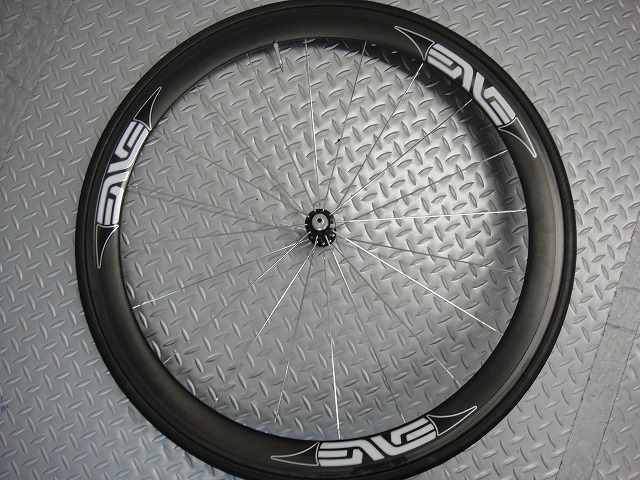
Same rim height, but an Edge-era 45 rim and an Enve 45 rim.
I've built both of these with inpoke radial lacing.

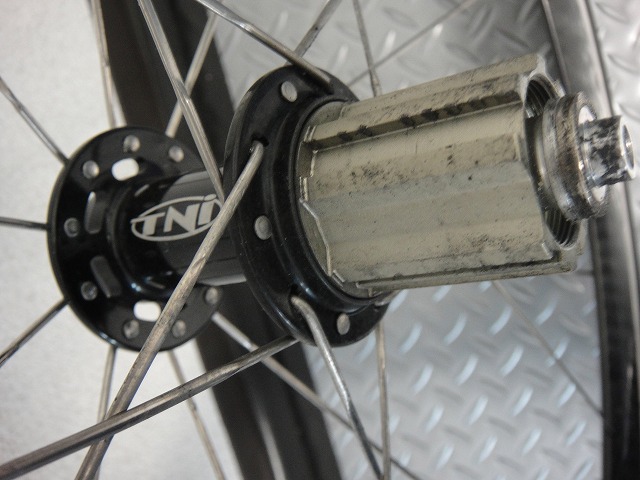
↑My mystery Cosmic Carbon wheel also has the non-drive-side radial lacing built with inpoke.
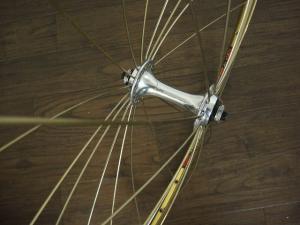
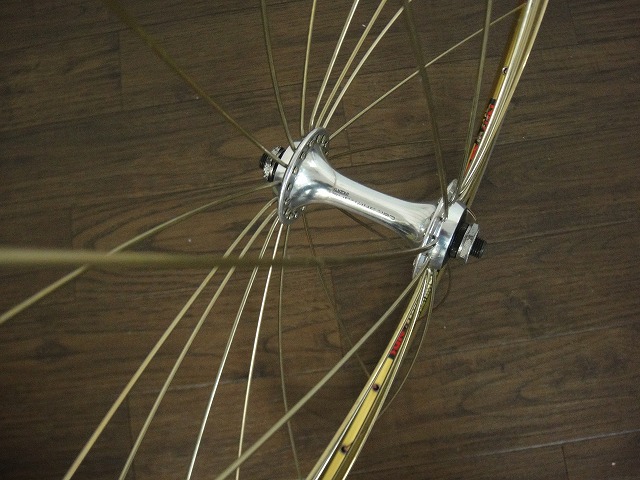
A wheel I'm building with inpoke radial in the initial stage—
the spokes bulge outward pretty dramatically.
Unrelated note: the hub is a Suntour Superbe Pro.
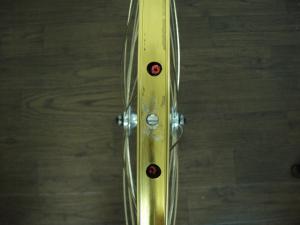
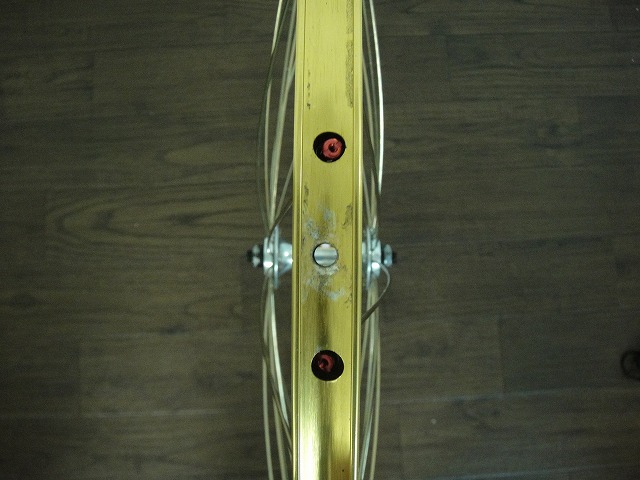
Before building
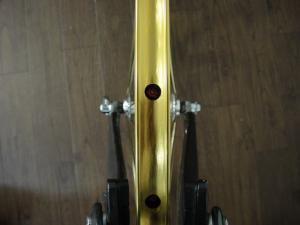
After building
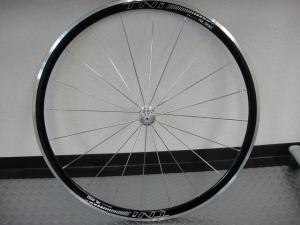
Changing topics,
I get asked a lot about the Tni AL300 rim wheel:
"How's the stiffness feel?"
I don't know.
Since that's not much of an answer, I built a front wheel for myself.
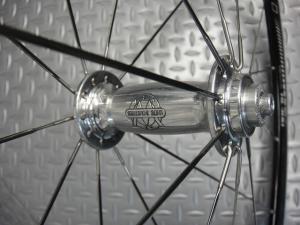
This is also built with inpoke radial lacing.
Hub is a White Industries H2,
spokes are Sapim CX-RAY.
The top of the image is the direction of travel.
The hub lettering ends up reversed, but that's intentional. There's a reason, which I'll explain later.
It's also possible to build yesterday's Nomu Lab wheels with CX-RAY,
for ¥5,000 extra per wheel pair (for 20H).
For 24H, it's ¥6,000 extra.

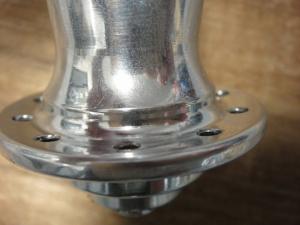
I chose this hub for a reason:
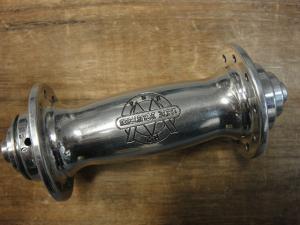
the hub flange isn't perfectly straight.
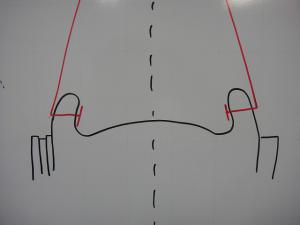
↑Exaggerated here, it looks something like this.
I chose it because flange contact problems shouldn't occur.
Unrelated to inpoke, but...
This time, I built the wheel with the top of the image as the direction of travel.

This means the lettering appears reversed when viewed from the front.

The adjustment screw hole on the hub should be on the left side in the direction of travel—
that's the correct orientation. When positioned that way, the lettering reads backward.
I still think this orientation is correct though.
On rear hubs, the adjustment screw hole is on the left side.
(The right side has the freewheel body, so that's impossible.)
If we think "adjustment mechanism is on the left for both front and rear,"
this is how it should be. And there's evidence supporting this theory
from another manufacturer.
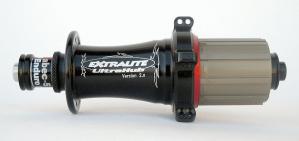
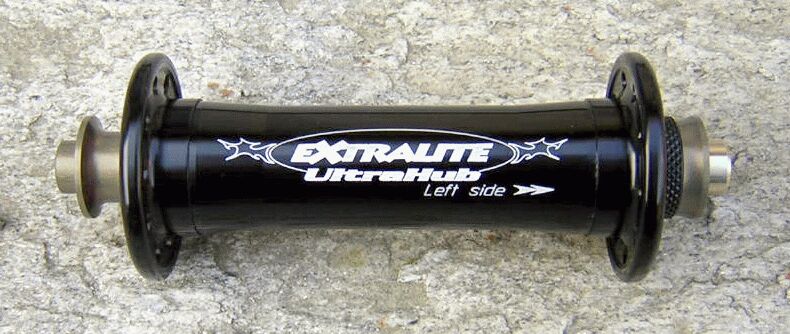
↑A rear hub from a maker called Extralight.
The adjustment mechanism is naturally on the left.
The left side of the hub body has a file-textured dial-like piece.

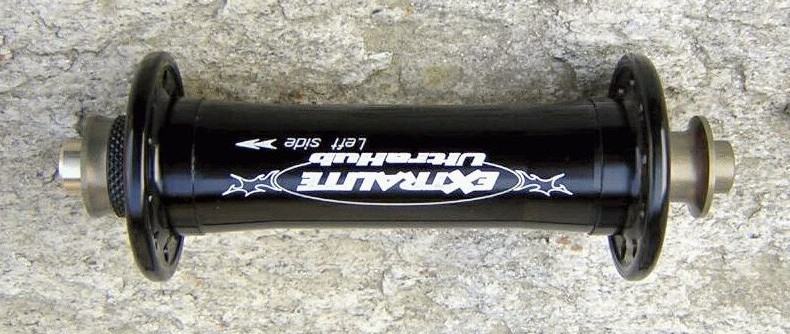
And this is their front hub, which has the same file-textured dial
on the (from the perspective of facing it) right side.
However, the hub body is marked "Left Side >>" as a deliberate note,

telling you to install it in this orientation.
So the logo is readable in the direction of travel on the rear hub,
but reversed on the front hub.
I made the same judgment about the White H2 hub, so
I deliberately assembled it in the seemingly backward orientation.
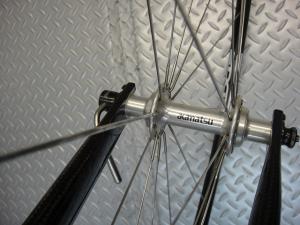
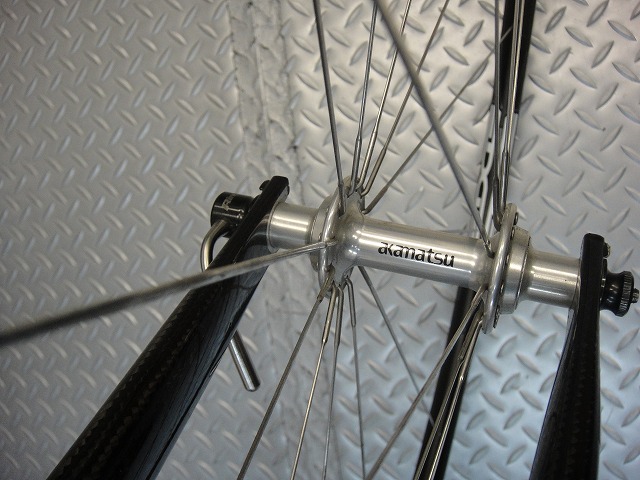
My 4,820g Akamatsu aluminum bike has a front wheel
built with an Akamatsu Systema hub.
There are lighter hubs available, but
here I chose the Systema because I wanted this hub specifically.
It's a truly excellent hub. All right, let me say it:
This is a plug for the Systema hub.
...Sorry, please ignore that.
Because the flange width is narrow, lateral stiffness is structurally limited,
but unless you're doing serious standing climbs, you won't notice.
Since the flange width is already narrow, rather than trying to boost lateral stiffness
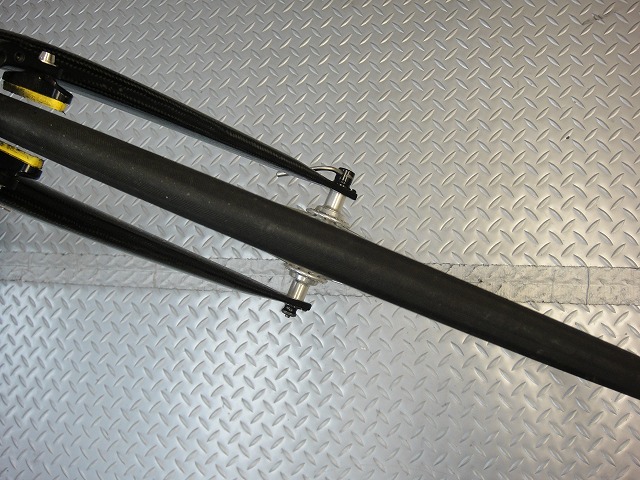
with inpoke radial, I wanted to pursue ultimate spoke frontal projection area reduction
with outpoke radial. That's why I built it that way.
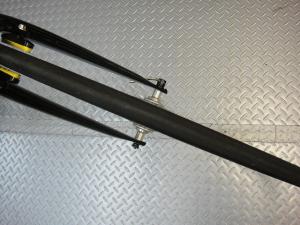
Narrow! Aerodynamically, this is a really excellent front wheel.
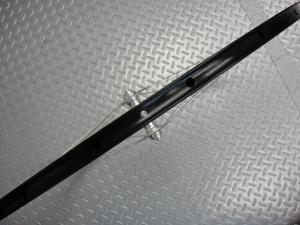
With the White H2 hub, it looks like this.
Since the H2 has quite a wide flange, these two wheels represent
opposite ends of the radial lacing spectrum.
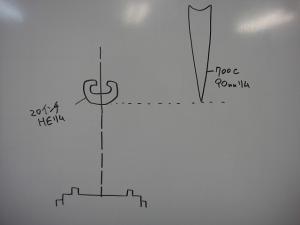
The reason the Systema hub has a narrow flange is that
it's also designed for use on small-wheeled bikes.
If you do the math, a 700C rim with the same inner diameter
as a 20-inch (HE) small-wheel rim comes out to roughly 90mm rim height.
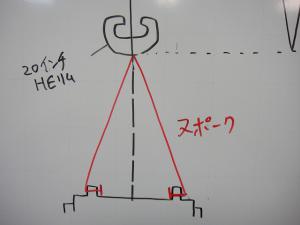
If you built such a rim with inpoke radial lacing, the spoke angle becomes very steep,
and flange contact problems become likely.
Or if you did tangential lacing instead, half would be inpoke anyway.
With tangential lacing with woven crossings, the angle at which
the inpokes emerge from the flange becomes even steeper than radial.
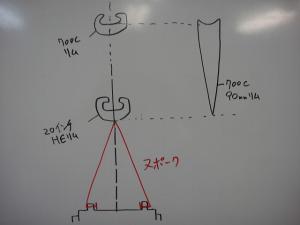
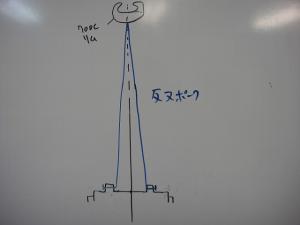
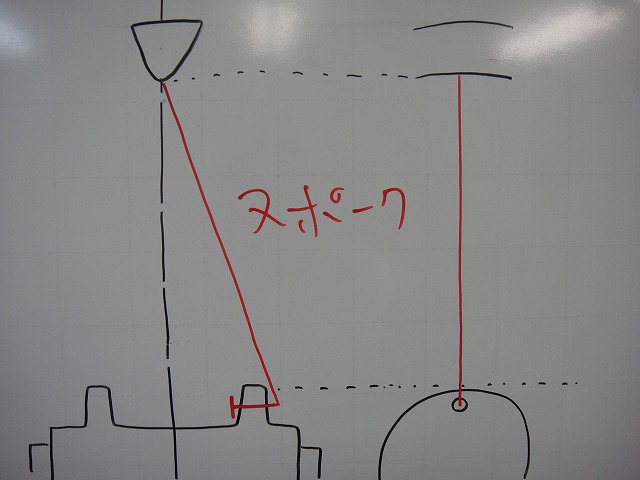
Let's consider a 700C rim with the same height as a 20-inch rim.
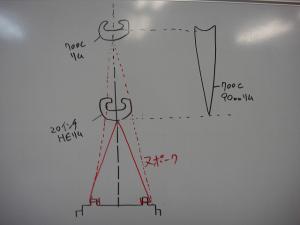
If you built this rim with inpoke radial,
the spokes would follow the red dashed line shown above.
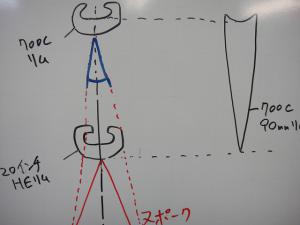
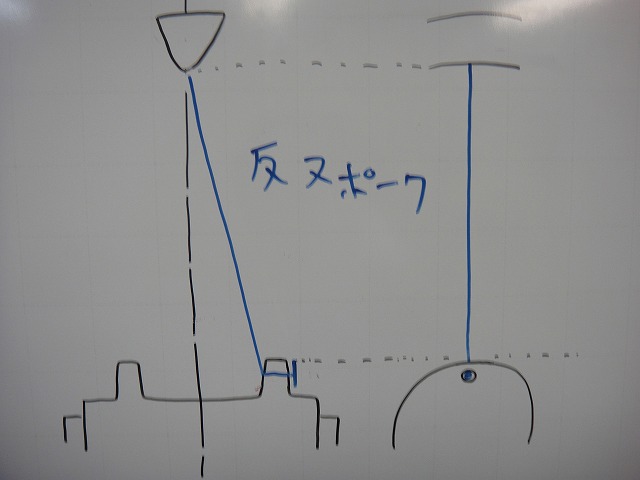
To build a 20-inch rim with spokes at roughly the same angle
(the blue angle shown above),
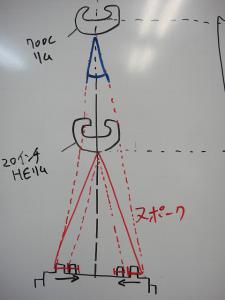
you'd need to move the hub flanges inward.
This is why the Systema hub is well-suited for small-wheel bikes.
Building a 700C rim with outpoke lacing from that configuration
produces the best frontal projection area for a front wheel
(for a spoked wheel, anyway). That's what I was going for with mine.
You're welcome to order Tni AL300 rim wheels with inpoke radial lacing,
but for various reasons, I don't recommend it.
(It's not impossible, though.)
If you ask why I built the Enve 45 with inpoke,
well, that's something I can't write about here, which is awkward...
Today's topic was "there are two types of radial lacing."
so I'll keep working through it bit by bit.
Today's topic is how to thread spokes when doing radial lacing.
First, since it's been a while, I should clarify the terminology.
In this blog, spokes threaded from inside the hub flange outward are called
"inpoke,"
and spokes threaded from outside the hub flange inward are called
"outpoke."
↑In tangential lacing, the spokes passing through the flange alternate between inpoke and outpoke,
but in radial lacing, you use either only inpoke or only outpoke.
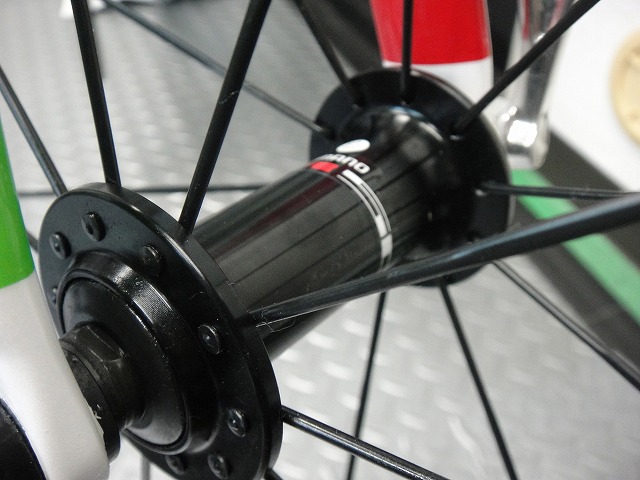
↑This is a Shimano WH-R501, built with outpoke radial lacing.
Virtually all factory-built wheels with butted spokes using radial lacing,
with only tiny exceptions, are built as "outpoke radial."
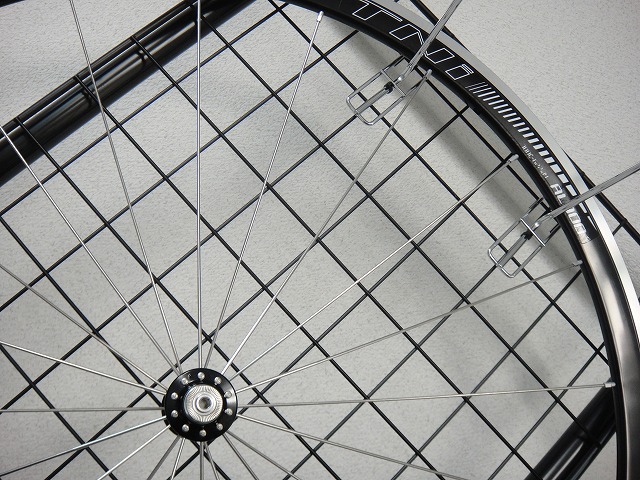
Yesterday's Tni wheel (thanks for all the inquiries) is
a standard build, so I kept things understated with outpoke radial lacing.
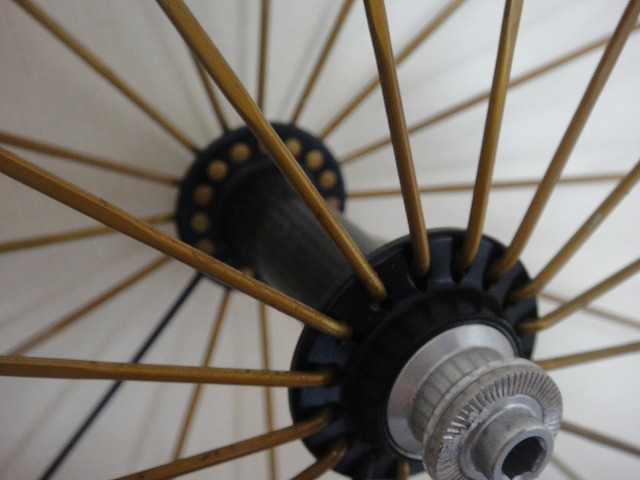
I said "kept things understated," but when I build radial wheels,
I sometimes use "inpoke radial" lacing.
It's not the standard method, but compared to outpoke radial,
there are both merits and demerits, and I choose inpoke radial when
weighing those factors suggests it's the better option.
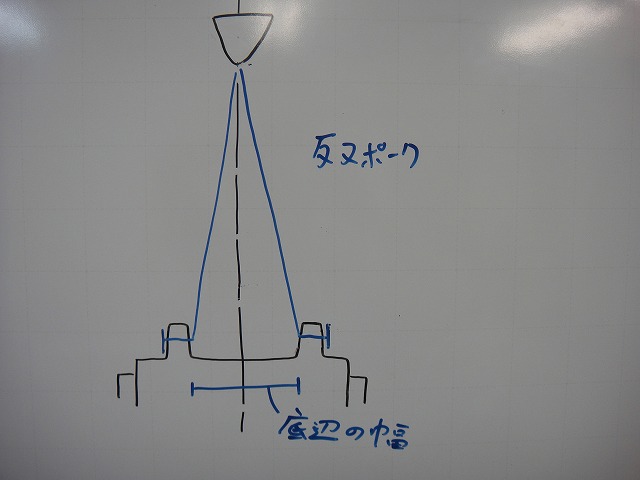
Whether inpoke or outpoke, I base lateral stiffness calculations on
the root of the spoke—specifically where the spoke exits the hub flange.
Outpoke has a narrower base width, so it offers less lateral stiffness
compared to inpoke (in my assessment).
This is the stiffness characteristic of outpoke radial from a structural standpoint, but
let's look at it from an aerodynamic perspective too.
The rim-side portion of spokes is hidden by the rim or tire,
and outpoke radial has a smaller frontal projection area,
making it aerodynamically advantageous.
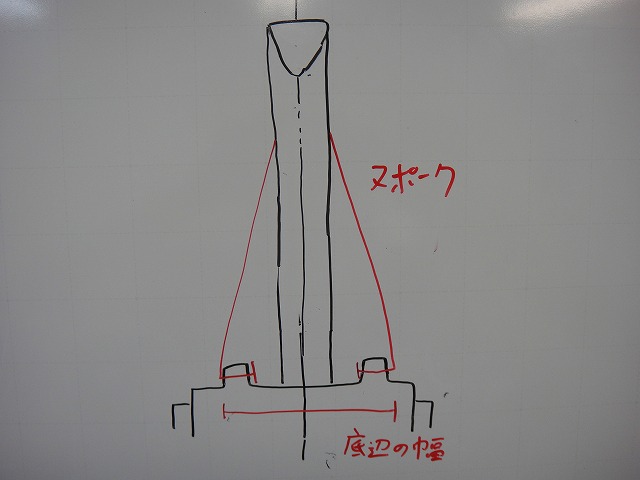
With inpoke radial, by contrast, more of the spoke is exposed compared to outpoke radial.
That's aerodynamically worse. However, because the spoke flex point
has a wider base, it offers better lateral stiffness.
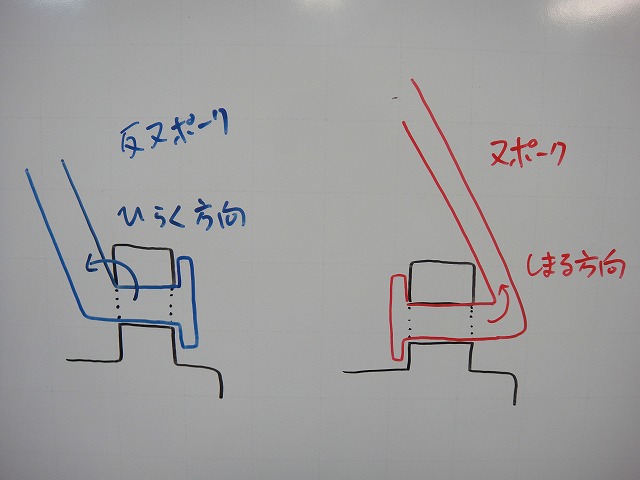
Also, with outpoke, the spoke neck opens outward as it exits the flange.
Inpoke, by contrast, bends inward. And here's the key:
inpoke is less likely to suffer spoke neck breakage.
This is the primary reason I sometimes build wheels with inpoke radial lacing.
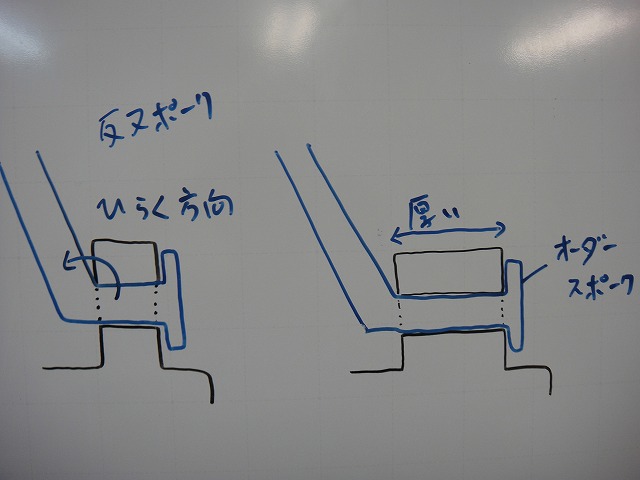
Some factory-built wheels with butted spokes use outpoke radial lacing
but mitigate spoke neck breakage risk by using
custom spokes with extra-long necks matched to very thick flange widths.
Rolf Prima is like this—they use
custom White Industries hubs (with custom hole phasing for pair spoking)
and Sapim spokes in custom dimensions. Real attention to detail.
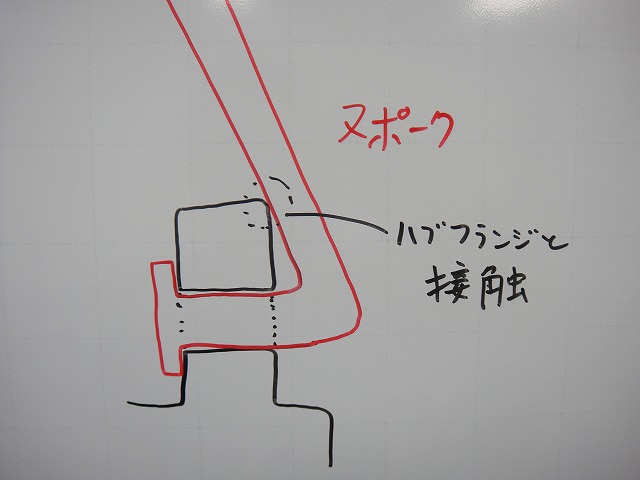
The (probably) biggest reason manufacturers avoid inpoke radial
is the risk of spoke-to-hub-flange interference depending on flange geometry (especially height).
The contact shown above can never happen with outpoke radial.
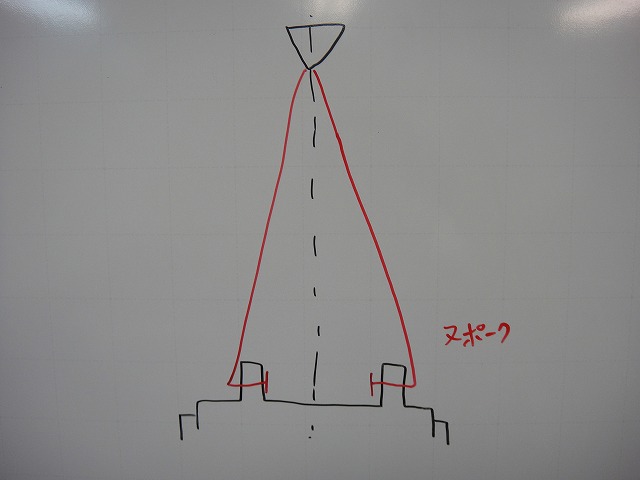
The severity of this problem varies with rim height.
With low rims, inpokes extend at a steeper angle toward the rim,
so flange contact is less likely,
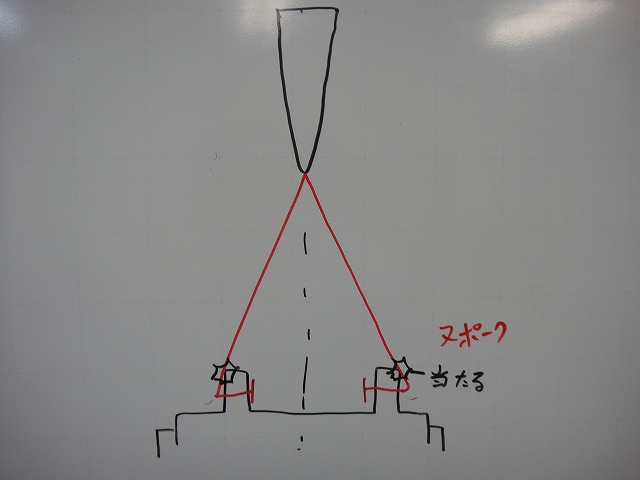
but as rim height increases, the spoke angle becomes shallower,
and flange contact problems occur.
Even when I want to use inpoke radial, if the rim height is too tall,
I often give up and go with outpoke radial instead.
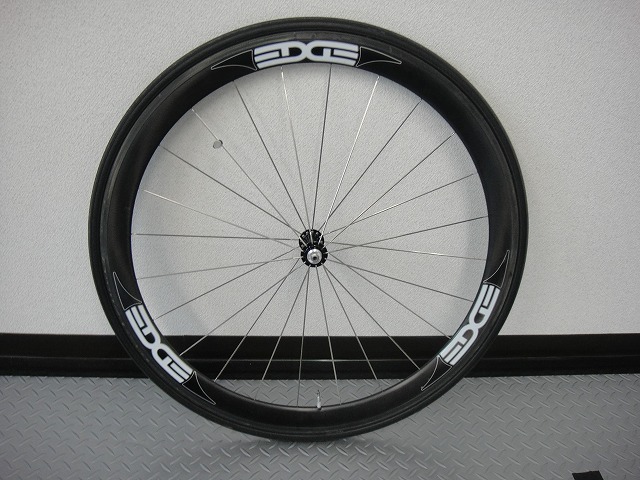
Same rim height, but an Edge-era 45 rim and an Enve 45 rim.
I've built both of these with inpoke radial lacing.
↑My mystery Cosmic Carbon wheel also has the non-drive-side radial lacing built with inpoke.
A wheel I'm building with inpoke radial in the initial stage—
the spokes bulge outward pretty dramatically.
Unrelated note: the hub is a Suntour Superbe Pro.
Before building
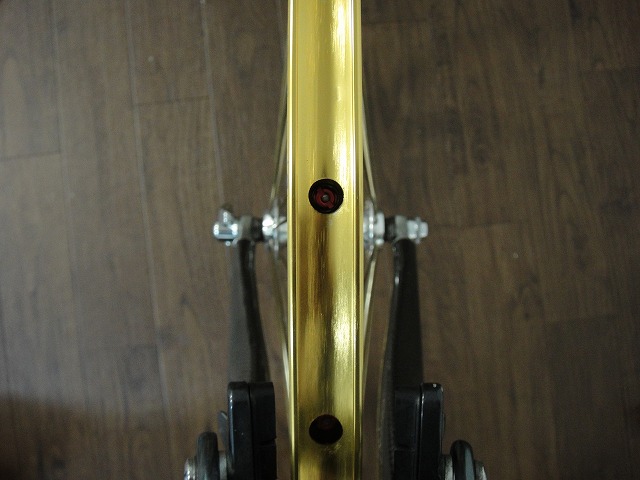
After building
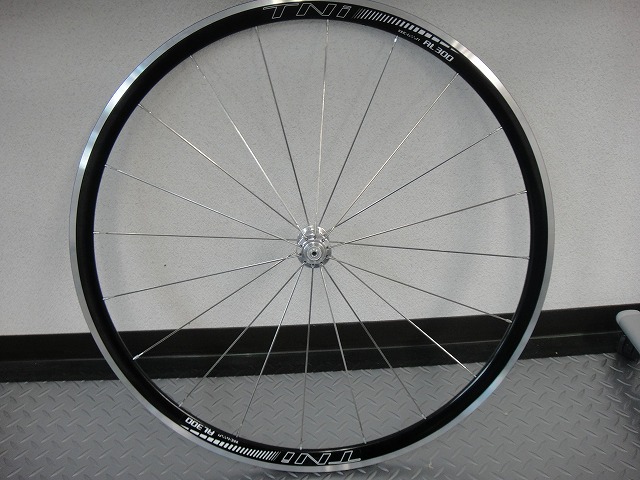
Changing topics,
I get asked a lot about the Tni AL300 rim wheel:
"How's the stiffness feel?"
I don't know.
Since that's not much of an answer, I built a front wheel for myself.
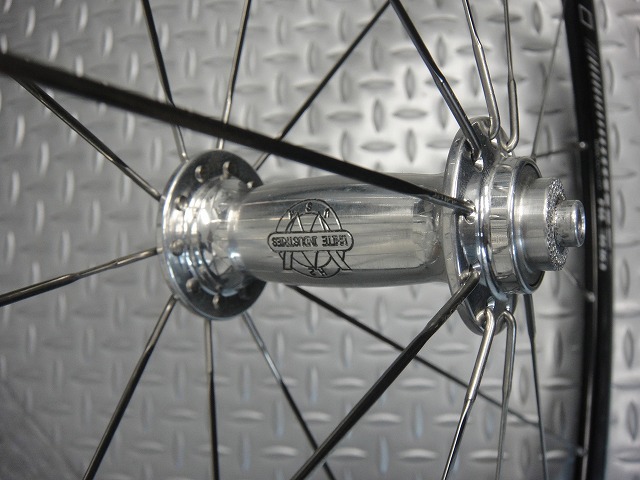
This is also built with inpoke radial lacing.
Hub is a White Industries H2,
spokes are Sapim CX-RAY.
The top of the image is the direction of travel.
The hub lettering ends up reversed, but that's intentional. There's a reason, which I'll explain later.
It's also possible to build yesterday's Nomu Lab wheels with CX-RAY,
for ¥5,000 extra per wheel pair (for 20H).
For 24H, it's ¥6,000 extra.

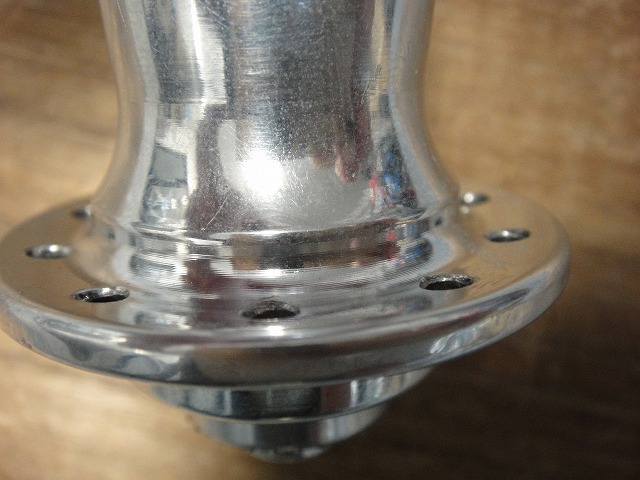
I chose this hub for a reason:
the hub flange isn't perfectly straight.
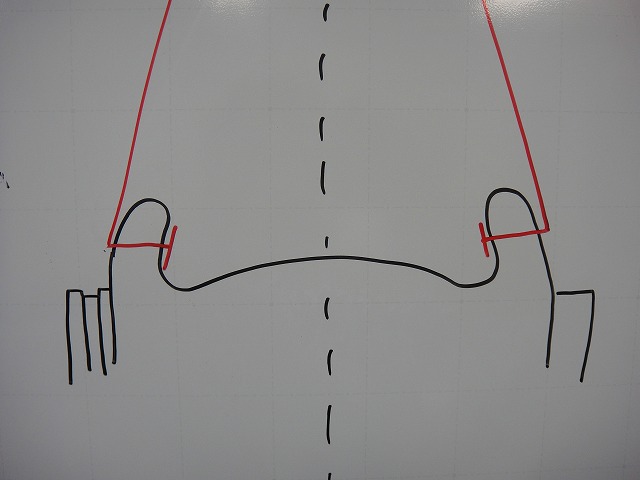
↑Exaggerated here, it looks something like this.
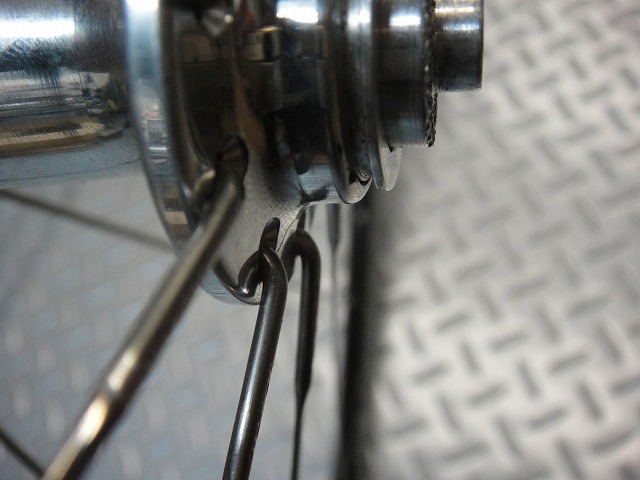
I chose it because flange contact problems shouldn't occur.

Unrelated to inpoke, but...
This time, I built the wheel with the top of the image as the direction of travel.
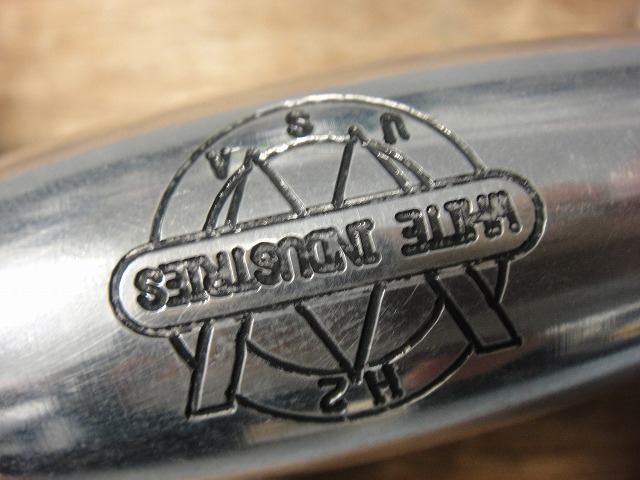
This means the lettering appears reversed when viewed from the front.

The adjustment screw hole on the hub should be on the left side in the direction of travel—
that's the correct orientation. When positioned that way, the lettering reads backward.
I still think this orientation is correct though.
On rear hubs, the adjustment screw hole is on the left side.
(The right side has the freewheel body, so that's impossible.)
If we think "adjustment mechanism is on the left for both front and rear,"
this is how it should be. And there's evidence supporting this theory
from another manufacturer.
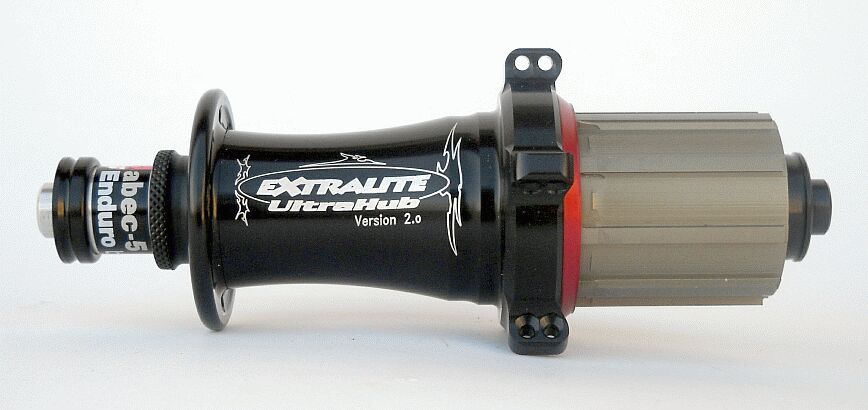
↑A rear hub from a maker called Extralight.
The adjustment mechanism is naturally on the left.
The left side of the hub body has a file-textured dial-like piece.
And this is their front hub, which has the same file-textured dial
on the (from the perspective of facing it) right side.
However, the hub body is marked "Left Side >>" as a deliberate note,
telling you to install it in this orientation.
So the logo is readable in the direction of travel on the rear hub,
but reversed on the front hub.
I made the same judgment about the White H2 hub, so
I deliberately assembled it in the seemingly backward orientation.
My 4,820g Akamatsu aluminum bike has a front wheel
built with an Akamatsu Systema hub.
There are lighter hubs available, but
here I chose the Systema because I wanted this hub specifically.
It's a truly excellent hub. All right, let me say it:
This is a plug for the Systema hub.
...Sorry, please ignore that.
Because the flange width is narrow, lateral stiffness is structurally limited,
but unless you're doing serious standing climbs, you won't notice.
Since the flange width is already narrow, rather than trying to boost lateral stiffness
with inpoke radial, I wanted to pursue ultimate spoke frontal projection area reduction
with outpoke radial. That's why I built it that way.
Narrow! Aerodynamically, this is a really excellent front wheel.
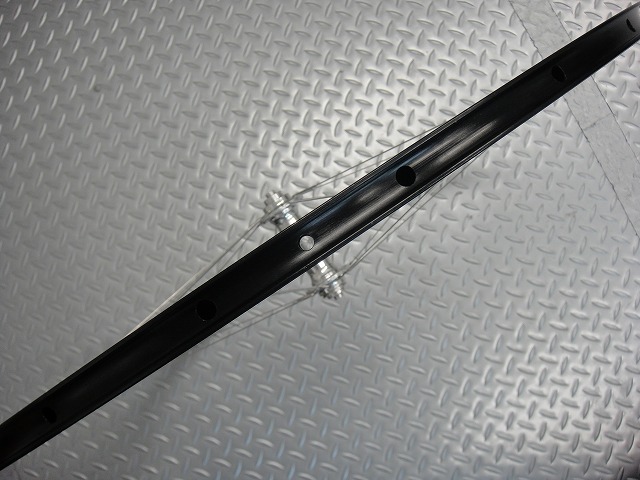
With the White H2 hub, it looks like this.
Since the H2 has quite a wide flange, these two wheels represent
opposite ends of the radial lacing spectrum.

The reason the Systema hub has a narrow flange is that
it's also designed for use on small-wheeled bikes.
If you do the math, a 700C rim with the same inner diameter
as a 20-inch (HE) small-wheel rim comes out to roughly 90mm rim height.
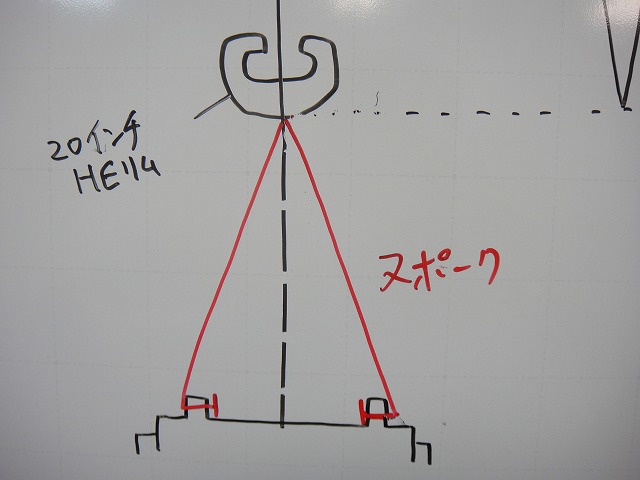
If you built such a rim with inpoke radial lacing, the spoke angle becomes very steep,
and flange contact problems become likely.
Or if you did tangential lacing instead, half would be inpoke anyway.
With tangential lacing with woven crossings, the angle at which
the inpokes emerge from the flange becomes even steeper than radial.
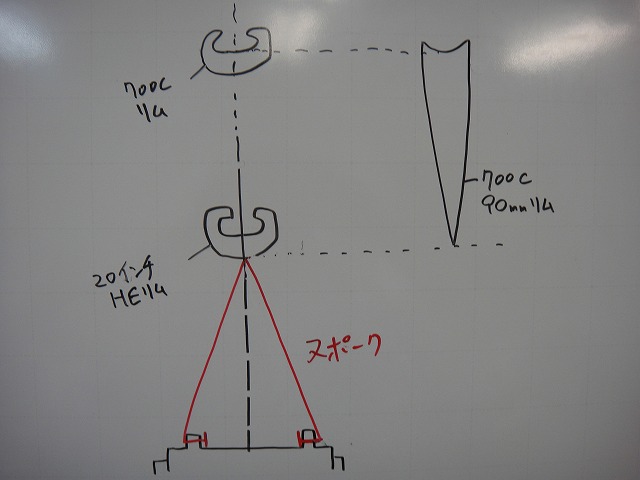
Let's consider a 700C rim with the same height as a 20-inch rim.

If you built this rim with inpoke radial,
the spokes would follow the red dashed line shown above.
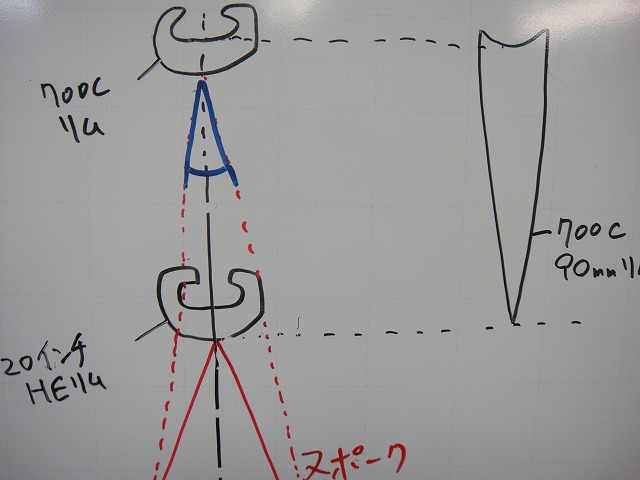
To build a 20-inch rim with spokes at roughly the same angle
(the blue angle shown above),

you'd need to move the hub flanges inward.
This is why the Systema hub is well-suited for small-wheel bikes.

Building a 700C rim with outpoke lacing from that configuration
produces the best frontal projection area for a front wheel
(for a spoked wheel, anyway). That's what I was going for with mine.
You're welcome to order Tni AL300 rim wheels with inpoke radial lacing,
but for various reasons, I don't recommend it.
(It's not impossible, though.)
If you ask why I built the Enve 45 with inpoke,
well, that's something I can't write about here, which is awkward...
Today's topic was "there are two types of radial lacing."