I took in the front and rear wheels of a first generation Shamal Ultra from a customer.

What you'd call a gold Shamal Ultra.
Based on the brake zone and the splines on the freebody,
it has a short usage history and is in really nice condition.

The customer wants the hub bearings converted to CULT spec.
I'll do a full inspection while I'm at it.


Starting with the front wheel.
There's no radial runout, but the rim is shifted to the left side.
There are traces of truing work, so
it looks like they only did lateral truing—just a partial job.
A front wheel without a dish won't shift from age-related use,
and with this amount of center offset,
I can't believe it would pass Campagnolo's QC.


These are steel ball bearings from the black ball race era.

I wiped away the dirt with the cone pressed in,
after removing the seal and ball retainer.
Fulcrum pioneered aluminum spokes,
but Campagnolo's first generation Shamal Ultra
is the first to use a carbon hub shell.
Perhaps due to anxiety about this,
they bonded aluminum inserts with a larger contact area,
and because the bore diameter of that part is small,
it doesn't fit most cone removal tools cleanly.
I once had a tool called "the first generation Shamal Ultra cone remover,"
but I don't have it on hand anymore, so
I made one on the spot.
What it looks like is... well, that's trade secret.

I removed the cone.
The seating position for the pressed-in cone
is also received by an aluminum insert.
Since it was a new design, they seem to have been pretty cautious about it.
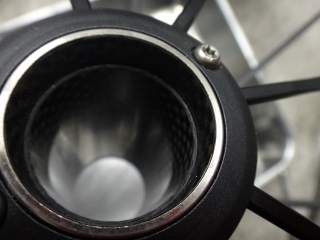
↑This is an image of the cone removed from a later-generation Shamal Ultra front hub,
and as you can see, the aluminum insert isn't bonded,
and the cone seating position is supported only by the carbon step.

I pressed in the CULT cone.


Temporary center reading after reassembling the hub.
Since I completely replaced the parts,
I don't need to respect the original left-right orientation, but
the rear wheel has an orange WARNING sticker on one side
that corresponds to the left side (what I call left WARNING),
and the original front wheel was the same way, so
the left side of the hub (where the bearing adjustment nut is) is the same as before.
If the original front wheel had right WARNING,
I would have assembled the hub left-right reversed.
Sometimes when doing work that changes cone press-fit conditions,
the center offset amount changes,
but this time it stayed about the same.


I centered the wheel with spoke tightening.


Now for the rear wheel.
It's shifted to the right, with some wear history mixed in.

Of the four locations—front and rear, left and right—
only the rear right cone and cup showed wear lines.


I removed the cones from both sides.

Two pins spaced 180° apart hold them in place, then
epoxy-type adhesive was applied,
and this blob that splattered inside
wouldn't come off even with aggressive nail scraping.
There are ways to remove it, but I'm leaving it as is.


I pressed in the CULT cones.

The freewheel pawl spring
was deformed like an old NTT DoCoMo logo,
so I replaced it.


I assembled the hub.
The center offset decreased slightly.
There's no guarantee I'm measuring at the same phase
as the temporary center reading,
so if the wheel has lateral runout,
I can't say for certain it was caused by the cone replacement work.
Also, the thread on the hub axle is now clean.


I centered the wheel with spoke tightening on the non-freewheel side.

What you'd call a gold Shamal Ultra.
Based on the brake zone and the splines on the freebody,
it has a short usage history and is in really nice condition.

The customer wants the hub bearings converted to CULT spec.
I'll do a full inspection while I'm at it.


Starting with the front wheel.
There's no radial runout, but the rim is shifted to the left side.
There are traces of truing work, so
it looks like they only did lateral truing—just a partial job.
A front wheel without a dish won't shift from age-related use,
and with this amount of center offset,
I can't believe it would pass Campagnolo's QC.


These are steel ball bearings from the black ball race era.

I wiped away the dirt with the cone pressed in,
after removing the seal and ball retainer.
Fulcrum pioneered aluminum spokes,
but Campagnolo's first generation Shamal Ultra
is the first to use a carbon hub shell.
Perhaps due to anxiety about this,
they bonded aluminum inserts with a larger contact area,
and because the bore diameter of that part is small,
it doesn't fit most cone removal tools cleanly.
I once had a tool called "the first generation Shamal Ultra cone remover,"
but I don't have it on hand anymore, so
I made one on the spot.
What it looks like is... well, that's trade secret.

I removed the cone.
The seating position for the pressed-in cone
is also received by an aluminum insert.
Since it was a new design, they seem to have been pretty cautious about it.

↑This is an image of the cone removed from a later-generation Shamal Ultra front hub,
and as you can see, the aluminum insert isn't bonded,
and the cone seating position is supported only by the carbon step.

I pressed in the CULT cone.


Temporary center reading after reassembling the hub.
Since I completely replaced the parts,
I don't need to respect the original left-right orientation, but
the rear wheel has an orange WARNING sticker on one side
that corresponds to the left side (what I call left WARNING),
and the original front wheel was the same way, so
the left side of the hub (where the bearing adjustment nut is) is the same as before.
If the original front wheel had right WARNING,
I would have assembled the hub left-right reversed.
Sometimes when doing work that changes cone press-fit conditions,
the center offset amount changes,
but this time it stayed about the same.


I centered the wheel with spoke tightening.


Now for the rear wheel.
It's shifted to the right, with some wear history mixed in.

Of the four locations—front and rear, left and right—
only the rear right cone and cup showed wear lines.


I removed the cones from both sides.

Two pins spaced 180° apart hold them in place, then
epoxy-type adhesive was applied,
and this blob that splattered inside
wouldn't come off even with aggressive nail scraping.
There are ways to remove it, but I'm leaving it as is.


I pressed in the CULT cones.

The freewheel pawl spring
was deformed like an old NTT DoCoMo logo,
so I replaced it.


I assembled the hub.
The center offset decreased slightly.
There's no guarantee I'm measuring at the same phase
as the temporary center reading,
so if the wheel has lateral runout,
I can't say for certain it was caused by the cone replacement work.
Also, the thread on the hub axle is now clean.


I centered the wheel with spoke tightening on the non-freewheel side.