The drill is singing!
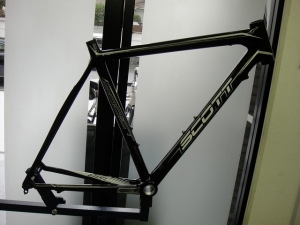
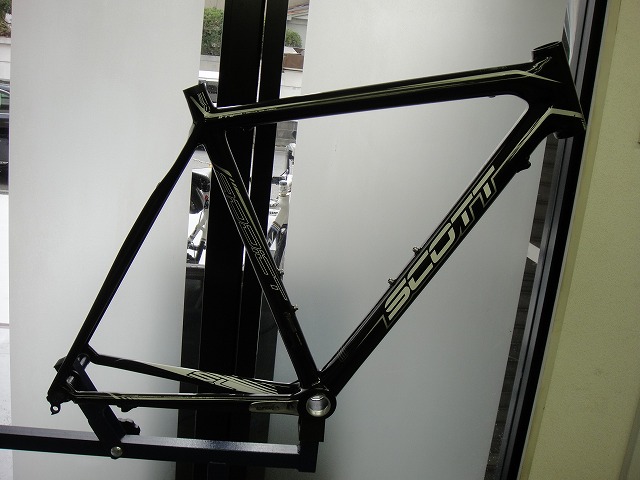
A customer left me with a Scott Addict SL to work on.
Since this frame predates the introduction of electronic groupsets,
it obviously has no provisions for internal hub routing.
This frame uses a BSC threaded bottom bracket (BB),
but the Addict SL was quickly superseded by the press-fit BB version,
so it was only produced for about a year or two—quite rare.
There were lighter frames even back then, but no other mass-produced frame
that was comparably light to this one.
When you want to build an UCI rule-independent ultra-light bike
weighing just under 4kg in actual measurement,
the threaded BSC allows for lighter weight around the crankset compared to press-fit,
so a light frame paired with a press-fit BB actually became a burden.
Oops, that's completely off-topic.
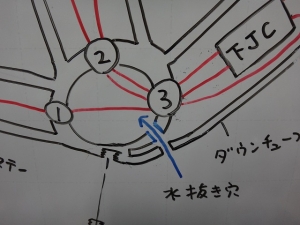
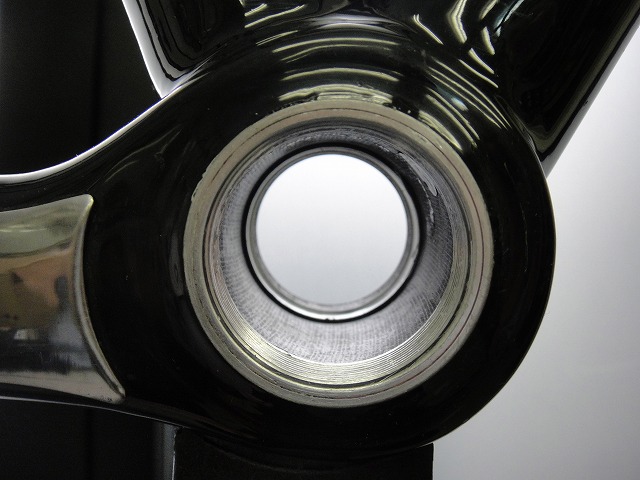
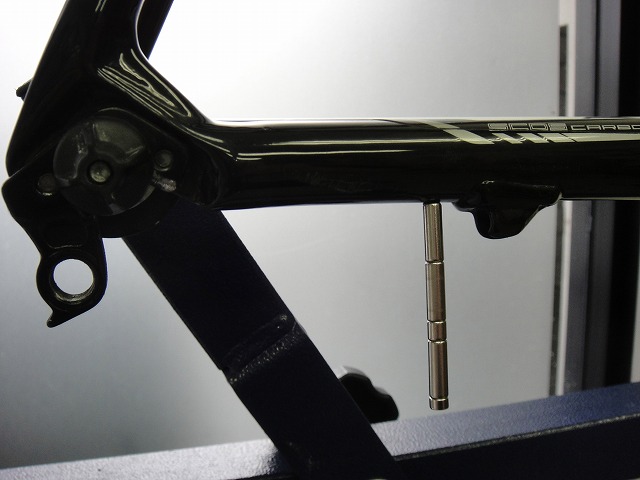
The annoying thing about this frame for electric hub conversion is that
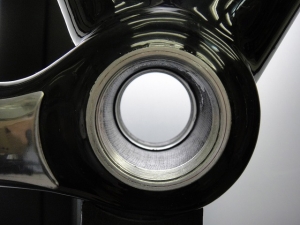
the BB is a completely sealed chamber.
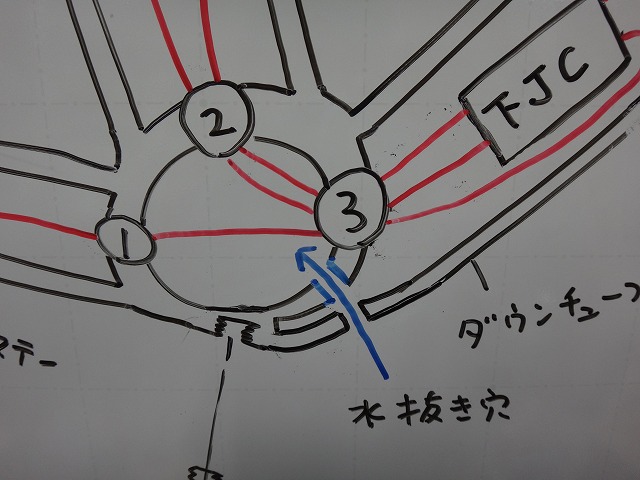
The back of the derailleur hanger has a screw hole for mounting the cable stop and
a drain hole, but
the cable stop hole doesn't penetrate the BB,
and the drain hole only goes to the down tube.
This is hard to understand in words, so
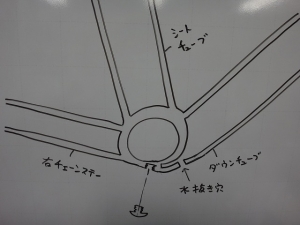
↑here's a diagram of it.
We're converting from a mechanical 9000 groupset
to an electric 6870 groupset, but
this is a downgrade in both grade and weight because
we need to finish over 6.8kg.
When it was built with the 9000, even with training wheels
it easily exceeded 6.8kg, so
with racing wheels we need quite a lot of added weight.
So the weight increase from the groupset change is actually welcome.
The customer was adjusting the weight themselves,
and their method was putting socket wrench pieces in a bag
and stashing them inside the seat tube.
The socket pieces were so badly rusted that I got curious,
so I shined a light inside the seat tube and looked in—
moisture wasn't escaping; it was damp and wet.
(Water seeping in from the seatpost gap is normal)
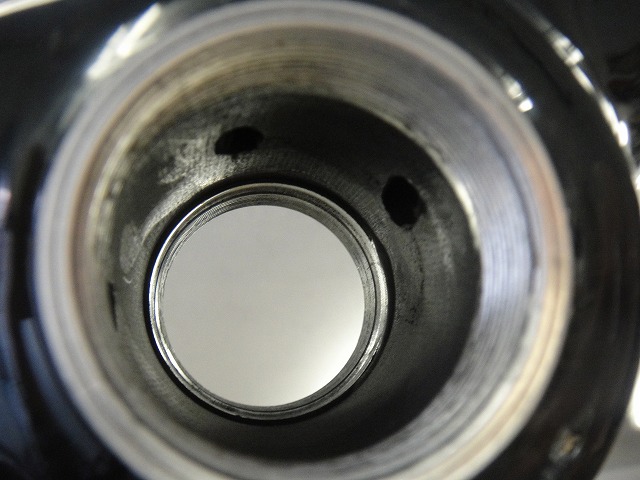
When I examined it more carefully,
the seat tube didn't connect to anything.
It would have been better if it at least connected to the down tube.
Since it didn't connect to the right chainstay either,
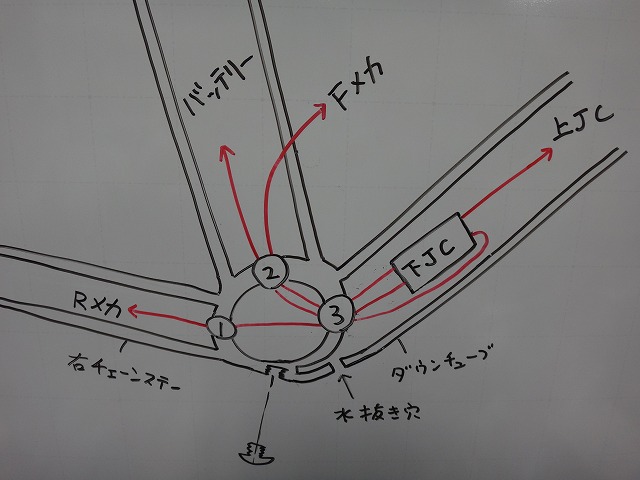
it became clear that we needed to drill holes from the BB to each tube.

↑I confirmed that the lower junction (JC) can be fed down the down tube
from the head tube, so
I'll route the cables like this.
The numbers written in the BB holes show how many cables pass through.

First, I drilled the hole to the right chainstay.
↑The magnet is sticking to the chainstay,
reacting to the probe wire I've threaded through it.
The probe wire is homemade, but recently Park Tool released
the "IR-1 Internal Cable Routing Kit (9,100 yen before tax),"
which I recommend.
I've added further modifications to my homemade version that make it even better.
The usability of the wire's end is superior to the original—hehehehe (pat on my own back).
I'm not showing it deliberately, of course.

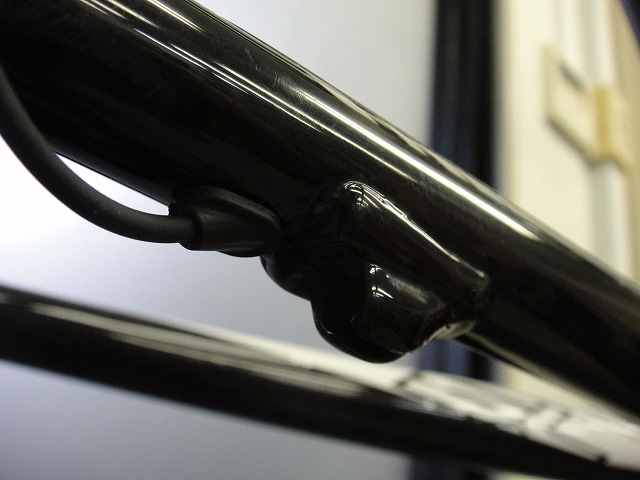
Next, I also drilled holes through the down tube and seat tube.
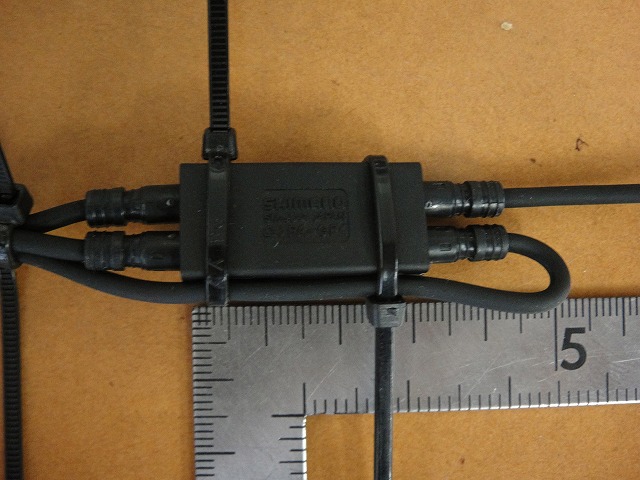
Four cables attach to the lower JC, but
as shown in the diagram earlier, due to the geometry
one of them has to be folded back.
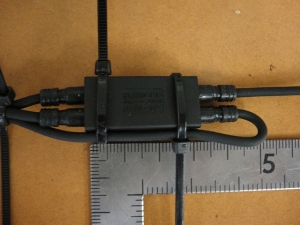
↑Actually, I'm handling it like this.
I'm not over-tightening the cable ties.
I'm not cutting the excess expecting it to act as a rattle stop.
The folded-back cable becomes effectively about 50mm shorter.
The short cable I didn't fold back is for the front derailleur,
the long cable I didn't fold back is 750mm,
and the folded-back cable is 700mm but effectively becomes about 650mm.
Which of these 750mm and effectively 650mm
goes to the seatpost battery and rear derailleur respectively will be
a matter of improvisationdecided by fitting everything together.

I managed to thread 3 cables through the down tube.
I was worried because the frame size is fairly large,
but the effectively 650mm was more than enough for the seatpost battery.
Even though it's called a seatpost battery,
this time I'm sinking it into the seat tube with a rattle stop.
Since I wanted to make the installation easily reversible and
allow room for some added weight,
this required some careful planning.

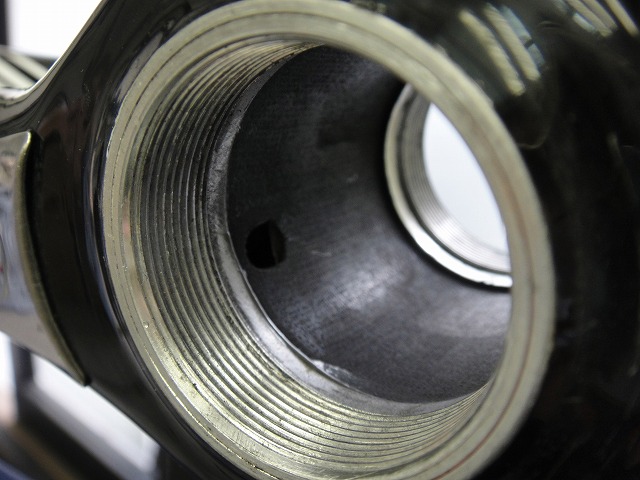
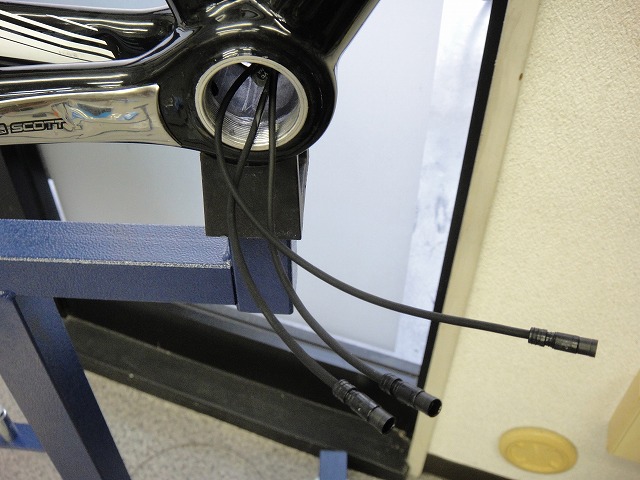
↑This is what the BB wiring looks like.
As I'll explain later, I further opened up the drain hole.
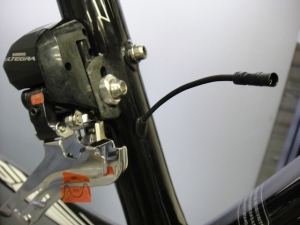
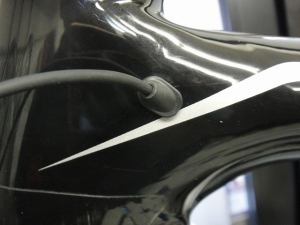
The front derailleur cable exits here.
Both the 9070 and 6870 have the cable inserted on the rear side of the front derailleur,
but it's better to drill the cable hole on the front side.
If you drill the shortest distance hole in the back of the seat tube,
the cable will float up and rattle instead.
From a mud splash perspective it's not good, and the rear tire could hit it.
Since I'm routing forward, there's a cable clip on the underside of the front derailleur
that I'll use for the cable.
I've seen examples where the front derailleur mounting crushes the cable flat,
so that requires careful attention.
You also have to watch out for interference with the support bolts.
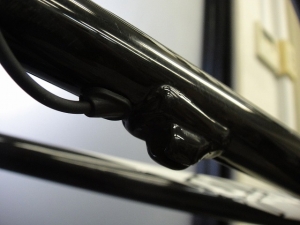

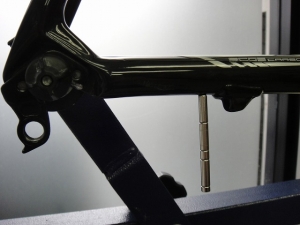
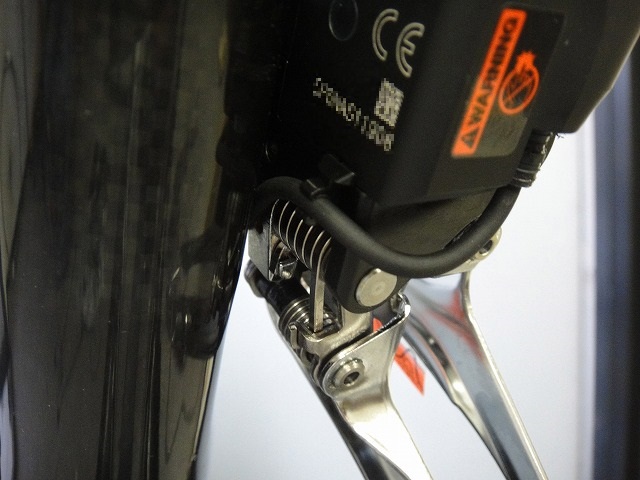
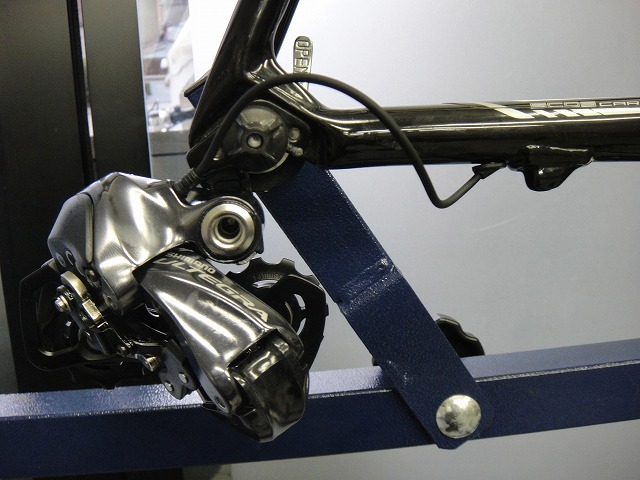
↑I drilled the rear derailleur hole here.
I've confirmed the cable won't tangle around your right heel,
and I routed it even lower to be safe.
If I were drilling above the chainstay, it would be better further back,
but based on what I found probing with the probe wire,
I wasn't confident about hitting a definite void, so I put it here.

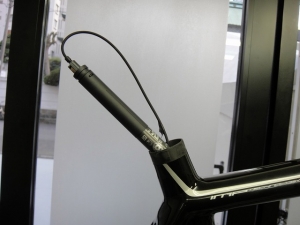
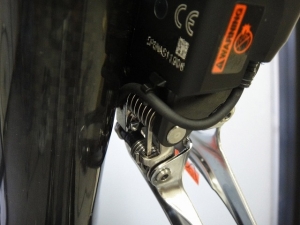
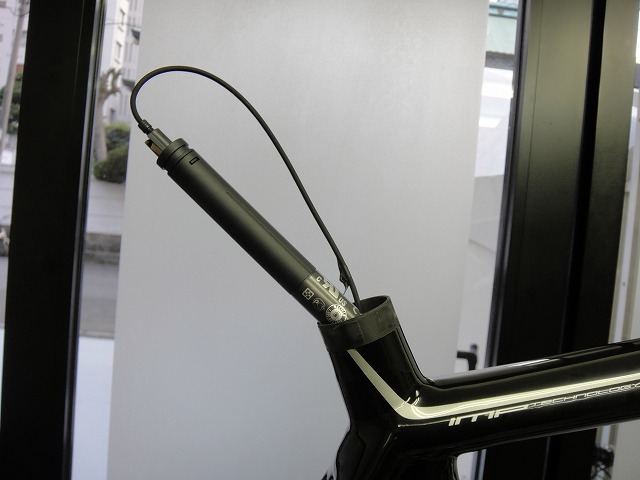
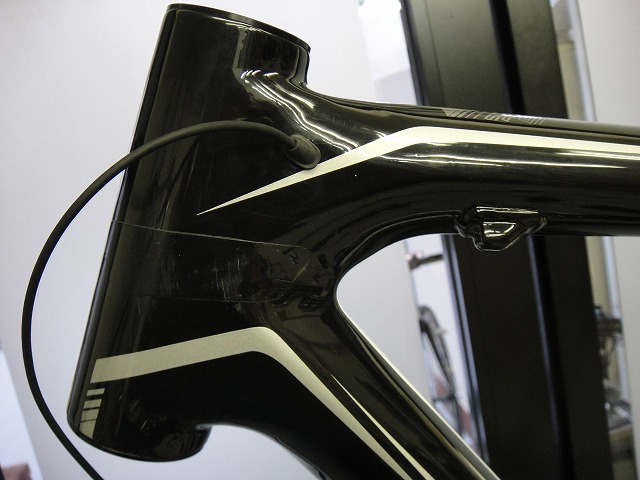
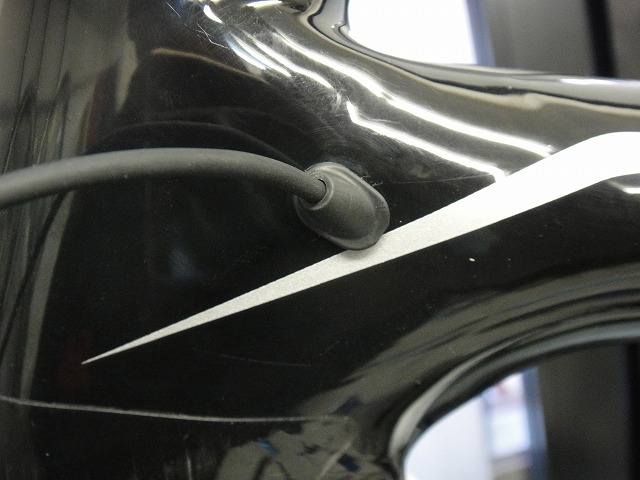
↑The upper JC cable went here.
The void space around the head tube was large and
easy to see into, which was a relief.
The crankset isn't an FC-9000,
but I managed to get the front shifting to work.
As for the bike's actual weight with racing wheels,
it came out slightly lighter than 6.8kg, so
we do need added weight, but not nearly as much as before.
The socket wrench pieces have the actual measured weight written on them with oil pen,
and the customer swaps them around like puzzle pieces,
fine-tuning them to just over 6.8kg (barely exceeding it).
Finally.
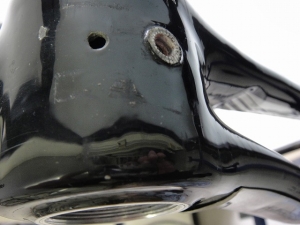
Since the BB hole drain seemed sketchy,
I extended the original drain hole and punched it through.
Looking at the interior of the sealed seat tube before modification,
it seems like this work was not just a good idea—it was necessary.
A customer left me with a Scott Addict SL to work on.
Since this frame predates the introduction of electronic groupsets,
it obviously has no provisions for internal hub routing.
This frame uses a BSC threaded bottom bracket (BB),
but the Addict SL was quickly superseded by the press-fit BB version,
so it was only produced for about a year or two—quite rare.
There were lighter frames even back then, but no other mass-produced frame
that was comparably light to this one.
When you want to build an UCI rule-independent ultra-light bike
weighing just under 4kg in actual measurement,
the threaded BSC allows for lighter weight around the crankset compared to press-fit,
so a light frame paired with a press-fit BB actually became a burden.
Oops, that's completely off-topic.
The annoying thing about this frame for electric hub conversion is that
the BB is a completely sealed chamber.

The back of the derailleur hanger has a screw hole for mounting the cable stop and
a drain hole, but
the cable stop hole doesn't penetrate the BB,
and the drain hole only goes to the down tube.
This is hard to understand in words, so

↑here's a diagram of it.
We're converting from a mechanical 9000 groupset
to an electric 6870 groupset, but
this is a downgrade in both grade and weight because
we need to finish over 6.8kg.
When it was built with the 9000, even with training wheels
it easily exceeded 6.8kg, so
with racing wheels we need quite a lot of added weight.
So the weight increase from the groupset change is actually welcome.
The customer was adjusting the weight themselves,
and their method was putting socket wrench pieces in a bag
and stashing them inside the seat tube.
The socket pieces were so badly rusted that I got curious,
so I shined a light inside the seat tube and looked in—
moisture wasn't escaping; it was damp and wet.
(Water seeping in from the seatpost gap is normal)
When I examined it more carefully,
the seat tube didn't connect to anything.
It would have been better if it at least connected to the down tube.
Since it didn't connect to the right chainstay either,
it became clear that we needed to drill holes from the BB to each tube.
↑I confirmed that the lower junction (JC) can be fed down the down tube
from the head tube, so
I'll route the cables like this.
The numbers written in the BB holes show how many cables pass through.
First, I drilled the hole to the right chainstay.
↑The magnet is sticking to the chainstay,
reacting to the probe wire I've threaded through it.
The probe wire is homemade, but recently Park Tool released
the "IR-1 Internal Cable Routing Kit (9,100 yen before tax),"
which I recommend.
The usability of the wire's end is superior to the original—hehehehe (pat on my own back).
I'm not showing it deliberately, of course.
Next, I also drilled holes through the down tube and seat tube.
Four cables attach to the lower JC, but
as shown in the diagram earlier, due to the geometry
one of them has to be folded back.
↑Actually, I'm handling it like this.
I'm not over-tightening the cable ties.
I'm not cutting the excess expecting it to act as a rattle stop.
The folded-back cable becomes effectively about 50mm shorter.
The short cable I didn't fold back is for the front derailleur,
the long cable I didn't fold back is 750mm,
and the folded-back cable is 700mm but effectively becomes about 650mm.
Which of these 750mm and effectively 650mm
goes to the seatpost battery and rear derailleur respectively will be
I managed to thread 3 cables through the down tube.
I was worried because the frame size is fairly large,
but the effectively 650mm was more than enough for the seatpost battery.
Even though it's called a seatpost battery,
this time I'm sinking it into the seat tube with a rattle stop.
Since I wanted to make the installation easily reversible and
allow room for some added weight,
this required some careful planning.

↑This is what the BB wiring looks like.
As I'll explain later, I further opened up the drain hole.
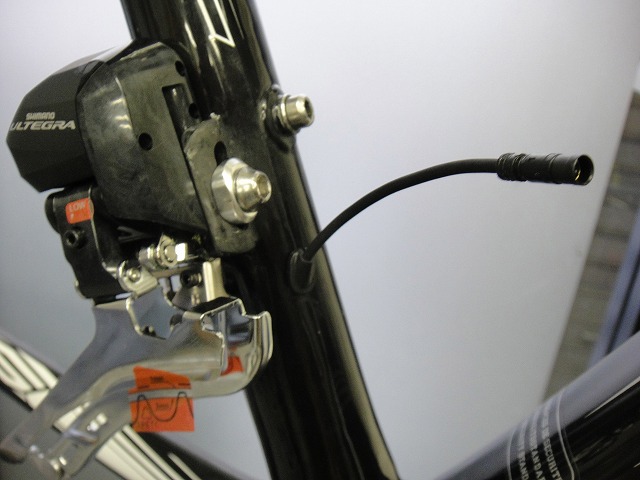
The front derailleur cable exits here.
Both the 9070 and 6870 have the cable inserted on the rear side of the front derailleur,
but it's better to drill the cable hole on the front side.
If you drill the shortest distance hole in the back of the seat tube,
the cable will float up and rattle instead.
From a mud splash perspective it's not good, and the rear tire could hit it.
Since I'm routing forward, there's a cable clip on the underside of the front derailleur
that I'll use for the cable.
I've seen examples where the front derailleur mounting crushes the cable flat,
so that requires careful attention.
You also have to watch out for interference with the support bolts.
↑I drilled the rear derailleur hole here.
I've confirmed the cable won't tangle around your right heel,
and I routed it even lower to be safe.
If I were drilling above the chainstay, it would be better further back,
but based on what I found probing with the probe wire,
I wasn't confident about hitting a definite void, so I put it here.
↑The upper JC cable went here.
The void space around the head tube was large and
easy to see into, which was a relief.
The crankset isn't an FC-9000,
but I managed to get the front shifting to work.
As for the bike's actual weight with racing wheels,
it came out slightly lighter than 6.8kg, so
we do need added weight, but not nearly as much as before.
The socket wrench pieces have the actual measured weight written on them with oil pen,
and the customer swaps them around like puzzle pieces,
fine-tuning them to just over 6.8kg (barely exceeding it).
Finally.
Since the BB hole drain seemed sketchy,
I extended the original drain hole and punched it through.
Looking at the interior of the sealed seat tube before modification,
it seems like this work was not just a good idea—it was necessary.