The drill whines!
A customer (probably) brought me a Ridley Helium to work on.
The issue was "the front derailleur mounting bracket is broken."
...I didn't quite understand what they meant, but they brought it in anyway.
This person's bike has issues like tires installed backwards—which is actually the least of the problems. The chain is flipped, the rear derailleur pulleys are intentionally installed upside down (or so it seems), the outer chainring cage is too long, brake shoe height is misaligned... there are so many things to complain about.
Their regular shop does bicycle work as a side gig, so the work is clearly sloppy, and it's honestly impossible to tell whether the poor adjustments are amateur mistakes or the shop's handiwork.
But anyway, never mind the complaints...
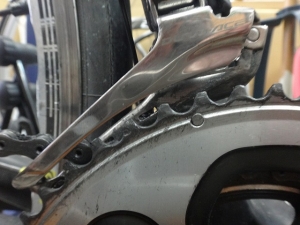
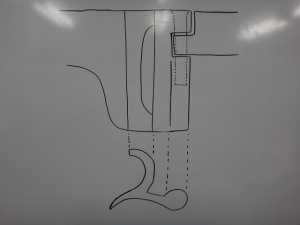
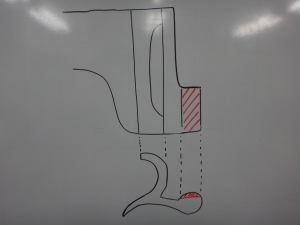
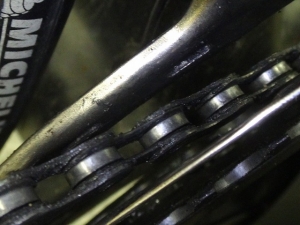
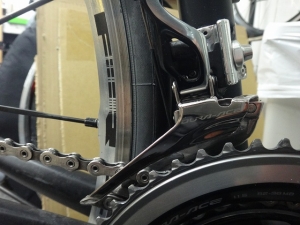
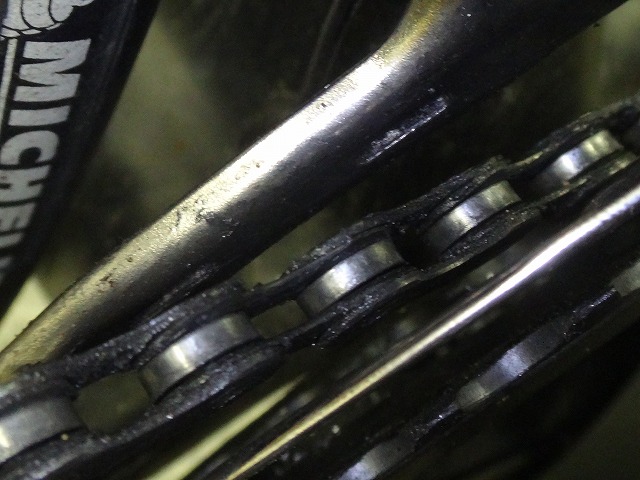
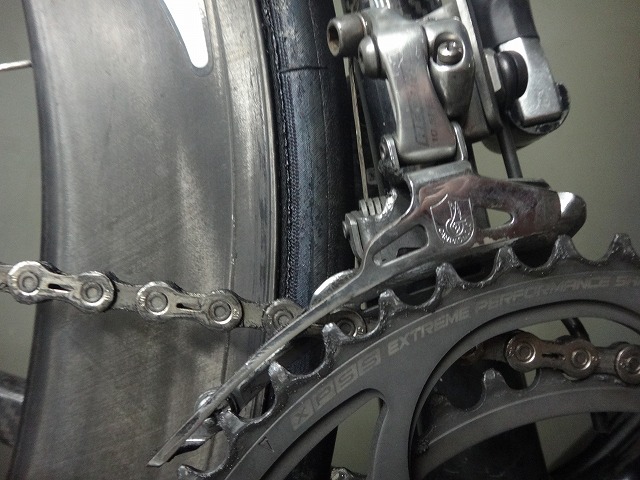
There's a condition called "reverse tooth clearance" happening here.
The distance between the front tip of the derailleur cage and the outer chainring teeth is unusually large.
The opposite phenomenon is common on modern frames with steeper seat angles, but reverse tooth clearance doesn't normally occur.

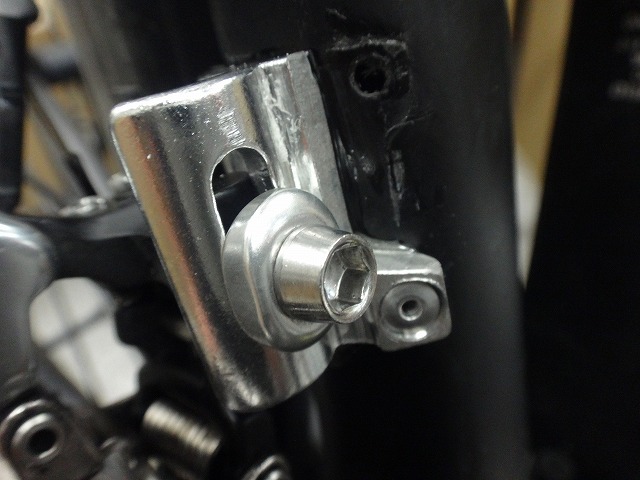
The low-side adjustment screw is sticking out way too far.
When it protrudes this much, the screw tip isn't actually pushing the derailleur, so it's essentially like the screw isn't there at all.

And this time's problem:

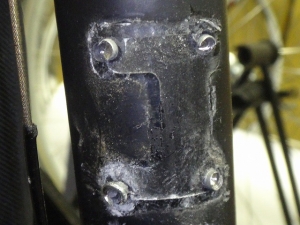
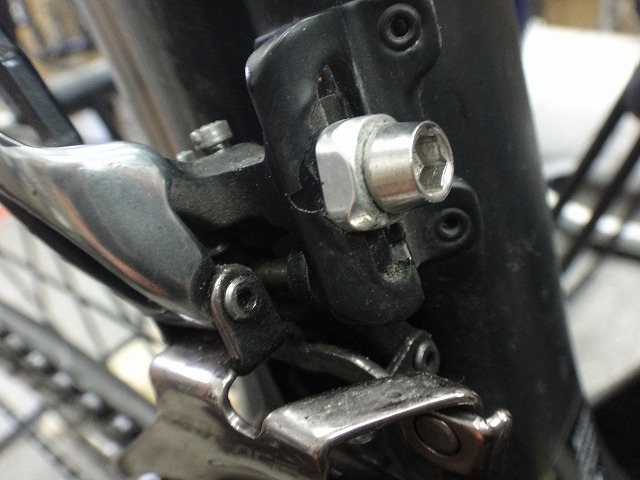
The front derailleur mounting bracket really was cracked.
They wanted me to fix it somehow.
Whirrrr.
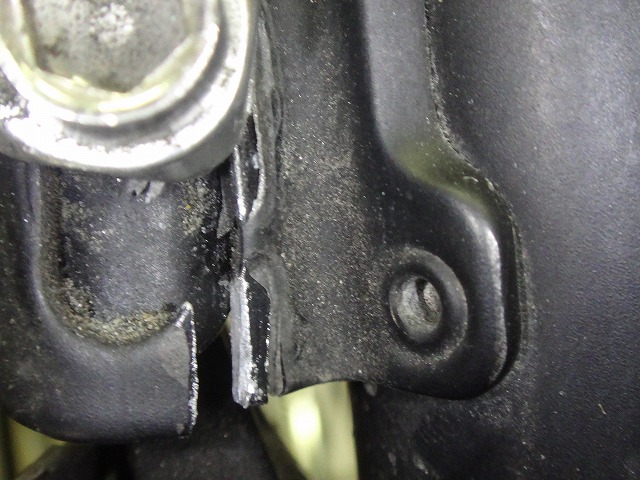
I knocked off the rivet head and removed the mounting bracket.
The adhesive was holding pretty well, so it took some effort to get it off.
You might think I should've consulted with the Ridley distributor before doing this sort of thing.
Actually, this frame did come through an official distributor, not some overseas online shop.
But there are circumstances that make that impossible. I can't write about them though.
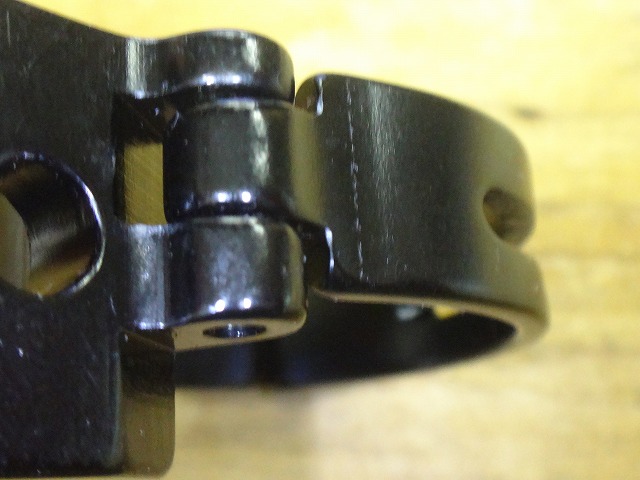
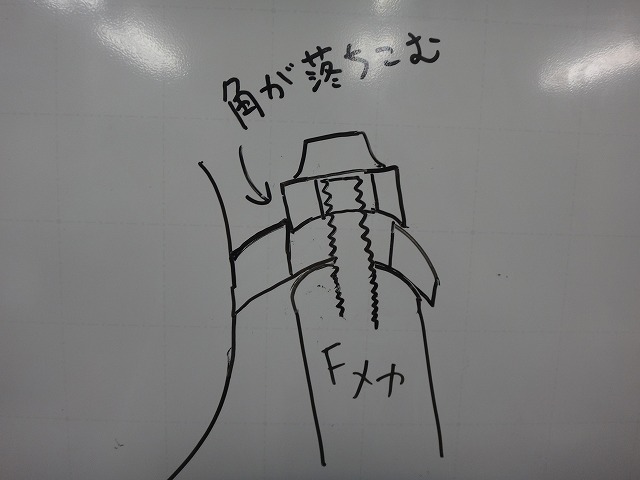
For the new mounting bracket I'm going to install here, I'll machine one from a front derailleur mounting clamp band.
But there are conditions for that too:
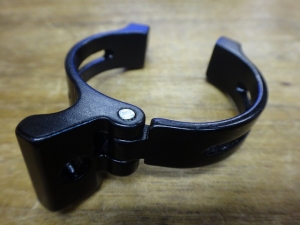
↑This type won't work. Actually, it's impossible.

There's no space in front of the derailleur to rivet.
The mounting holes for the front derailleur aren't slots, so you can't adjust the position. That's another reason why it won't work.
Plus, because of the weight-saving cutouts on the band, you can't drill rivet holes there either.


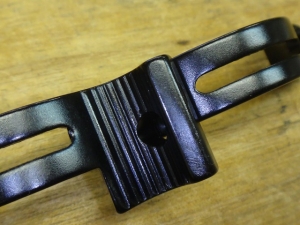
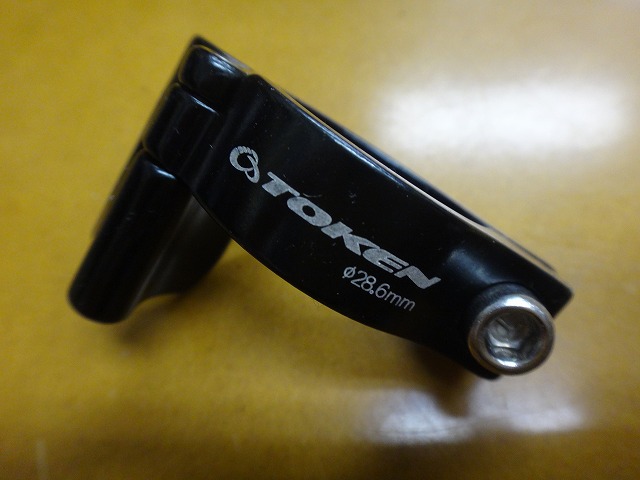
Token makes a band that satisfies all these conditions.
The reason it's 28.6mm is because after cutting off the hinge, this diameter fits best with the non-circular shape of the seat tube.
However, the black anodized version shows machining marks, so
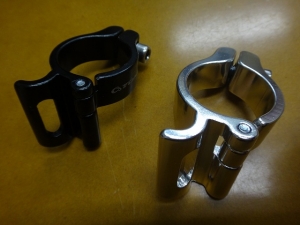
I'm using a color variant of the same part from Yoshigai (※).
※: ○Yoshi-gai (Yoshigai) ×Kichi-gai (a homophone to avoid)

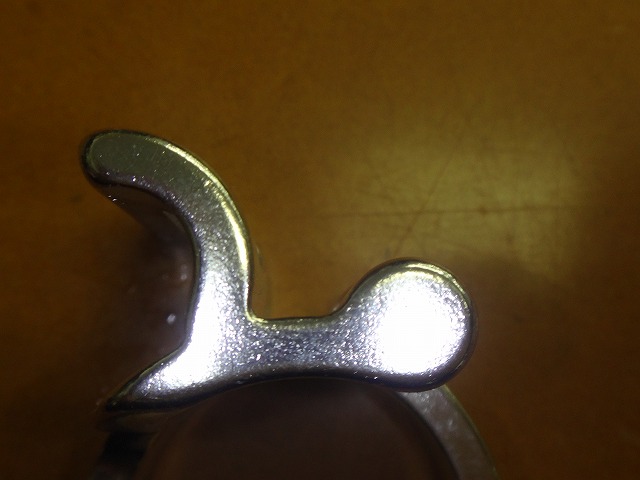
↑This is how it looks, but
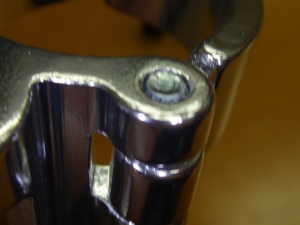
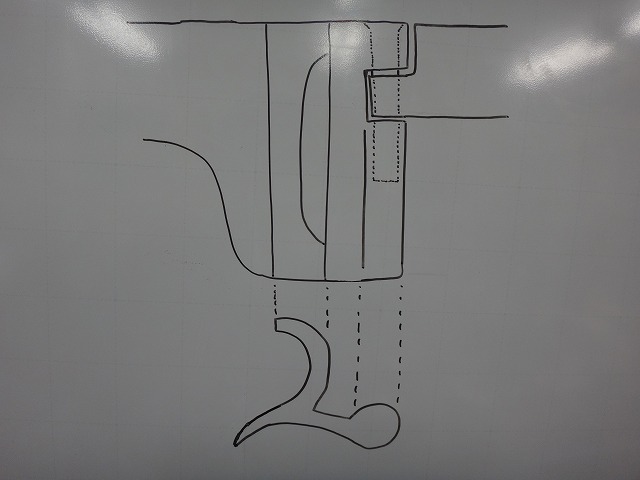
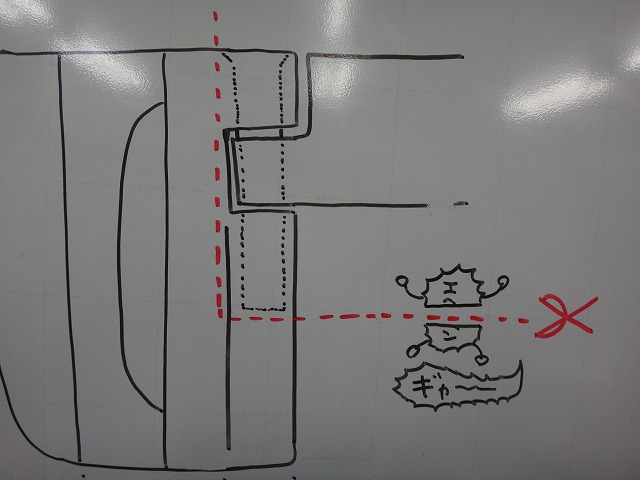
In diagram form, it looks like this.
Whether the hinge pin length (depth of pin hole) is short enough was basically a gamble.
By the way, I make the new bracket before removing the original one from the frame.

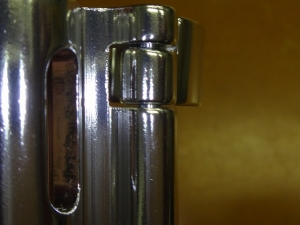
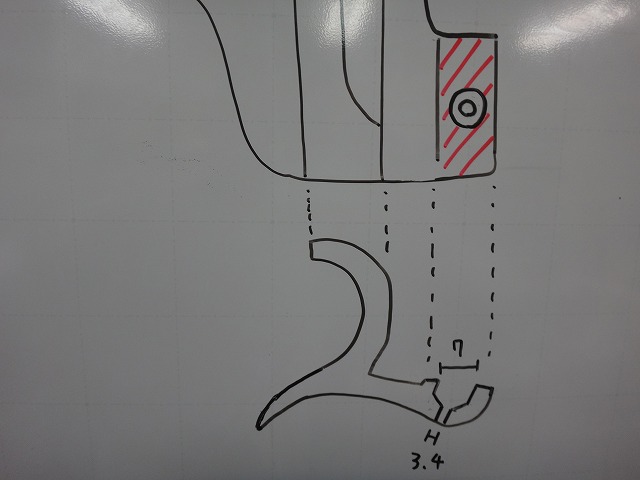
I cut here.
Next, I flatten this part by grinding it down.
I'll be driving a rivet through here, and the hollow space from the hinge hole would've been a problem.

The rivet diameter is 3.2mm, and I drill a 3.4mm pilot hole.
I also countersink about 7mm (the rivet head diameter) so the rivet head sits flush.
With thick material like this, you have to do this or the rivet won't grip the frame properly.
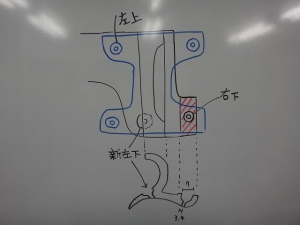
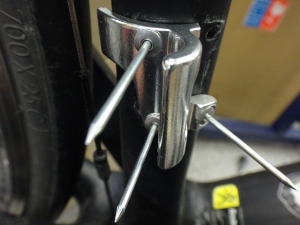
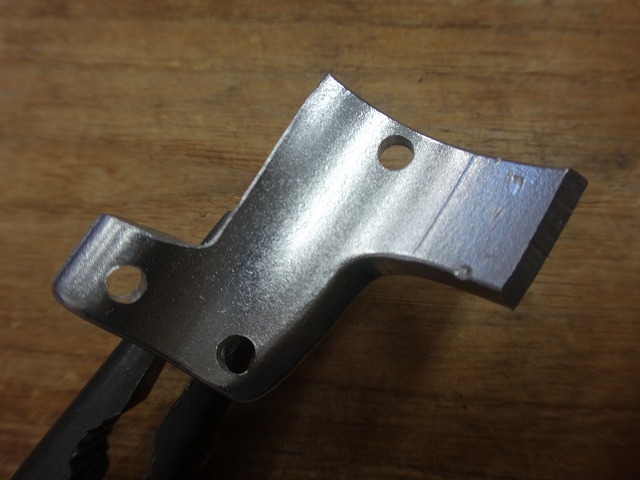
I've marked the hole positions from the original bracket.
The bottom-right hole will be in the same position on the new bracket.
The top-left hole will also be reused in the new bracket.
Unfortunately the top-right hole can't be used.
The bottom-left hole can't be used because of the new bracket's shape, but I still need a rivet there, so I'm adding a new hole slightly to the right.
↑Top-left and new bottom-left
↑Bottom-right

↑View from the back
↑It looks like this.
The top-right and old bottom-left can't be used due to the bracket shape.
I'm glossing over some details, but contouring the bracket to fit the frame was pretty difficult.
Since I set the bracket position using the bottom-right as a reference,
the derailleur mounting hole ended up here.
For a 50-53T chainring, there's absolutely no problem.

With the derailleur clamped down, the reverse tooth clearance from earlier has improved to just a somewhat severe tooth clearance.

This is out of order chronologically, but I'll mention it now.
The dust from the whirrrr scattered everywhere, so
I washed the bike.
With the rear derailleur in the lowest gear,
there's a gap between the inner plate and the chain.
It's because the low-side adjustment bolt is sticking way out and not making contact...wait?
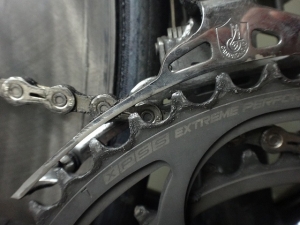
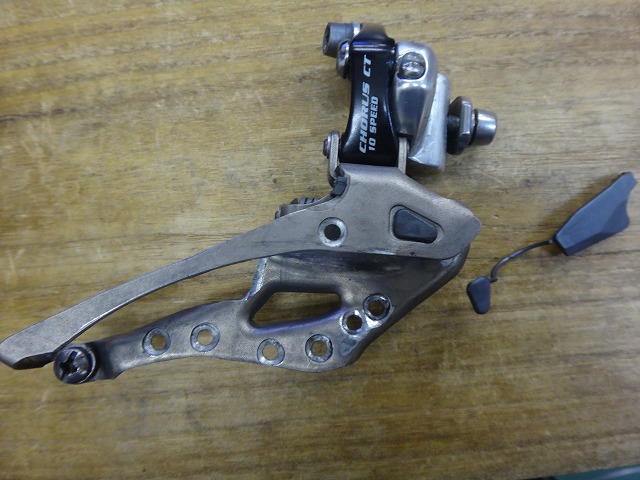
"A plate that reduces cage wear during shifts to the outer ring while also preventing chain rattle noise during inner×low"
...is somehow missing.
How does this fall off? It's always like this. Come on.
By the way, this part's service name is "skip plate" (or chain guide plate).
It's not on electric front derailleurs, so the main purpose probably isn't reducing wear during shifts to the outer ring, but rather eliminating rattle noise when trim adjustment is insufficient.
(Electric components auto-trim, so they don't need it.)
On inner×low when the derailleur hasn't fully dropped, if there's no skip plate, you get a chattering noise. With the skip plate, the noise is mostly gone.
That said, the noise is suppressed but contact is still happening.
It's a failsafe for people who can't operate trim properly.
Also, internal routing is extremely common on frames these days. When a cable liner runs through the downtube, if resistance builds up between the inner wire and liner, the derailleur won't return fully even after operating the lever.
It's actually possible for the derailleur to move a bit more when you push it by hand after seemingly fully dropping to the inner ring.
Additionally, the coating peeling off 9000-series shift cables and jamming in the liner increases downtube resistance. For frames with liner-style internal routing, it's actually better long-term not to use coated cables
(because 9000 inners are causing 9000 derailleur malfunction)
—I can make this claim with confidence based on many real examples.
Since this repair is urgent, I'm borrowing a skip plate from one of my spare derailleurs.
But I hesitated to snap it into this filthy mounting point, so
I washed the derailleur before installing the plate.
But...
Too late!

Yura no Suke!
The skip plate obviously did a lot of work—it proved itself by showing considerable wear.
If this much wear came from repeated outer-ring shifts, electric derailleurs would need skip plates too. But I suspect this wear came from neglected chain rattle during insufficient trim operation.
To be fair, before the mounting bracket cracked, the derailleur's rear end was fixed in an outward position. So regardless of trim operation, this area would've been prone to contact, and maybe that's why such extreme screw adjustment was necessary.
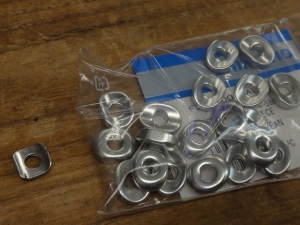
Also, the front derailleur mounting washer (that's the proper service part name)
—you shouldn't use or often can't use the 9000-series OEM version.
This time I deliberately switched to the older style with greater vertical height and larger contact area.
Front

Back
↑Whoever designed this was an idiot
Sure, feather-weight savings are great, but try mounting this on a carbon direct-mount bracket and it'll dig in and become unusable. Some frame makers provide dedicated washers for their carbon direct-mount brackets, but not all of them.
The bracket failure in this case may have involved over-tightening, but I can't rule out that this washer was a contributing factor.

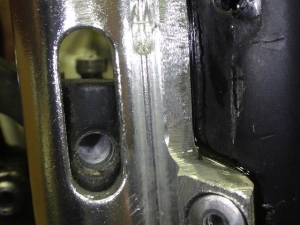
The slot on the front derailleur direct-mount bracket—you only need it wide enough for an M5 bolt to pass through, yet some have slots much wider than necessary.
In some cases, the washer corners can dig into the slot.
↑This is a separate case, but the slot is extremely wide, and the frame didn't come with a wide washer, so I sourced a wider one.
Since the derailleur positioning requires adjusting left-right alignment with the chainring, maybe an M5-tight slot would be problematic. But this is still too wide.
In this case too, after aligning straight with the chainring, the derailleur angle got skewed, so the washer-to-bracket contact differs left and right. The contact on the frame side is quite shallow, but even an old Shimano OEM washer didn't work.
Why do I keep the older ones on hand? Well, I don't always avoid the new washers.
Done.

Compared to earlier, the tooth clearance is even better corrected now.
That's because I adjusted the derailleur itself.
The FD-7900 had extremely rigid cage plates and wouldn't allow tooth clearance correction, but the FD-9000 is softer than the 7900 and does allow correction.
Comparing just the response during tooth clearance correction, the FD-9000 is actually softer than the FD-7900.

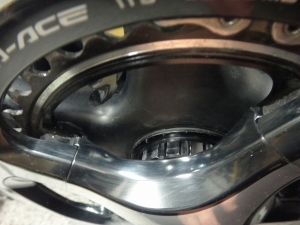
Okay, now let me show you the ultimate tooth clearance correction!
My personal bike.
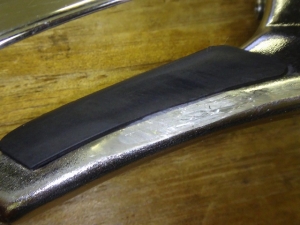
I ground away parts that don't contact during shifting—that was my philosophy.
Of course, overall cage rigidity suffered.
If you shift aggressively, it should break easily, but fortunately it hasn't.
This shifts extremely smoothly, though you can't tell from the photos.
Originally, there's a polymer part on the outer plate that acts as a "skip plate for inner shifts," but I intentionally removed it.


After Campagnolo started including this polymer, they later carbonized the outer cage plate.
(Some irrelevant images are mixed in, but ignore them.)
Thanks to the polymer, the outer carbon cage avoids direct contact with the chain during inner shifts.
But on the latest Campagnolo derailleurs with carbon outer plates, there's no polymer.
According to someone who knows Campagnolo better than anyone in Japan, they decided the polymer wasn't necessary. That's why it's gone.
This applies to SuperRecord EPS, SuperRecord, and Record—three models. The Record EPS has an aluminum outer plate with polymer instead.

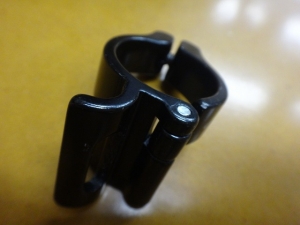
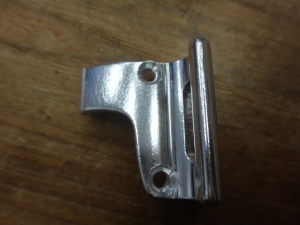
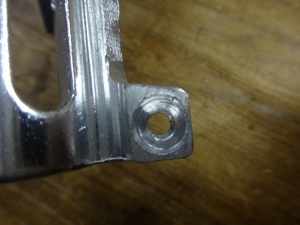
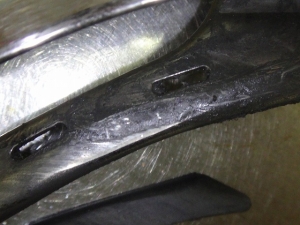
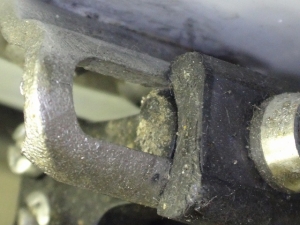
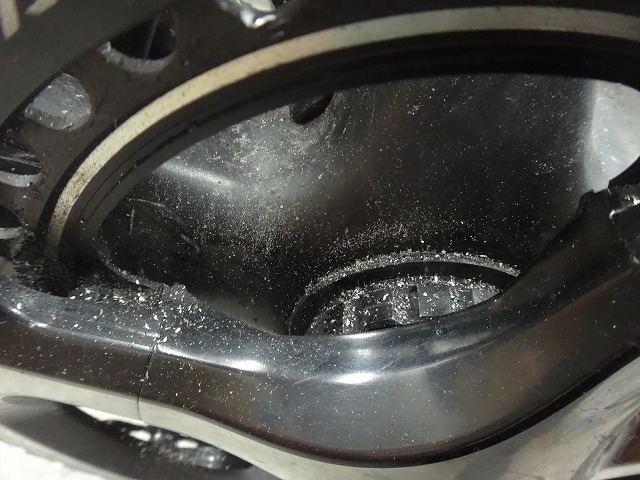
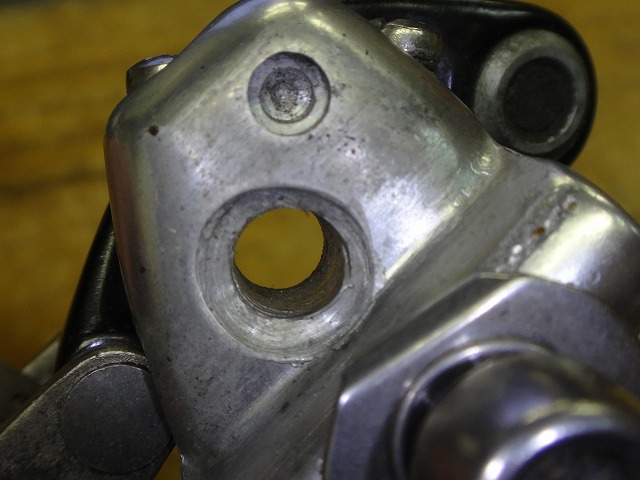
↑Original bracket
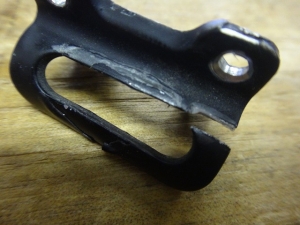
Even pressing it hard with your fingers to close the crack, you can't seal the gap completely.
And in this state, it's rock solid.

A customer (probably) brought me a Ridley Helium to work on.
The issue was "the front derailleur mounting bracket is broken."
...I didn't quite understand what they meant, but they brought it in anyway.
This person's bike has issues like tires installed backwards—which is actually the least of the problems. The chain is flipped, the rear derailleur pulleys are intentionally installed upside down (or so it seems), the outer chainring cage is too long, brake shoe height is misaligned... there are so many things to complain about.
Their regular shop does bicycle work as a side gig, so the work is clearly sloppy, and it's honestly impossible to tell whether the poor adjustments are amateur mistakes or the shop's handiwork.
But anyway, never mind the complaints...
There's a condition called "reverse tooth clearance" happening here.
The distance between the front tip of the derailleur cage and the outer chainring teeth is unusually large.
The opposite phenomenon is common on modern frames with steeper seat angles, but reverse tooth clearance doesn't normally occur.

The low-side adjustment screw is sticking out way too far.
When it protrudes this much, the screw tip isn't actually pushing the derailleur, so it's essentially like the screw isn't there at all.
And this time's problem:
The front derailleur mounting bracket really was cracked.
They wanted me to fix it somehow.

Whirrrr.
I knocked off the rivet head and removed the mounting bracket.
The adhesive was holding pretty well, so it took some effort to get it off.
You might think I should've consulted with the Ridley distributor before doing this sort of thing.
Actually, this frame did come through an official distributor, not some overseas online shop.
But there are circumstances that make that impossible. I can't write about them though.
For the new mounting bracket I'm going to install here, I'll machine one from a front derailleur mounting clamp band.
But there are conditions for that too:

↑This type won't work. Actually, it's impossible.
There's no space in front of the derailleur to rivet.

The mounting holes for the front derailleur aren't slots, so you can't adjust the position. That's another reason why it won't work.
Plus, because of the weight-saving cutouts on the band, you can't drill rivet holes there either.


Token makes a band that satisfies all these conditions.
The reason it's 28.6mm is because after cutting off the hinge, this diameter fits best with the non-circular shape of the seat tube.
However, the black anodized version shows machining marks, so

I'm using a color variant of the same part from Yoshigai (※).
※: ○Yoshi-gai (Yoshigai) ×Kichi-gai (a homophone to avoid)


↑This is how it looks, but
In diagram form, it looks like this.
Whether the hinge pin length (depth of pin hole) is short enough was basically a gamble.
By the way, I make the new bracket before removing the original one from the frame.
I cut here.

Next, I flatten this part by grinding it down.
I'll be driving a rivet through here, and the hollow space from the hinge hole would've been a problem.
The rivet diameter is 3.2mm, and I drill a 3.4mm pilot hole.
I also countersink about 7mm (the rivet head diameter) so the rivet head sits flush.
With thick material like this, you have to do this or the rivet won't grip the frame properly.
I've marked the hole positions from the original bracket.
The bottom-right hole will be in the same position on the new bracket.
The top-left hole will also be reused in the new bracket.
Unfortunately the top-right hole can't be used.
The bottom-left hole can't be used because of the new bracket's shape, but I still need a rivet there, so I'm adding a new hole slightly to the right.

↑Top-left and new bottom-left

↑Bottom-right
↑View from the back

↑It looks like this.
The top-right and old bottom-left can't be used due to the bracket shape.
I'm glossing over some details, but contouring the bracket to fit the frame was pretty difficult.

Since I set the bracket position using the bottom-right as a reference,
the derailleur mounting hole ended up here.
For a 50-53T chainring, there's absolutely no problem.

With the derailleur clamped down, the reverse tooth clearance from earlier has improved to just a somewhat severe tooth clearance.
This is out of order chronologically, but I'll mention it now.
The dust from the whirrrr scattered everywhere, so

I washed the bike.
With the rear derailleur in the lowest gear,
there's a gap between the inner plate and the chain.
It's because the low-side adjustment bolt is sticking way out and not making contact...wait?
"A plate that reduces cage wear during shifts to the outer ring while also preventing chain rattle noise during inner×low"
...is somehow missing.
How does this fall off? It's always like this. Come on.
By the way, this part's service name is "skip plate" (or chain guide plate).
It's not on electric front derailleurs, so the main purpose probably isn't reducing wear during shifts to the outer ring, but rather eliminating rattle noise when trim adjustment is insufficient.
(Electric components auto-trim, so they don't need it.)
On inner×low when the derailleur hasn't fully dropped, if there's no skip plate, you get a chattering noise. With the skip plate, the noise is mostly gone.
That said, the noise is suppressed but contact is still happening.
It's a failsafe for people who can't operate trim properly.
Also, internal routing is extremely common on frames these days. When a cable liner runs through the downtube, if resistance builds up between the inner wire and liner, the derailleur won't return fully even after operating the lever.
It's actually possible for the derailleur to move a bit more when you push it by hand after seemingly fully dropping to the inner ring.
Additionally, the coating peeling off 9000-series shift cables and jamming in the liner increases downtube resistance. For frames with liner-style internal routing, it's actually better long-term not to use coated cables
(because 9000 inners are causing 9000 derailleur malfunction)
—I can make this claim with confidence based on many real examples.

Since this repair is urgent, I'm borrowing a skip plate from one of my spare derailleurs.

But I hesitated to snap it into this filthy mounting point, so

I washed the derailleur before installing the plate.
But...

Too late!

Yura no Suke!
The skip plate obviously did a lot of work—it proved itself by showing considerable wear.
If this much wear came from repeated outer-ring shifts, electric derailleurs would need skip plates too. But I suspect this wear came from neglected chain rattle during insufficient trim operation.
To be fair, before the mounting bracket cracked, the derailleur's rear end was fixed in an outward position. So regardless of trim operation, this area would've been prone to contact, and maybe that's why such extreme screw adjustment was necessary.
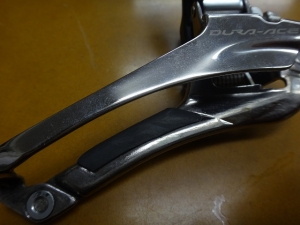
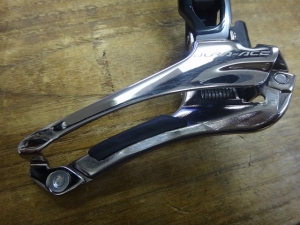
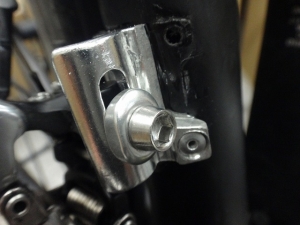
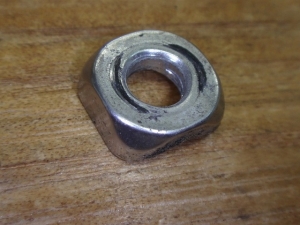
Also, the front derailleur mounting washer (that's the proper service part name)
—you shouldn't use or often can't use the 9000-series OEM version.
This time I deliberately switched to the older style with greater vertical height and larger contact area.

Front

Back
Sure, feather-weight savings are great, but try mounting this on a carbon direct-mount bracket and it'll dig in and become unusable. Some frame makers provide dedicated washers for their carbon direct-mount brackets, but not all of them.
The bracket failure in this case may have involved over-tightening, but I can't rule out that this washer was a contributing factor.
The slot on the front derailleur direct-mount bracket—you only need it wide enough for an M5 bolt to pass through, yet some have slots much wider than necessary.
In some cases, the washer corners can dig into the slot.

↑This is a separate case, but the slot is extremely wide, and the frame didn't come with a wide washer, so I sourced a wider one.
Since the derailleur positioning requires adjusting left-right alignment with the chainring, maybe an M5-tight slot would be problematic. But this is still too wide.
In this case too, after aligning straight with the chainring, the derailleur angle got skewed, so the washer-to-bracket contact differs left and right. The contact on the frame side is quite shallow, but even an old Shimano OEM washer didn't work.

Why do I keep the older ones on hand? Well, I don't always avoid the new washers.

Done.
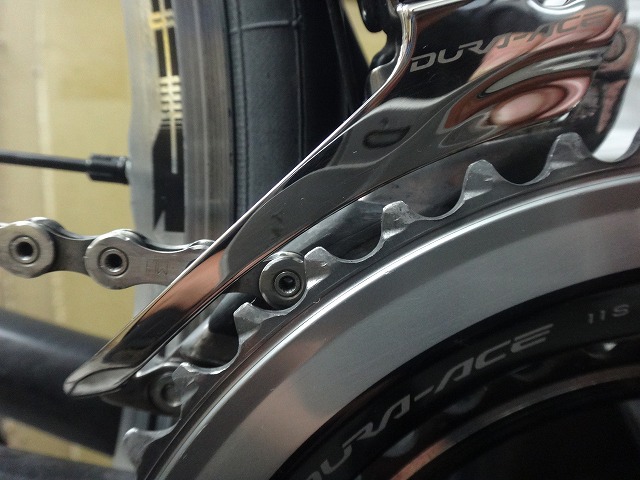
Compared to earlier, the tooth clearance is even better corrected now.
That's because I adjusted the derailleur itself.
The FD-7900 had extremely rigid cage plates and wouldn't allow tooth clearance correction, but the FD-9000 is softer than the 7900 and does allow correction.
Comparing just the response during tooth clearance correction, the FD-9000 is actually softer than the FD-7900.
Okay, now let me show you the ultimate tooth clearance correction!

My personal bike.
I ground away parts that don't contact during shifting—that was my philosophy.
Of course, overall cage rigidity suffered.
If you shift aggressively, it should break easily, but fortunately it hasn't.
This shifts extremely smoothly, though you can't tell from the photos.
Originally, there's a polymer part on the outer plate that acts as a "skip plate for inner shifts," but I intentionally removed it.

After Campagnolo started including this polymer, they later carbonized the outer cage plate.
(Some irrelevant images are mixed in, but ignore them.)
Thanks to the polymer, the outer carbon cage avoids direct contact with the chain during inner shifts.
But on the latest Campagnolo derailleurs with carbon outer plates, there's no polymer.
According to someone who knows Campagnolo better than anyone in Japan, they decided the polymer wasn't necessary. That's why it's gone.
This applies to SuperRecord EPS, SuperRecord, and Record—three models. The Record EPS has an aluminum outer plate with polymer instead.
↑Original bracket

Even pressing it hard with your fingers to close the crack, you can't seal the gap completely.
And in this state, it's rock solid.