Before getting to the main topic.
Campagnolo's Ergopower levers can be broadly divided into 3 generations based on bracket shape, but
since EPS from the second generation onward calls them V2 (Version Two) and V3,
I'll follow that convention and call the Ergopower generations V1, V2, and V3 in this article.
The current model is V3, but strictly speaking it's the late-model V3 (2015 onwards)
and the bracket shape and compatible lever pad part numbers differ from the early model.
I was using an early-model V3 Athena lever, but it developed problems, so
I'm now using an aftermarket conversion of a V2 Mirage 9-speed lever to 11-speed (here).
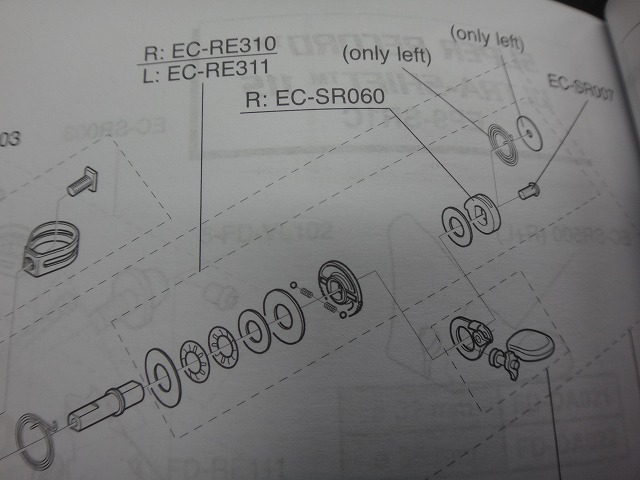
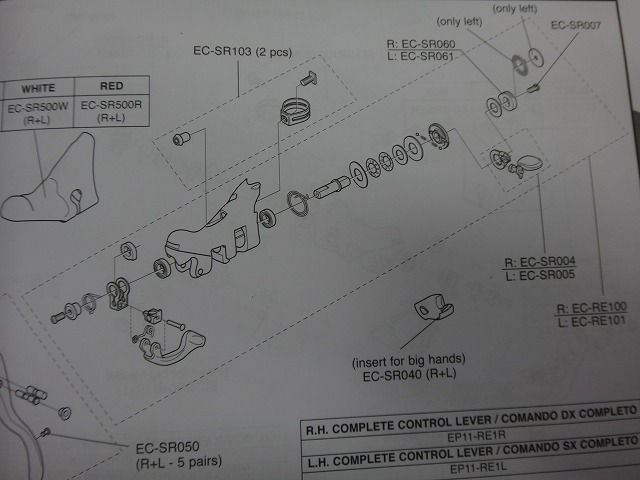
Back when V2 levers were current, nearly all the fine internal parts of Ergopower
were available as spare parts (down to individual springs),
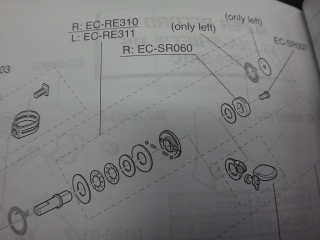
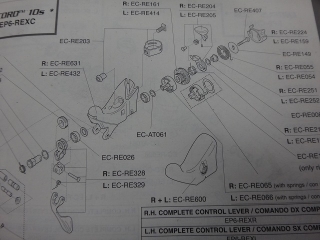
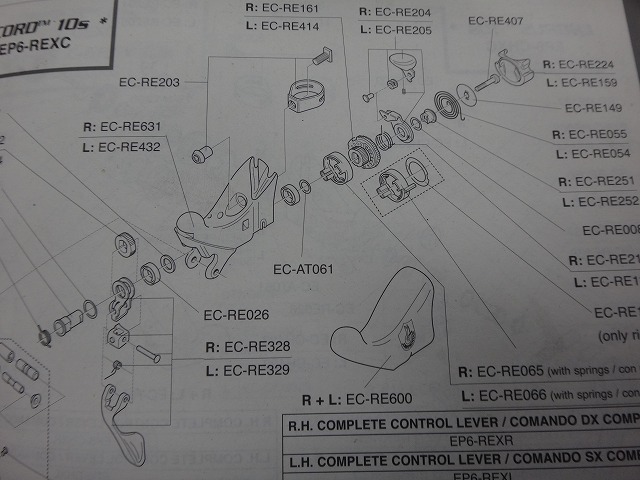
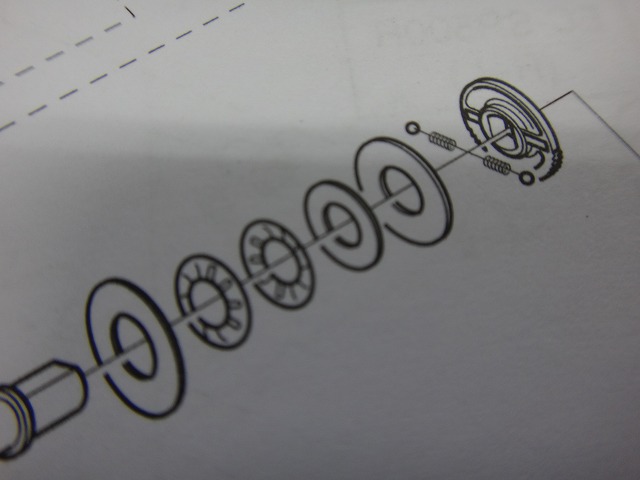
and while early-model V3 also initially had internal parts available in reasonably organized units
(the EC-RE310/311 in the image above),

eventually they started selling only as a complete assembled unit with parts pre-assembled into the bracket
(the EC-RE100/101 in the image above).
For the current late-model V3, the sales format is still just the bracket assembly,
but they've also stopped including exploded diagrams in the spare parts list.
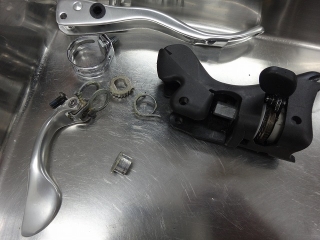
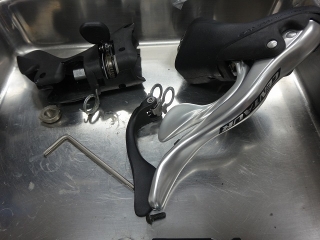
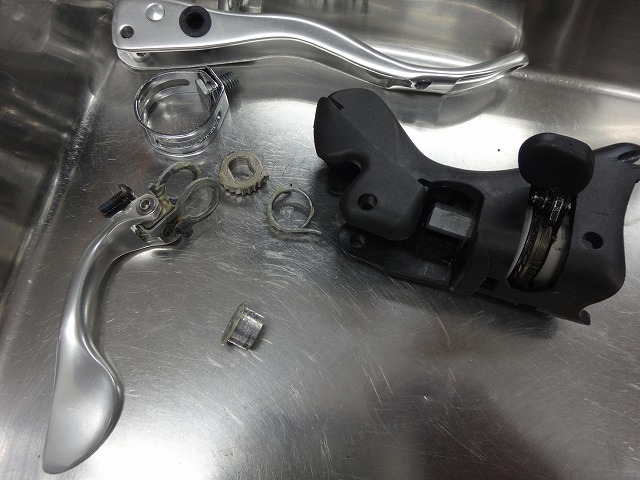
This is the complete set of parts "other than the bracket assembly" from my early-model V3 Athena (left side).
The brake lever, brake lever fixing pin, bracket cover,
and all parts except the handlebar clamp band and nut become the EC-RE101, so
buying that would let me restore everything to working condition, but
for some reason the EC-RE101 I ordered for my own use
has needed to be used twice recently,
and I used it just the other day for a broken left Ergopower on a Chorus.
When am I ever going to get mine fixed.
As for that Chorus Ergopower,
I disassembled it, identified what was wrong,
and reassembled it so it functioned again, but
at the customer's request I replaced it with a new bracket assembly.
Even if I wanted to repair it, since screws and springs aren't sold individually,
I can't do a simple replacement of just the broken part.
Also, the parts that break (or wear out and fail) are usually the same ones, so
keeping a broken Ergopower around as a source of spare parts doesn't make much sense.
But that's a separate matter from my main topic here,
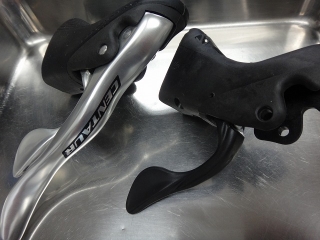
A customer left me an early-model V3 Centaur 10-speed right lever and
an EC-RE100 bracket assembly for an early-model V3 11-speed.
The brake lever would fit, so I could transplant the Centaur's aluminum brake lever
to the EC-RE100 and quickly create something like a "Centaur 11-speed lever."
But the customer's request was also to swap out the aluminum shift lever
behind the brake lever for the one from the EC-RE100.
Not trying to nitpick (here) (here),
but in the customer's letter it said
"please also swap the shift-up lever," but
in Campagnolo's case, this is the shift-down lever.
Because "shifting to an easier gear is shift-down" for them.
That said, even I had to look it up just now before writing this,
so it's true that it's confusing and hard to tell which is which.
If someone yells at you mid-climb "shift down there!"
you can't instantly tell if they mean
"the gradient's getting steeper, so naturally go to an easier gear"
or "this is the attack point, so push a harder gear."
In those cases, you might as well just say "easier gear!" and be done with it.

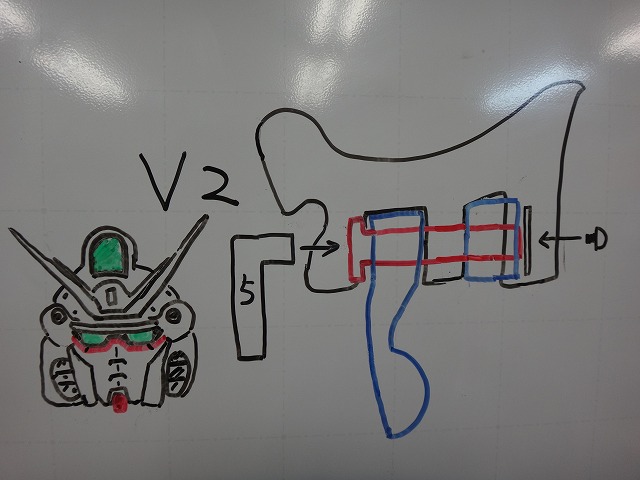
With V2 levers, the flange of the main shaft that all the parts attach to is at the front end,
and you disassemble and secure it with a 5mm Allen key and a 3mm Allen key (or Torx T15).
I've marked the front set of parts and rear set of parts in blue,
but to swap out the front set, you have to pull the main shaft out of the bracket,
which inevitably means the rear set falls apart.
(I) can quickly reassemble V2 levers without an exploded diagram, so
it's not a problem.
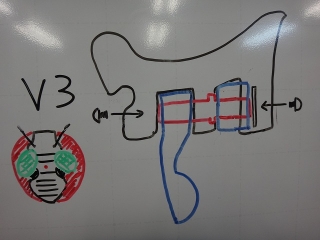
With V3, the flange of the main shaft moved to the center of the bracket,
and you attach each set of parts from the front and rear respectively,
fixing them to the main shaft with a 3mm Allen key bolt (or Torx T15).
In other words, with V3 you can swap out the front set of parts without disassembling the rear.
The V3 rear set of parts are
harder to assemble than V2, at least in my opinion—hooking the return spring properly is trickier—
so I'd rather not disassemble them if I can help it.

I removed the front set from the 10-speed Centaur.
The return spring in the shift... wait, which one was it again—
the shift-down lever return spring, it's a part that breaks frequently, yet
it's not available as an individual item.
We've had two instances this past year where a single broken spring meant replacing the entire bracket assembly.
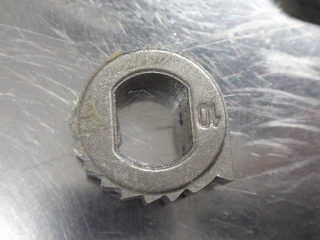
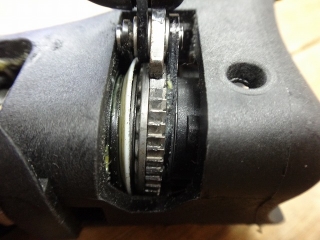
This is the 10-speed part in the shift-down lever.
The "10" indicates 10-speed.
In V2 levers, this part has the same gear cut on both sides at 180° phase offset,
so since one side goes unused, you could flip it when disassembling and get a fresh side,
but in V3 levers it has gears only on one side.
Used Ergopower levers lose their ratcheting feel and sound over time, but
wear on this part isn't the cause of that, so
having gears on both sides wouldn't really be that useful anyway.

The same part in 11-speed.
I've reassembled it.
Both the brake lever and the shift-down lever are now aluminum 11-speed Centaur Ergopower levers.
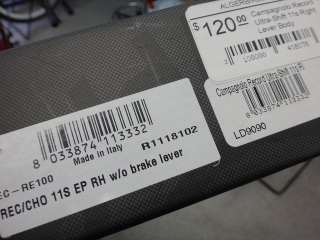
By the way, the EC-RE100/101 (same price)
had a 2018 retail price of ¥12,021 including tax, and ¥11,274 in 2017 before a price hike.
Since it's such a commonly used part, even the parts dealer most knowledgeable about Campagnolo in Japan
usually keeps it in stock for immediate delivery.
A parts dealer called today with news of some rims I ordered,
and since they had EC-RE101 in stock, I went ahead and ordered one for myself too while I had them on the line.
I'm not saying the $120 price on overseas retailers seems a bit high, just for the record.
Bonus
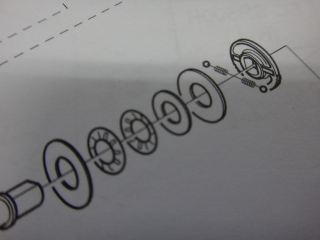
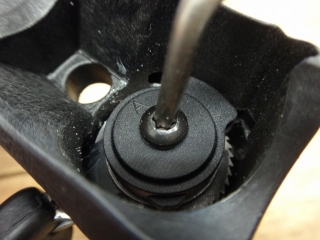
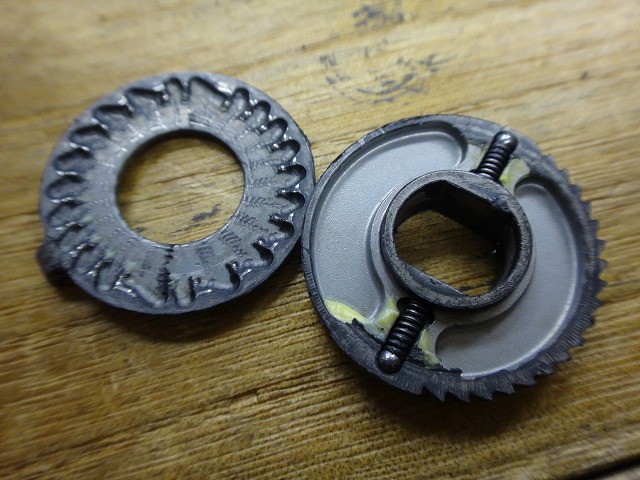
The ratchet mechanism in V3 uses
a steel ball pressed by a spring fitted in a slot that
engages with the grooves in a gear-shaped part to create the ratchet action.
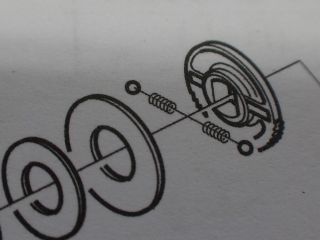
↑This one
The exploded diagram shows this, but
in reality it's not quite like the diagram—
like W levers' indexing or Suntour's Command Shifter,
the ball engages in a half-hole drilled in a plate to create the ratchet action—
or so I mentioned to the person at the parts dealer most knowledgeable about Campagnolo in Japan,
but that person said
that's not the case.

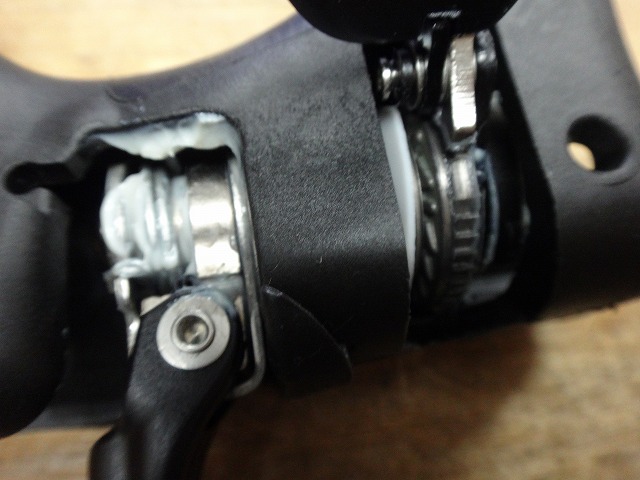
An EC-RE100 that became junk because the
shift-down lever's return spring broke.
The internal rear parts of the V3 Ergopower have
a bowl-shaped washer that serves as a spring being compressed under tension,
and when this fixing bolt loosens, that tension is released,
resulting in abnormal operation, according to reports.

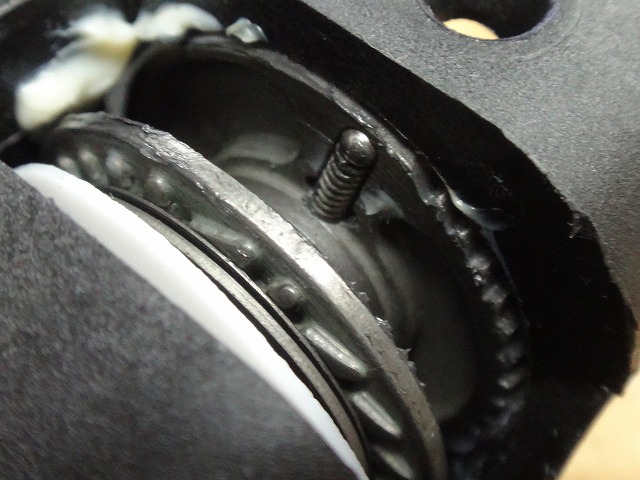
I disassembled it.
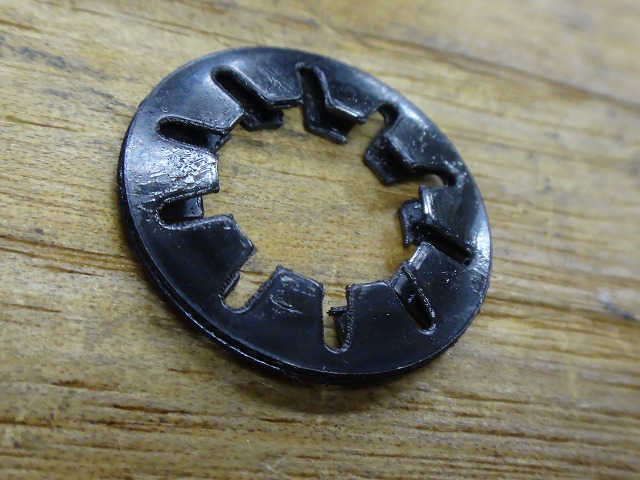
This bowl washer is shown as 2 in the exploded diagram, but the actual unit sometimes has 3,
which seems to be individually adjusted and installed during factory assembly.
Also, though I've never seen it myself,
apparently the white plastic washer at the very back sometimes comes with 2 instead.
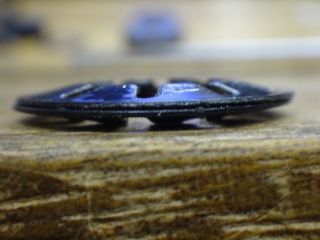

↑Bowl washers
Even in the old W levers before indexing,
washers with this same shape were used for the same purpose.

The ratchet part matches what's shown in the exploded diagram.

Let me check my own EC-RE100 as well.

Same as the diagram here too.
At this point I realized that the only time I'd seen a ratchet structure different from the diagram
was the EC-RE101, which is the left lever.
The spare parts catalog's exploded diagram only shows the right lever—the left lever isn't included.
Probably because it's not a part that's meant to be disassembled, so they didn't think detailed documentation was necessary.
I should have my personal Athena's EC-RE101 for repairs arrive soon,
so I'll look into that while I'm at it.
Campagnolo's Ergopower levers can be broadly divided into 3 generations based on bracket shape, but
since EPS from the second generation onward calls them V2 (Version Two) and V3,
I'll follow that convention and call the Ergopower generations V1, V2, and V3 in this article.
The current model is V3, but strictly speaking it's the late-model V3 (2015 onwards)
and the bracket shape and compatible lever pad part numbers differ from the early model.
I was using an early-model V3 Athena lever, but it developed problems, so
I'm now using an aftermarket conversion of a V2 Mirage 9-speed lever to 11-speed (here).
Back when V2 levers were current, nearly all the fine internal parts of Ergopower
were available as spare parts (down to individual springs),
and while early-model V3 also initially had internal parts available in reasonably organized units
(the EC-RE310/311 in the image above),
eventually they started selling only as a complete assembled unit with parts pre-assembled into the bracket
(the EC-RE100/101 in the image above).

For the current late-model V3, the sales format is still just the bracket assembly,
but they've also stopped including exploded diagrams in the spare parts list.

This is the complete set of parts "other than the bracket assembly" from my early-model V3 Athena (left side).
The brake lever, brake lever fixing pin, bracket cover,
and all parts except the handlebar clamp band and nut become the EC-RE101, so
buying that would let me restore everything to working condition, but
for some reason the EC-RE101 I ordered for my own use
has needed to be used twice recently,
and I used it just the other day for a broken left Ergopower on a Chorus.
As for that Chorus Ergopower,
I disassembled it, identified what was wrong,
and reassembled it so it functioned again, but
at the customer's request I replaced it with a new bracket assembly.
Even if I wanted to repair it, since screws and springs aren't sold individually,
I can't do a simple replacement of just the broken part.
Also, the parts that break (or wear out and fail) are usually the same ones, so
keeping a broken Ergopower around as a source of spare parts doesn't make much sense.
But that's a separate matter from my main topic here,

A customer left me an early-model V3 Centaur 10-speed right lever and
an EC-RE100 bracket assembly for an early-model V3 11-speed.
The brake lever would fit, so I could transplant the Centaur's aluminum brake lever
to the EC-RE100 and quickly create something like a "Centaur 11-speed lever."
But the customer's request was also to swap out the aluminum shift lever
behind the brake lever for the one from the EC-RE100.
Not trying to nitpick (here) (here),
but in the customer's letter it said
"please also swap the shift-up lever," but
in Campagnolo's case, this is the shift-down lever.
Because "shifting to an easier gear is shift-down" for them.
That said, even I had to look it up just now before writing this,
so it's true that it's confusing and hard to tell which is which.
If someone yells at you mid-climb "shift down there!"
you can't instantly tell if they mean
"the gradient's getting steeper, so naturally go to an easier gear"
or "this is the attack point, so push a harder gear."
In those cases, you might as well just say "easier gear!" and be done with it.
With V2 levers, the flange of the main shaft that all the parts attach to is at the front end,
and you disassemble and secure it with a 5mm Allen key and a 3mm Allen key (or Torx T15).
I've marked the front set of parts and rear set of parts in blue,
but to swap out the front set, you have to pull the main shaft out of the bracket,
which inevitably means the rear set falls apart.
(I) can quickly reassemble V2 levers without an exploded diagram, so
it's not a problem.

With V3, the flange of the main shaft moved to the center of the bracket,
and you attach each set of parts from the front and rear respectively,
fixing them to the main shaft with a 3mm Allen key bolt (or Torx T15).
In other words, with V3 you can swap out the front set of parts without disassembling the rear.
The V3 rear set of parts are
harder to assemble than V2, at least in my opinion—hooking the return spring properly is trickier—
so I'd rather not disassemble them if I can help it.
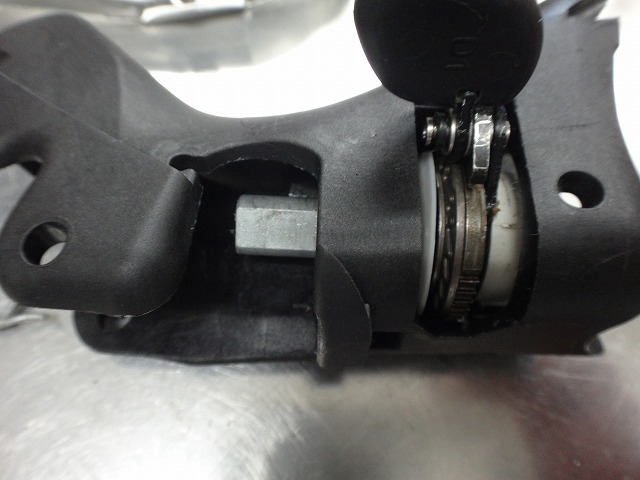
I removed the front set from the 10-speed Centaur.
The return spring in the shift... wait, which one was it again—
the shift-down lever return spring, it's a part that breaks frequently, yet
it's not available as an individual item.
We've had two instances this past year where a single broken spring meant replacing the entire bracket assembly.
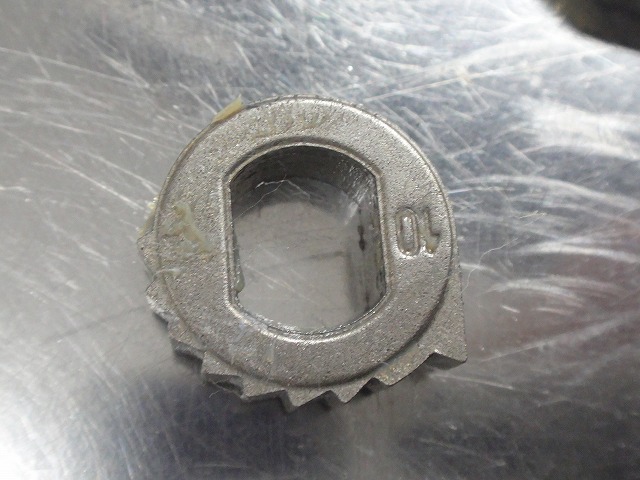
This is the 10-speed part in the shift-down lever.
The "10" indicates 10-speed.
In V2 levers, this part has the same gear cut on both sides at 180° phase offset,
so since one side goes unused, you could flip it when disassembling and get a fresh side,
but in V3 levers it has gears only on one side.
Used Ergopower levers lose their ratcheting feel and sound over time, but
wear on this part isn't the cause of that, so
having gears on both sides wouldn't really be that useful anyway.

The same part in 11-speed.
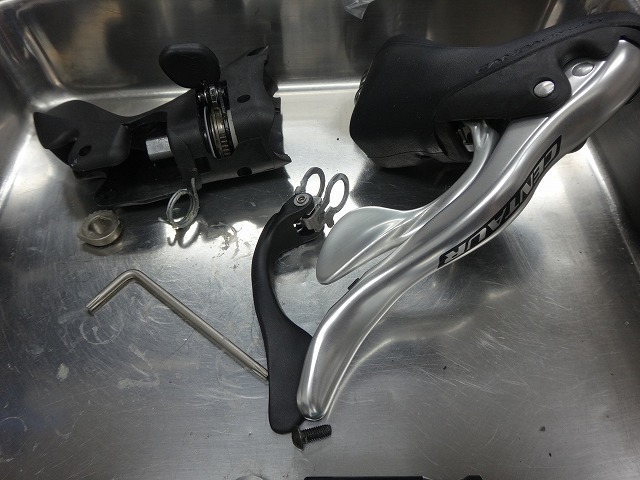
I've reassembled it.
Both the brake lever and the shift-down lever are now aluminum 11-speed Centaur Ergopower levers.
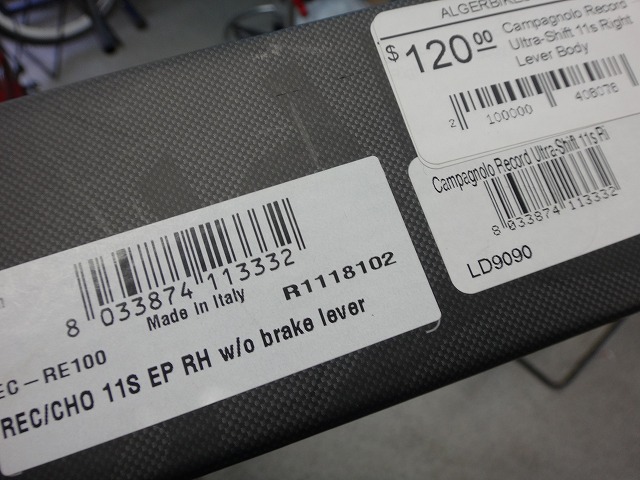
By the way, the EC-RE100/101 (same price)
had a 2018 retail price of ¥12,021 including tax, and ¥11,274 in 2017 before a price hike.
Since it's such a commonly used part, even the parts dealer most knowledgeable about Campagnolo in Japan
usually keeps it in stock for immediate delivery.
A parts dealer called today with news of some rims I ordered,
and since they had EC-RE101 in stock, I went ahead and ordered one for myself too while I had them on the line.
I'm not saying the $120 price on overseas retailers seems a bit high, just for the record.
Bonus
The ratchet mechanism in V3 uses
a steel ball pressed by a spring fitted in a slot that
engages with the grooves in a gear-shaped part to create the ratchet action.
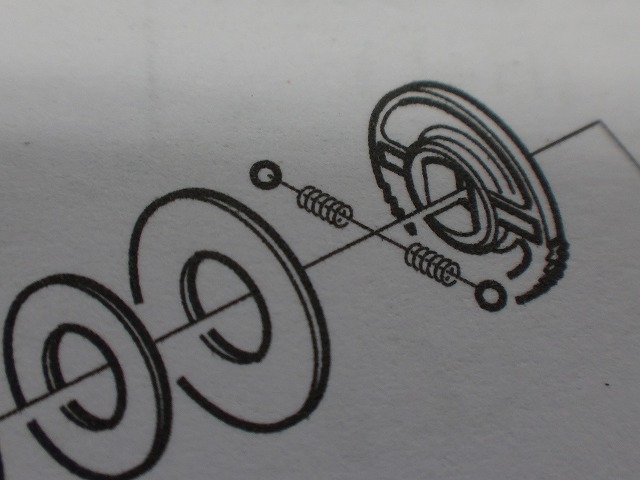
↑This one
The exploded diagram shows this, but
in reality it's not quite like the diagram—
like W levers' indexing or Suntour's Command Shifter,
the ball engages in a half-hole drilled in a plate to create the ratchet action—
or so I mentioned to the person at the parts dealer most knowledgeable about Campagnolo in Japan,
but that person said
that's not the case.

An EC-RE100 that became junk because the
shift-down lever's return spring broke.

The internal rear parts of the V3 Ergopower have
a bowl-shaped washer that serves as a spring being compressed under tension,

and when this fixing bolt loosens, that tension is released,
resulting in abnormal operation, according to reports.
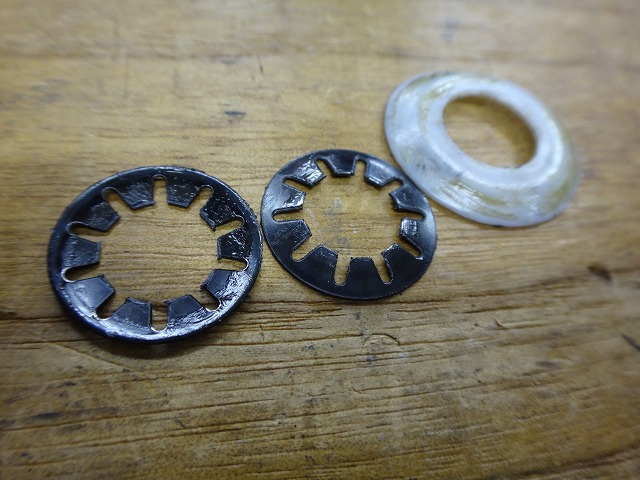
I disassembled it.
This bowl washer is shown as 2 in the exploded diagram, but the actual unit sometimes has 3,
which seems to be individually adjusted and installed during factory assembly.
Also, though I've never seen it myself,
apparently the white plastic washer at the very back sometimes comes with 2 instead.

↑Bowl washers
Even in the old W levers before indexing,
washers with this same shape were used for the same purpose.
The ratchet part matches what's shown in the exploded diagram.
Let me check my own EC-RE100 as well.
Same as the diagram here too.
At this point I realized that the only time I'd seen a ratchet structure different from the diagram
was the EC-RE101, which is the left lever.
The spare parts catalog's exploded diagram only shows the right lever—the left lever isn't included.
Probably because it's not a part that's meant to be disassembled, so they didn't think detailed documentation was necessary.
I should have my personal Athena's EC-RE101 for repairs arrive soon,
so I'll look into that while I'm at it.