The IRC S-Light got a slow puncture during this morning's training ride.

But first. This is a photo from the day I went for a ride right after putting on the tire that got the slow puncture today.
It was April 30th of this year.
That's exactly two months ago.
The location is the intersection in Ono-cho at the foot of Nabeya Pass.
It was already raining before I left home,
so I put on a rain jacket—or more like a waterproof wind breaker—on top,
and didn't mind my shoes getting wet, wearing waterproof socks instead,
and changed my racer pants to shorts.
I applied Wako's sunscreen to my exposed knees and shins.
It serves the role of a water-repellent protective coating
and won't come off unless you use cleansing oil
(it won't come off even with just rubbing with soap).
For me, Wako's sunscreen is used more often for this purpose than as actual sunscreen,
but doing this requires a temperature that won't chill your knees in the rain.
That day I judged it was right at the borderline temperature where this was possible,
so I didn't wear full-length rain pants.
Water-repellent legs plus shorts means no pedaling interference.
I intend to write an article about the POLAR's usability issues someday,
but the current VANTAGE V series doesn't allow you to select "temperature" as a display option.
The previous V800 series, and even older RS and S series could select it.
It's not that they don't collect temperature data—they record it in the background,
so you can check it afterwards when you transfer the ride data to your PC.
Being able to see the temperature in real-time is convenient because you can check while riding
things like "I'll need neoprene shoe covers at this temperature" or
"what temperature was it when I took off my arm warmers?"
Temperature gauges on roadside LED displays tend to show temperatures that are "conservative" compared to actual feel.
Since the temperature sensor is located away from the ground,
it probably doesn't pick up heat reflection from the ground.
In summer, the cycle computer shows a higher temperature,
and in winter, it seems like the cycle computer shows a lower temperature because it doesn't pick up the cold at ground level.
This is especially noticeable when it's particularly hot.
Right now, when I checked the temperature recorded at the time when the GPS track was at Ono-cho on April 30th, it was 16.3℃.
At this kind of temperature, there seems to be no upswings or downswings.
Today I had some business at my master's place,
so I left home at 4 AM to be able to stop by around 8-9 AM,
and I figured that going out of Osaka via Fukibuki Pass and back into Osaka via Kimi Pass would work out well timing and route-wise.

This is today's entrance to Fukibuki Pass on the Osaka side.
Though it's the "Osaka side entrance,"
we're already in Wakayama Prefecture just before the tunnel,
so it's Wakayama in terms of address.
Incidentally, the rest stop at the tunnel entrance is also in Wakayama Prefecture.
For some reason, I often see snails at this tunnel entrance.
I don't think it's always the same individual, but I always see just one.
It's the one in the upper part of the image above.

Up close, it looks like this.
Since it's defecating, I don't think it's dead,
but its body is withdrawn into its shell and it doesn't move.


This was July 30th last year.
I didn't take a photo the next day, but there was
what appeared to be the same snail
that had advanced about 10 meters toward the tunnel,
and I wondered if it would make it back alive.


This was June 1st this year.


I splashed water from my bottle on it.
No response.

I made a slight detour (about 200 meters round trip),
but this is the main gate of Kokawa Temple.

↑My mental map of the area.
There's Mt. Katsuragi between Nabeya Pass and Kimi Pass,
but I hardly go there so I left it out.
Between Fukibuki Pass and Nabeya Pass there's Inunaki Mountain (Ikeda Tunnel),
which I climb sometimes, but I forgot to write it in.
When you descend Fukibuki Pass, there's first a wide-area agricultural road, then below that the Kokawa-Kada Line,
and further down is Route 24,
but the Kokawa-Kada Line, which connects Kada to Kokawa and merges with Route 24,
has few cars and traffic lights and is easy to ride.
If you ride the agricultural road you hit the intersection at Miyuki-Tsuji South on Kimi Pass,
but the ups and downs are brutal so I pass on it.
After getting to Route 24, I ride a bit to the east,
but soon I cross the Kino River to the south and ride to the foot of Kimi Pass,
so I barely ride on Route 24.

↑Like this, I just go over it.
Incidentally, from Nabeya Pass you can climb Mt. Koya from Route 480
(or rather, Nabeya Pass itself is Route 480), and from Kimi Pass you can climb from Route 371
(or rather, Kimi Pass itself is Route 371).
From both, the routes merge at Yatate Tea House, and after that it's a single road.
So when crossing the Kino River on the Kokawa side,
at the bridge joint which forms a W-W-W-W-W pattern,
there's a place with a large gap, and I carelessly caused a pinch flat.
I think it was after that when a pretty slow puncture developed,
and midway up Kimi Pass on the way back I
topped up the air with a portable pump.
Just before that I could feel a slight pinch flat sensation even at small bumps.
From experience, when you notice a slow puncture and top up the air,
without bursting the sealant scab with internal pressure—
say, putting in about 4 bar—
the higher the pressure, the faster the air leaks, and
eventually it drops to about 2 bar, but
it often stabilizes at an "air pressure that barely leaks any further"
But this slow puncture seemed to keep leaking slowly through that threshold,
on and on.

Separate from the midway point on Kimi Pass I mentioned earlier,
I also topped up the air at the top of Kimi Pass.
I pressurized it to the point where my finger couldn't dent it,
but on the descent of Kimi Pass I was still getting that pinch flat feeling at bumps.

↑This is the sealant scab.
I remembered it as "next to the round wear indicator on the tire near the valve,"
but since there are three valves it's hard to find.
This slow puncture doesn't seem to be from scab burst,
but rather from a strong pinch flat that loosened the tire bead seal in one spot.
I chose Kimi Pass on the way back because it's the nearest pass to my master's workshop,
and when I borrowed a floor pump there and gambled by putting in 5 bar,
there was no sealant scab burst
(there was no cracking sound when the bead lifted either).
After chatting for about an hour, I left,
and when I checked before riding off, the air hadn't lost any pressure in the hour of sitting.
Then I passed in front of Brother Maintenance (→here)
and since Route 310 has a lot of traffic, I took the backroad one block inside,
the Koya Old Road (which merges with Route 310 in Sakai),
but on that route the scab burst
and shot out sealant with pssh-pssh-pssh! from the wound, but
keeping on riding, it sealed up quickly,
and it became just lower pressure than before the burst,
and the sealant did its job within a few wheel rotations—this happened 3 times.
When I got home, the air pressure was around 3 bar.
The slow puncture up to Kimi Pass wasn't from sealant scab burst.
After the bridge joint buckling,
there was an air leak without a lower limit, that's how it felt.
Probably it would have happened even if the sealant scab was completely absent.
On the way back from my master's place,
sealant scab burst occurred 3 times—something that didn't happen in the hour of static pressure at 5 bar—
but on that route I felt no pinch flat sensation whatsoever,
and I'm almost certain there was no ongoing air leak outside of scab burst times.
The reason air leaked before and after floor pump pressurization is different.
In the state after topping up air at Kimi Pass's summit,
the air probably would have kept leaking even sitting static,
but after pressurization with the floor pump,
unless the sealant scab opens from tire deformation under riding,
air doesn't escape—that's how it felt.
So when I got home and looked at the bike,

sealant had splattered on the back of the seat tube.

Even the Cateye light in a leather case hanging from the saddle got sealant on it.
The forecast was for rain that day, so I put my wallet and phone in a waterproof pack
and carried a waterproof wind breaker in my back pocket,
but it didn't rain during the time I rode so I didn't use them.
If I'd been riding in the rain, some of this sealant might have washed away.
The puncture was on the right side, but the sealant splattered
even to the back of the four arms of the right crank.
Since it becomes a hassle when it dries completely,
I rinsed it off by scrubbing with hot water shower.
Unrelated to this, if after riding in summer you touch the underside of the top tube
and it feels gritty from salt in your sweat,
it's worth making it a habit to at least rinse it quickly with water,
or if that's difficult, wipe it quickly with a damp cloth or paper towel—
this alone makes a huge difference in the long-term damage accumulation to the frame.
The only thing you don't have to worry about this with is an unpainted titanium frame.
Even then, if the top tube's derailleur cable stop is fastened with blind rivets rather than welding,
it's worth doing.

Customers have told me many times, "Your IRC tubeless tires puncture pretty often, don't they?"
but having specifically chosen the S-Light—which was nearly one-of-a-kind for its lightness—despite knowing the puncture risk,
and riding in the rain pretty readily
(not getting caught in rain during the ride, but going out even when it's already raining before I leave),
I'm not dissatisfied with the puncture frequency itself.
I say "nearly one-of-a-kind" in past tense because similar-weight tires are now available from other manufacturers,
but one of them, a certain domestic brand that's not IRC,
at least regarding road bike tires, has never made a decent tire even once in the past,
and I've been burned by them so many times
that I'm leaving the job of being deceived to other people.
If they ever made a decent tire, I'd hear about it.
Until then, I'm sitting on the sidelines as a mere observer.
Some actual stories I've heard include
"the lightness you feel in your hands doesn't translate to rolling lightness,"
"it flats constantly,"
"we were supplied a tubular version, that's a crappy tire,"
"they said if we wrote a report we'd get it free, so we use it, but wouldn't buy it,"
"(when trying to remount a tire that was removed for inspection after work) we're going back to Grand Prix 5000, don't bother installing that tire,"
and so on.
Also, someone from a wholesaler who's kind of a senior to me in the business sense in this industry,
when we talked on the phone before about this tire,
was surprised that "if you do SNS advertising properly, it sells that much in the initial phase, regardless of repeat customers."
This senior was also a former pro rider, so there was a period when he stuck to the professional approach of
showing he enjoyed things offered by sponsors no matter what he really thought,
and he may have had the experience of showing that he enjoyed this manufacturer's tires too (figuratively speaking).
So this tire that got a slow puncture today has worn tread anyway,
so I decided to replace it, but I haven't bought replacement stock.
In these situations, as a temporary measure I usually patch the back of the tire and use it until the same tire arrives,
but this time I decided to try out the Continental Grand Prix 5000S TR (tubeless ready) that was in stock.
The measured weight for the 25C is just under 260g
(as you can see in the image above, I removed the instruction sheet which weighs 7-8g).
The 5000 TL, which was tubeless (not tubeless-ready),
was discontinued at the same time the 5000S TR came out.
I've never used it (and never ordered it as stock)
because at 25C width with an actual measured weight of 300g, I figured
even if rolling was somehow light, I just didn't need it,
but people who actually used it said
before they could even feel the comfort of tubeless riding,
the rolling was abnormally sluggish and it was no good—most feedback was like that.
Also, the tire sidewall is thick and the bead is stiff, so
depending on rim internal width,
at minimum it's far harder to mount on the rim than the same-width tubed 5000,
and since tubular-type road UST (ultra-light sealed tubeless) tires only fit with road UST tubeless rims,
Mavic bears no fault,
but mounting on Mavic rims was extremely difficult,
and if you forced it on, removing it at roadside became
basically impossible for a normal person.
It's like equipping a cursed item in Dragon Quest.
You can only get it unsealed at a church.
I've never ordered the TL myself, but I handle them sometimes for inspections, so
when I heard it was being discontinued, I figured there must have been some embarrassing circumstances beyond just the tire's performance.

The 5000S TR has a much beefier tire bead compared to IRC.

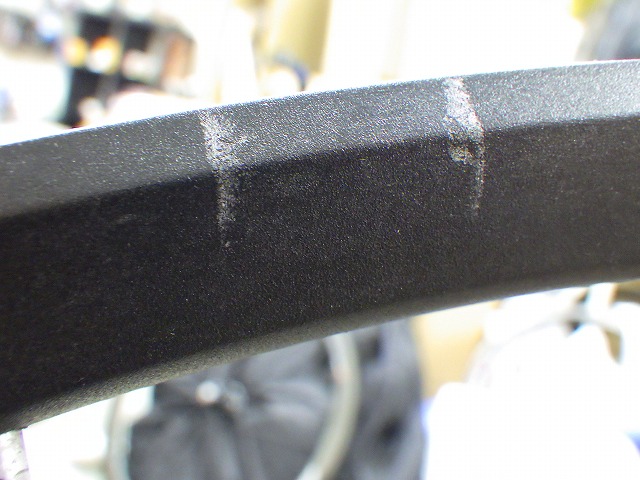
There was no deformation like dents, but the rim sidewall had gotten scratched from the bridge joint buckling.
This definitely wasn't there yesterday.
Man, I really messed up.

The bead protrusions are large.

People who started road biking in the last two years or so and have never ridden a rim-brake road bike might not know,
but there was a Grand Prix 4000 before the Grand Prix 5000,
and it went through minor changes 4000→4000S→4000S II,
but with all those models, when mounted on a rim,
threads would fray and come out from
the casing end just outside the tire-rim boundary—
that was how they were made (→here).
The 5000 TL came after the 5000, but
that manufacturing method was oddly the same as the 4000,
and those threads that stopped appearing on the 5000
came back on the 5000 TL.
I'm curious how the 5000S TR handles this.
Since the sidewall is covered with rubber,
I figure the threads probably don't come out, but.


With the IRC S-Light, in both 23C and 25C,
with my rims I can mount and remove the tire without tire levers—
I know this from experience.
For removal, I've confirmed that I can do it even with brand-new,
basically unused tires before their first ride, with the tire mounted and bead seated up to air pressure.
So for portability I carry only one small tire lever
as insurance.
That's either the IRC tire lever I cut short
or the PB tire lever from the company famous for Allen keys.

In terms of pure tire lever performance, it's shorter than the ones above from
Marwi or Campagnolo (Fulcrum),

and since it has no bending it's excellent for portability.
What concerned me was whether with the Grand Prix 5000S TR
I'd need to carry one more tire lever as insurance.
First about mounting: hooking one bead side onto the rim required a tire lever.
Hooking the other side was doable by hand,
and surprisingly the final flip-up of the bead was soft despite looking thick.
The bead lift with the compressor came up quite smoothly,
and it was clearly easier to lift than IRC.
As a side note, IRC tires get noticeably harder to lift the bead as they age.
All tire makers show this tendency, but IRC is particularly marked.
Next, removing the tire from that state:
First, getting one bead off was doable by hand.
What surprised me was that the other bead also came off by hand with just light effort.
Installation required a tire lever, but now I could remove without one.
It's unlikely the tire sidewall stretched that much from one pressurization,
so maybe I picked up the knack for it.
Looks like I can keep carrying just one portable tire lever.

I mounted it again.
I did it without a tire lever.
The second time I'm using Imagery sealant.
The tire width is 25C, but I'll test whether 35ml is enough.

↑This is a Grand Prix 4000 (on Racing Zero),

and here's how much the threads start coming out and the casing exposure looks.
![RIMG4402amx15.jpg]() Technical archive
Technical archive

But first. This is a photo from the day I went for a ride right after putting on the tire that got the slow puncture today.
It was April 30th of this year.
That's exactly two months ago.
The location is the intersection in Ono-cho at the foot of Nabeya Pass.
It was already raining before I left home,
so I put on a rain jacket—or more like a waterproof wind breaker—on top,
and didn't mind my shoes getting wet, wearing waterproof socks instead,
and changed my racer pants to shorts.
I applied Wako's sunscreen to my exposed knees and shins.
It serves the role of a water-repellent protective coating
and won't come off unless you use cleansing oil
(it won't come off even with just rubbing with soap).
For me, Wako's sunscreen is used more often for this purpose than as actual sunscreen,
but doing this requires a temperature that won't chill your knees in the rain.
That day I judged it was right at the borderline temperature where this was possible,
so I didn't wear full-length rain pants.
Water-repellent legs plus shorts means no pedaling interference.
I intend to write an article about the POLAR's usability issues someday,
but the current VANTAGE V series doesn't allow you to select "temperature" as a display option.
The previous V800 series, and even older RS and S series could select it.
It's not that they don't collect temperature data—they record it in the background,
so you can check it afterwards when you transfer the ride data to your PC.
Being able to see the temperature in real-time is convenient because you can check while riding
things like "I'll need neoprene shoe covers at this temperature" or
"what temperature was it when I took off my arm warmers?"
Temperature gauges on roadside LED displays tend to show temperatures that are "conservative" compared to actual feel.
Since the temperature sensor is located away from the ground,
it probably doesn't pick up heat reflection from the ground.
In summer, the cycle computer shows a higher temperature,
and in winter, it seems like the cycle computer shows a lower temperature because it doesn't pick up the cold at ground level.
This is especially noticeable when it's particularly hot.
Right now, when I checked the temperature recorded at the time when the GPS track was at Ono-cho on April 30th, it was 16.3℃.
At this kind of temperature, there seems to be no upswings or downswings.
Today I had some business at my master's place,
so I left home at 4 AM to be able to stop by around 8-9 AM,
and I figured that going out of Osaka via Fukibuki Pass and back into Osaka via Kimi Pass would work out well timing and route-wise.

This is today's entrance to Fukibuki Pass on the Osaka side.
Though it's the "Osaka side entrance,"
we're already in Wakayama Prefecture just before the tunnel,
so it's Wakayama in terms of address.
Incidentally, the rest stop at the tunnel entrance is also in Wakayama Prefecture.
For some reason, I often see snails at this tunnel entrance.
I don't think it's always the same individual, but I always see just one.
It's the one in the upper part of the image above.

Up close, it looks like this.
Since it's defecating, I don't think it's dead,
but its body is withdrawn into its shell and it doesn't move.


This was July 30th last year.
I didn't take a photo the next day, but there was
what appeared to be the same snail
that had advanced about 10 meters toward the tunnel,
and I wondered if it would make it back alive.


This was June 1st this year.


I splashed water from my bottle on it.
No response.

I made a slight detour (about 200 meters round trip),
but this is the main gate of Kokawa Temple.

↑My mental map of the area.
There's Mt. Katsuragi between Nabeya Pass and Kimi Pass,
but I hardly go there so I left it out.
Between Fukibuki Pass and Nabeya Pass there's Inunaki Mountain (Ikeda Tunnel),
which I climb sometimes, but I forgot to write it in.
When you descend Fukibuki Pass, there's first a wide-area agricultural road, then below that the Kokawa-Kada Line,
and further down is Route 24,
but the Kokawa-Kada Line, which connects Kada to Kokawa and merges with Route 24,
has few cars and traffic lights and is easy to ride.
If you ride the agricultural road you hit the intersection at Miyuki-Tsuji South on Kimi Pass,
but the ups and downs are brutal so I pass on it.
After getting to Route 24, I ride a bit to the east,
but soon I cross the Kino River to the south and ride to the foot of Kimi Pass,
so I barely ride on Route 24.

↑Like this, I just go over it.
Incidentally, from Nabeya Pass you can climb Mt. Koya from Route 480
(or rather, Nabeya Pass itself is Route 480), and from Kimi Pass you can climb from Route 371
(or rather, Kimi Pass itself is Route 371).
From both, the routes merge at Yatate Tea House, and after that it's a single road.
So when crossing the Kino River on the Kokawa side,
at the bridge joint which forms a W-W-W-W-W pattern,
there's a place with a large gap, and I carelessly caused a pinch flat.
I think it was after that when a pretty slow puncture developed,
and midway up Kimi Pass on the way back I
topped up the air with a portable pump.
Just before that I could feel a slight pinch flat sensation even at small bumps.
From experience, when you notice a slow puncture and top up the air,
without bursting the sealant scab with internal pressure—
say, putting in about 4 bar—
the higher the pressure, the faster the air leaks, and
eventually it drops to about 2 bar, but
it often stabilizes at an "air pressure that barely leaks any further"
But this slow puncture seemed to keep leaking slowly through that threshold,
on and on.

Separate from the midway point on Kimi Pass I mentioned earlier,
I also topped up the air at the top of Kimi Pass.
I pressurized it to the point where my finger couldn't dent it,
but on the descent of Kimi Pass I was still getting that pinch flat feeling at bumps.

↑This is the sealant scab.
I remembered it as "next to the round wear indicator on the tire near the valve,"
but since there are three valves it's hard to find.
This slow puncture doesn't seem to be from scab burst,
but rather from a strong pinch flat that loosened the tire bead seal in one spot.
I chose Kimi Pass on the way back because it's the nearest pass to my master's workshop,
and when I borrowed a floor pump there and gambled by putting in 5 bar,
there was no sealant scab burst
(there was no cracking sound when the bead lifted either).
After chatting for about an hour, I left,
and when I checked before riding off, the air hadn't lost any pressure in the hour of sitting.
Then I passed in front of Brother Maintenance (→here)
and since Route 310 has a lot of traffic, I took the backroad one block inside,
the Koya Old Road (which merges with Route 310 in Sakai),
but on that route the scab burst
and shot out sealant with pssh-pssh-pssh! from the wound, but
keeping on riding, it sealed up quickly,
and it became just lower pressure than before the burst,
and the sealant did its job within a few wheel rotations—this happened 3 times.
When I got home, the air pressure was around 3 bar.
The slow puncture up to Kimi Pass wasn't from sealant scab burst.
After the bridge joint buckling,
there was an air leak without a lower limit, that's how it felt.
Probably it would have happened even if the sealant scab was completely absent.
On the way back from my master's place,
sealant scab burst occurred 3 times—something that didn't happen in the hour of static pressure at 5 bar—
but on that route I felt no pinch flat sensation whatsoever,
and I'm almost certain there was no ongoing air leak outside of scab burst times.
The reason air leaked before and after floor pump pressurization is different.
In the state after topping up air at Kimi Pass's summit,
the air probably would have kept leaking even sitting static,
but after pressurization with the floor pump,
unless the sealant scab opens from tire deformation under riding,
air doesn't escape—that's how it felt.
So when I got home and looked at the bike,

sealant had splattered on the back of the seat tube.

Even the Cateye light in a leather case hanging from the saddle got sealant on it.
The forecast was for rain that day, so I put my wallet and phone in a waterproof pack
and carried a waterproof wind breaker in my back pocket,
but it didn't rain during the time I rode so I didn't use them.
If I'd been riding in the rain, some of this sealant might have washed away.
The puncture was on the right side, but the sealant splattered
even to the back of the four arms of the right crank.
Since it becomes a hassle when it dries completely,
I rinsed it off by scrubbing with hot water shower.
Unrelated to this, if after riding in summer you touch the underside of the top tube
and it feels gritty from salt in your sweat,
it's worth making it a habit to at least rinse it quickly with water,
or if that's difficult, wipe it quickly with a damp cloth or paper towel—
this alone makes a huge difference in the long-term damage accumulation to the frame.
The only thing you don't have to worry about this with is an unpainted titanium frame.
Even then, if the top tube's derailleur cable stop is fastened with blind rivets rather than welding,
it's worth doing.

Customers have told me many times, "Your IRC tubeless tires puncture pretty often, don't they?"
but having specifically chosen the S-Light—which was nearly one-of-a-kind for its lightness—despite knowing the puncture risk,
and riding in the rain pretty readily
(not getting caught in rain during the ride, but going out even when it's already raining before I leave),
I'm not dissatisfied with the puncture frequency itself.
I say "nearly one-of-a-kind" in past tense because similar-weight tires are now available from other manufacturers,
but one of them, a certain domestic brand that's not IRC,
at least regarding road bike tires, has never made a decent tire even once in the past,
and I've been burned by them so many times
that I'm leaving the job of being deceived to other people.
If they ever made a decent tire, I'd hear about it.
Until then, I'm sitting on the sidelines as a mere observer.
Some actual stories I've heard include
"the lightness you feel in your hands doesn't translate to rolling lightness,"
"it flats constantly,"
"we were supplied a tubular version, that's a crappy tire,"
"they said if we wrote a report we'd get it free, so we use it, but wouldn't buy it,"
"(when trying to remount a tire that was removed for inspection after work) we're going back to Grand Prix 5000, don't bother installing that tire,"
and so on.
Also, someone from a wholesaler who's kind of a senior to me in the business sense in this industry,
when we talked on the phone before about this tire,
was surprised that "if you do SNS advertising properly, it sells that much in the initial phase, regardless of repeat customers."
This senior was also a former pro rider, so there was a period when he stuck to the professional approach of
showing he enjoyed things offered by sponsors no matter what he really thought,
and he may have had the experience of showing that he enjoyed this manufacturer's tires too (figuratively speaking).
So this tire that got a slow puncture today has worn tread anyway,
so I decided to replace it, but I haven't bought replacement stock.
In these situations, as a temporary measure I usually patch the back of the tire and use it until the same tire arrives,
but this time I decided to try out the Continental Grand Prix 5000S TR (tubeless ready) that was in stock.
The measured weight for the 25C is just under 260g
(as you can see in the image above, I removed the instruction sheet which weighs 7-8g).
The 5000 TL, which was tubeless (not tubeless-ready),
was discontinued at the same time the 5000S TR came out.
I've never used it (and never ordered it as stock)
because at 25C width with an actual measured weight of 300g, I figured
even if rolling was somehow light, I just didn't need it,
but people who actually used it said
before they could even feel the comfort of tubeless riding,
the rolling was abnormally sluggish and it was no good—most feedback was like that.
Also, the tire sidewall is thick and the bead is stiff, so
depending on rim internal width,
at minimum it's far harder to mount on the rim than the same-width tubed 5000,
and since tubular-type road UST (ultra-light sealed tubeless) tires only fit with road UST tubeless rims,
Mavic bears no fault,
but mounting on Mavic rims was extremely difficult,
and if you forced it on, removing it at roadside became
basically impossible for a normal person.
It's like equipping a cursed item in Dragon Quest.
You can only get it unsealed at a church.
I've never ordered the TL myself, but I handle them sometimes for inspections, so
when I heard it was being discontinued, I figured there must have been some embarrassing circumstances beyond just the tire's performance.

The 5000S TR has a much beefier tire bead compared to IRC.
There was no deformation like dents, but the rim sidewall had gotten scratched from the bridge joint buckling.
This definitely wasn't there yesterday.
Man, I really messed up.

The bead protrusions are large.

People who started road biking in the last two years or so and have never ridden a rim-brake road bike might not know,
but there was a Grand Prix 4000 before the Grand Prix 5000,
and it went through minor changes 4000→4000S→4000S II,
but with all those models, when mounted on a rim,
threads would fray and come out from
the casing end just outside the tire-rim boundary—
that was how they were made (→here).
The 5000 TL came after the 5000, but
that manufacturing method was oddly the same as the 4000,
and those threads that stopped appearing on the 5000
came back on the 5000 TL.
I'm curious how the 5000S TR handles this.
Since the sidewall is covered with rubber,
I figure the threads probably don't come out, but.


With the IRC S-Light, in both 23C and 25C,
with my rims I can mount and remove the tire without tire levers—
I know this from experience.
For removal, I've confirmed that I can do it even with brand-new,
basically unused tires before their first ride, with the tire mounted and bead seated up to air pressure.
So for portability I carry only one small tire lever
as insurance.
That's either the IRC tire lever I cut short
or the PB tire lever from the company famous for Allen keys.

In terms of pure tire lever performance, it's shorter than the ones above from
Marwi or Campagnolo (Fulcrum),

and since it has no bending it's excellent for portability.
What concerned me was whether with the Grand Prix 5000S TR
I'd need to carry one more tire lever as insurance.
First about mounting: hooking one bead side onto the rim required a tire lever.
Hooking the other side was doable by hand,
and surprisingly the final flip-up of the bead was soft despite looking thick.
The bead lift with the compressor came up quite smoothly,
and it was clearly easier to lift than IRC.
As a side note, IRC tires get noticeably harder to lift the bead as they age.
All tire makers show this tendency, but IRC is particularly marked.
Next, removing the tire from that state:
First, getting one bead off was doable by hand.
What surprised me was that the other bead also came off by hand with just light effort.
Installation required a tire lever, but now I could remove without one.
It's unlikely the tire sidewall stretched that much from one pressurization,
so maybe I picked up the knack for it.
Looks like I can keep carrying just one portable tire lever.

I mounted it again.
I did it without a tire lever.
The second time I'm using Imagery sealant.
The tire width is 25C, but I'll test whether 35ml is enough.

↑This is a Grand Prix 4000 (on Racing Zero),

and here's how much the threads start coming out and the casing exposure looks.
 Technical archive
Products Mentioned in This Article
- 🛒 IRC S-Light bicycle tire
- 🛒 Continental Grand Prix 5000S TR tire
- 🛒 Wako's sunscreen water-repellent
* Amazon affiliate links — prices may vary
Original Japanese post: のむラボ日記 #6742