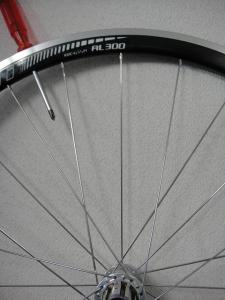
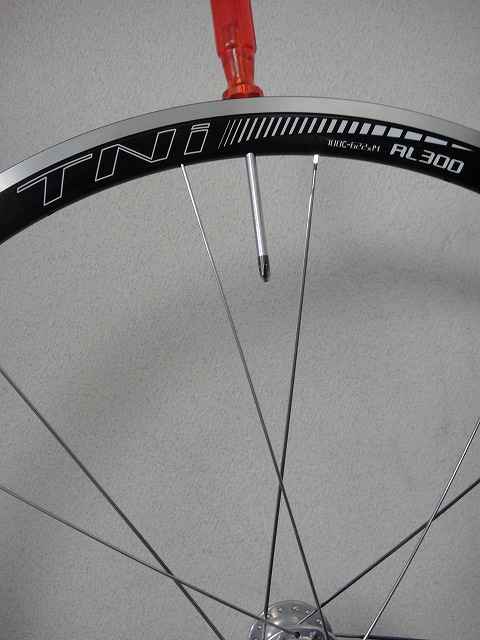
I said the other day that "the AL300 rim has no runout," but sorry about that. It does have a slight amount of runout.
It's the kind where "you can't tell by looking at the assembled wheel, but you can barely make it out when you look at the rim by itself."
However, since the rim's apex is pointed and narrow, it looks like there shouldn't be any particular problems even if you build it while ignoring the runout.
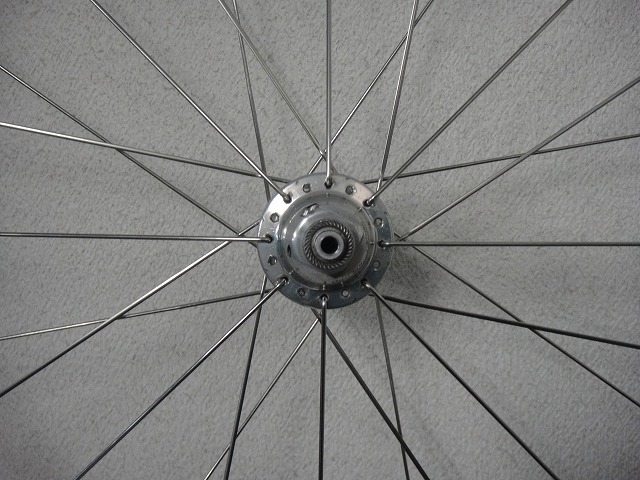
As I promised the other day, I'm going to buy one AL300 24H rim and build it with 2:1 lacing.
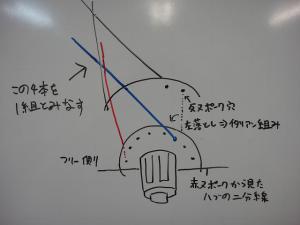
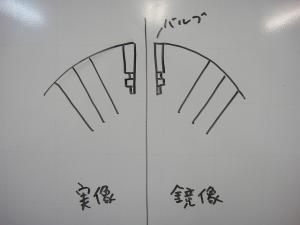
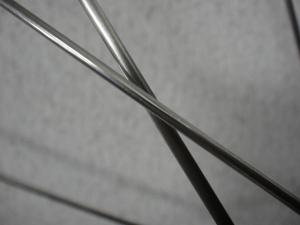
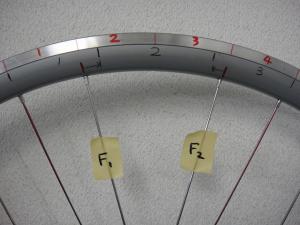
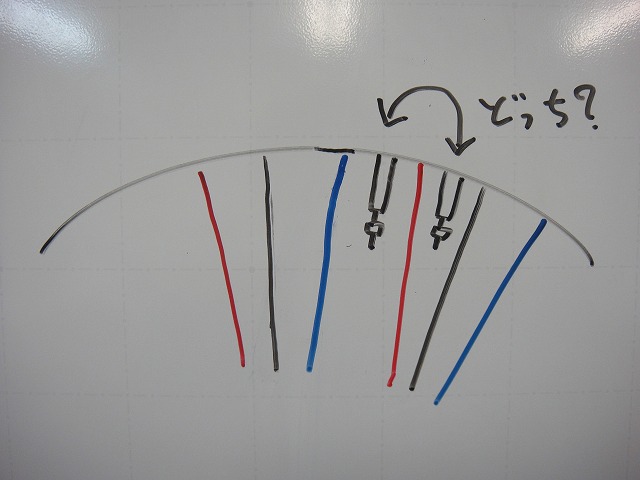
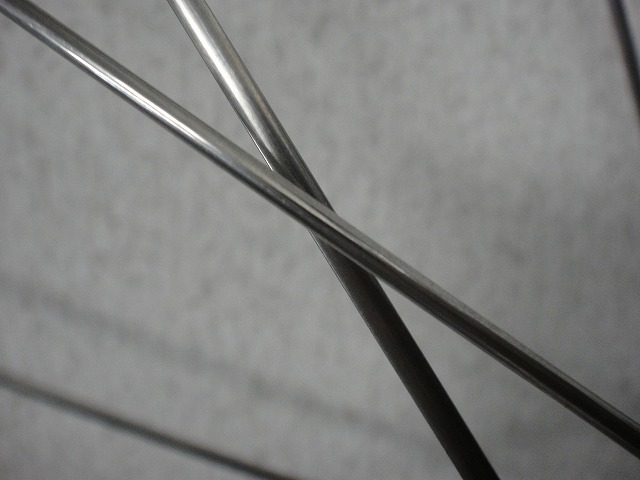
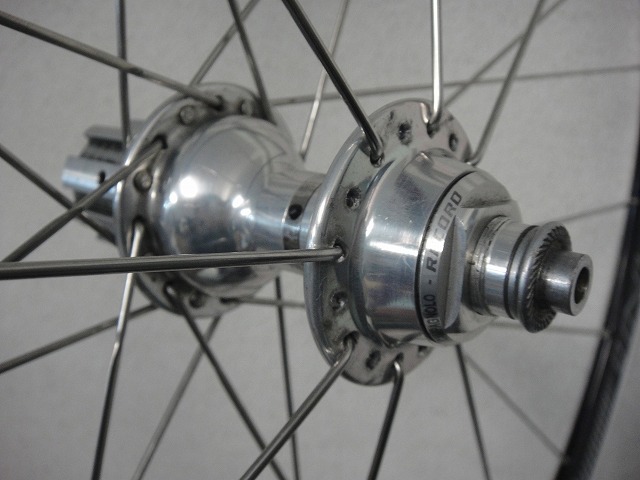
↑This is a 32H Italian 6-cross.
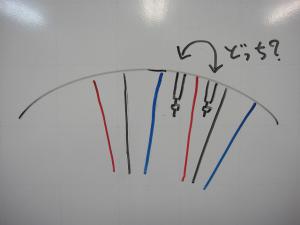
I'll draw the inpokes on the freewheel side in blue and the outpokes in red.
Normally, you consider four spokes as one group: two crossed spokes plus two spokes on the opposite shore with a phase offset of one.
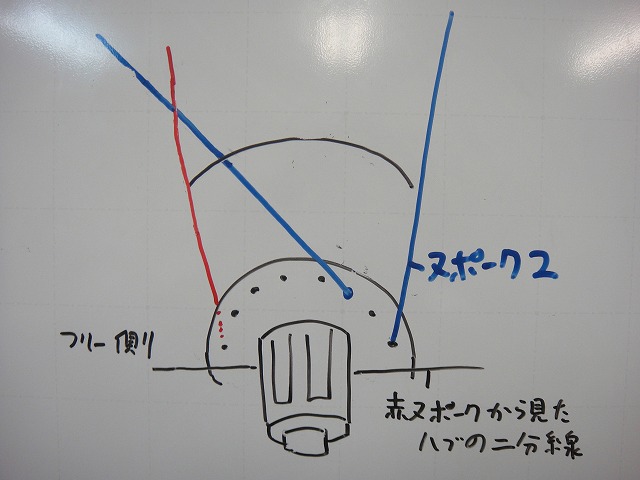
Looking at just the two on the freewheel side.
When the red outpoke is crossed in y-cross lacing, I'm going to call the inpoke coming out of the inpoke hole when lacing in (y+2)-cross "inpoke 2."
In tangent lacing, inpoke 2 comes from the hole you'd use for 6-cross when doing 4-cross, from the hole you'd use for 8-cross when doing 6-cross, from the hole you'd use for 10-cross (hypothetically) when doing 8-cross—in other words, it just exists normally next to it.
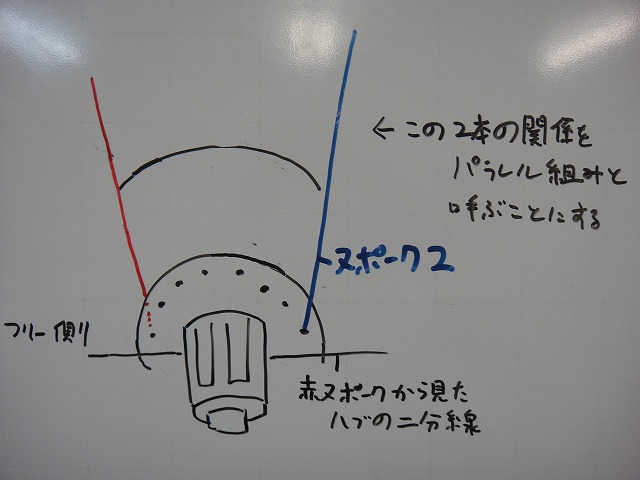
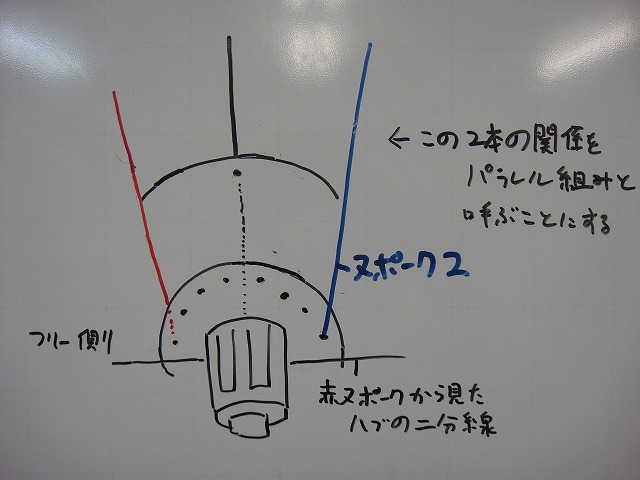
Now, the relationship between the original red outpoke and inpoke 2—(not quite parallel, but close to it)—I'm going to call "parallel lacing."
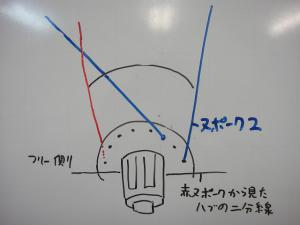
This way of thinking is particularly meaningless when the number of spokes is equal on both sides.
When a spoke hole exists right in the middle of the phase between the parallel-laced holes on the opposite shore,
you put a spoke out of that hole and consider those three spokes as one group.
Only in this relationship does it make sense to be conscious of parallel lacing.
If you meet the condition written in red above, you can build with 2:1 lacing.
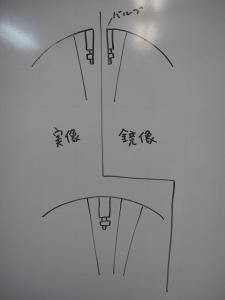
Hereafter I'll call inpoke 2 the F1 spoke, the outpoke the F2 spoke,
and the spoke on the opposite shore positioned right between F1 and F2 the F3 spoke.
I wrote the other day that arranging F1 and F2 in perfect parallel is G3 lacing.
If the direction of travel is toward the right side of the image, spokes continue clockwise as
F2→F3→F1→... repeating.
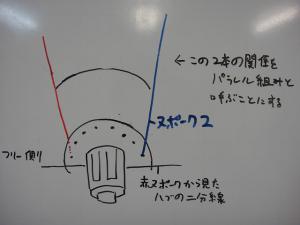
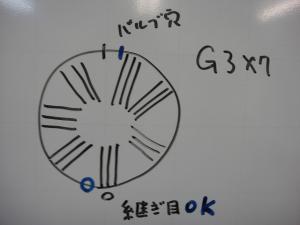
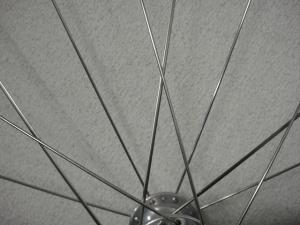
In this case, where should the valve hole be positioned for a neater look?
With Fulcrum, the valve is positioned inside the parallel lacing.
With Campagnolo G3, the valve is positioned between parallel-laced groups.
This is an Eurus 21H, but
this position is not exactly in the middle of the parallel lacing.
There's a reason why that can't be done.

If G3 lacing is an even number, there's no spoke on the opposite side from the valve, but

when it becomes odd, the phase of the rim hole and valve seam overlap.
So they offset it like this.
This time I'm hand-lacing a 24H, putting the valve right in the middle of the three-spoke group
and using Campagnolo arrangement, which gives
a spoke pattern that's mirror-symmetric relative to the line connecting the valve and rim seam.
With Fulcrum arrangement, it doesn't mirror-flip.
Since the Campagnolo arrangement seems better balance-wise, that's how I'm building it.

On normal wheels, having the valve between crossed spokes is a no-no.
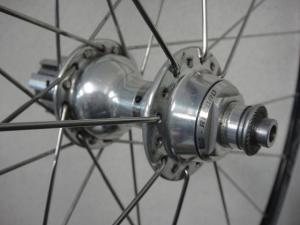
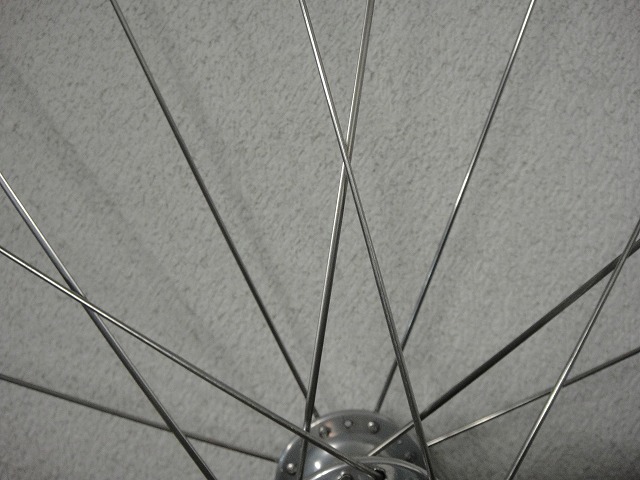
I've got a screwdriver stuck through the valve hole,
and this looks like that kind of "incorrect" routing.
But when you build it, it comes out like this. Rather than thinking of normal crossing as the "group,"
when you think of parallel lacing as the "group" and determine valve position accordingly, that's where it ends up.
The three spokes to the right as you look from the screwdriver are one group.
If you build it the normal way so crossings don't span the valve hole,
you end up with Fulcrum arrangement.
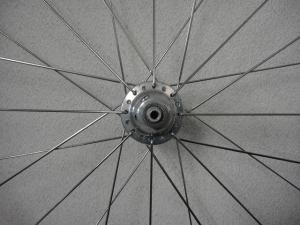
So, it's built.
I've removed the screwdriver, and the spoke pattern is mirror-symmetric relative to the line connecting the valve hole and its opposite side.
Regarding spoke thickness: if in addition to the 2:1 conversion you want to increase the non-freewheel side tension further,
you'd make the 8 non-freewheel spokes thinner.
But using thin spokes on only 8 spokes feels risky.
With wheels of equal spoke count on both sides, if the freewheel side (right) is 2.0mm plain
and the non-freewheel side (left) is CX-RAY,
the specific gravity ratio left:right becomes 63:100 (ignoring length differences).
In this case, if all spokes were the same, left:right would be 100:200,
so that's a pretty substantial correction for left-right tension differences.
If just the left were CX-RAY it'd be 63:200, but
this time I'm trying the opposite approach.

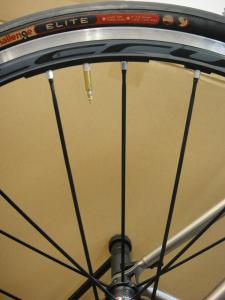
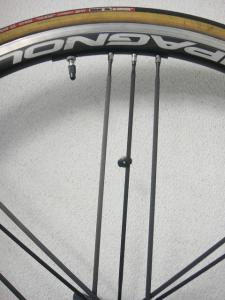
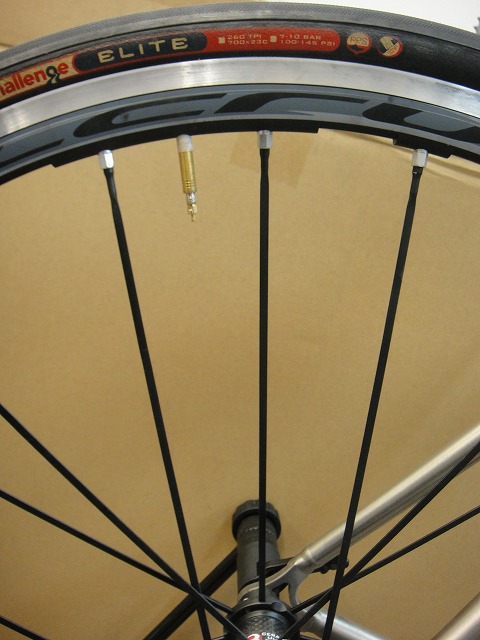
I haven't laced the freewheel side yet.
If you look carefully at the images,
F1 spokes are DT Competition 2.0–1.8–2.0mm,
F2 spokes are Sapim CX-RAY.
F1's specific gravity is 90.3, F2's is 63, so
the total specific gravity of the freewheel side spokes is 153.3.
The non-freewheel side is 2.0mm plain.
I'm doing straight-pull (inpoke) because I think that's better against nipple breakage.
So by simple calculation, the left:right ratio of total spoke specific gravity sums is
100:153.3, but compared to equal-spoke-count wheels,
this (100:153.3 ≈ 65.2:100) is still an excellent number.

In Campagnolo's take on G3 lacing, regarding power transmission,
it seems F2 spokes are treated as negligible (laughs).
I mostly agree.
So I want to find out whether there's a perceptible difference when riding with
F1 spokes as Competition and F2 spokes as CX-RAY versus
later swapping F1 and F2,
and that's why I'm doing something this weird.
Also, when F1 is Competition and F2 is CX-RAY (or vice versa), I'll measure
the spoke tension of F3 too.
Then when I rebuild with F1 and F2 both as 2.0mm plain, I want to see if
there's any perceptible difference,
and also measure the F1 and F2 spoke tensions (which should be lower)
when F3 tension is the same.
Since I want the final state to be freewheel side 2.0mm plain, I'm doing
the Competition·CX-RAY build first so the rebuilding happens just once.
↑This image is from the viewpoint of normal crossing, not the parallel-laced perspective, but
it shows the 32H rim with both the spoke hole positions for 32H (red line on the outside) and
the spoke hole positions for 24H (black line on the inside) drawn on it.
If you consider the F3 spoke spacing as one unit,
with 32H it's divided into 4 parts, and with 24H into 3 parts.
When building a 24H rim on a 32H hub,
the phase of F3 (red spoke) is exactly the same as it would be at 32H.
Since F2 and F1 deviate away from parallel relative to F3,
the spokes are slightly shorter compared to building with a 32H rim.
Impressions etc.
I've used it just a bit during last night's training ride, and there's no sense of unease in use.
In a blind test, there's no way you'd detect that this is a 2:1 laced wheel.
However, I still have major reservations about selling as a Nomulabo wheel a wheel with only 8H on one side
(and that being a straight-pull spoke too),
so we won't sell it with this spec.
A spoke tension left-right difference smaller than normal can also be achieved
with Yonroku or Yonhachi lacing—using most-tangent (6-cross for 24H or 8-cross for 32H)
on just the non-freewheel side.
So for a sellable product, I'll go with that.
Between 24H Yonroku lacing and 2:1 lacing with a 32H hub,
which is more effective at correcting spoke tension left-right difference?
Overwhelmingly, 2:1 lacing is. That much is certain.
With soldered bracing, you can get the apparent spoke tension left-right difference almost the same with Yonroku too,
so I'll go with this higher-confidence option for the product.
Campagnolo and Fulcrum complete wheels are specially designed to achieve high confidence even with 2:1 lacing,
and it's clear that there's an oppositional structure where hand-built wheels can only push back from a different angle.
I'm going to use this wheel a bit more, then swap F1 and F2, and after that rebuild both F1 and F2
as 2.0mm plain, trying various things.
What I learn from that might be reflected in Nomulabo wheels.
Completely separately, today I got a hint about #4 from a conversation with a customer.
If rim stock is available, I'd like to start building (though I should finish #1 orders first).
It's the kind where "you can't tell by looking at the assembled wheel, but you can barely make it out when you look at the rim by itself."
However, since the rim's apex is pointed and narrow, it looks like there shouldn't be any particular problems even if you build it while ignoring the runout.
As I promised the other day, I'm going to buy one AL300 24H rim and build it with 2:1 lacing.

↑This is a 32H Italian 6-cross.
I'll draw the inpokes on the freewheel side in blue and the outpokes in red.
Normally, you consider four spokes as one group: two crossed spokes plus two spokes on the opposite shore with a phase offset of one.
Looking at just the two on the freewheel side.
When the red outpoke is crossed in y-cross lacing, I'm going to call the inpoke coming out of the inpoke hole when lacing in (y+2)-cross "inpoke 2."
In tangent lacing, inpoke 2 comes from the hole you'd use for 6-cross when doing 4-cross, from the hole you'd use for 8-cross when doing 6-cross, from the hole you'd use for 10-cross (hypothetically) when doing 8-cross—in other words, it just exists normally next to it.
Now, the relationship between the original red outpoke and inpoke 2—(not quite parallel, but close to it)—I'm going to call "parallel lacing."
This way of thinking is particularly meaningless when the number of spokes is equal on both sides.
When a spoke hole exists right in the middle of the phase between the parallel-laced holes on the opposite shore,
you put a spoke out of that hole and consider those three spokes as one group.
Only in this relationship does it make sense to be conscious of parallel lacing.
If you meet the condition written in red above, you can build with 2:1 lacing.
Hereafter I'll call inpoke 2 the F1 spoke, the outpoke the F2 spoke,
and the spoke on the opposite shore positioned right between F1 and F2 the F3 spoke.
I wrote the other day that arranging F1 and F2 in perfect parallel is G3 lacing.
If the direction of travel is toward the right side of the image, spokes continue clockwise as
F2→F3→F1→... repeating.
In this case, where should the valve hole be positioned for a neater look?
With Fulcrum, the valve is positioned inside the parallel lacing.

With Campagnolo G3, the valve is positioned between parallel-laced groups.
This is an Eurus 21H, but
this position is not exactly in the middle of the parallel lacing.
There's a reason why that can't be done.

If G3 lacing is an even number, there's no spoke on the opposite side from the valve, but
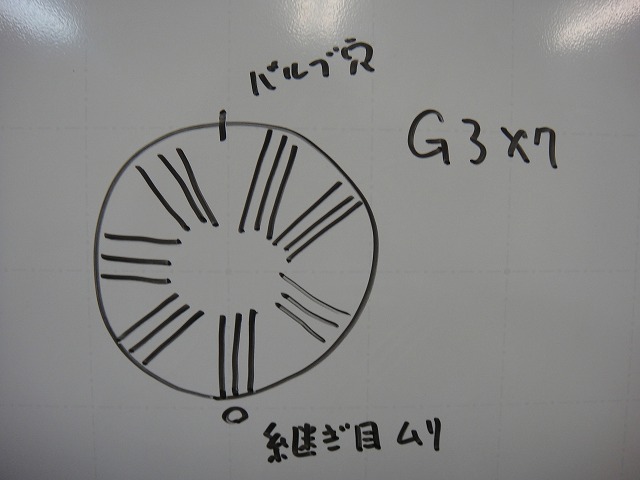
when it becomes odd, the phase of the rim hole and valve seam overlap.

So they offset it like this.
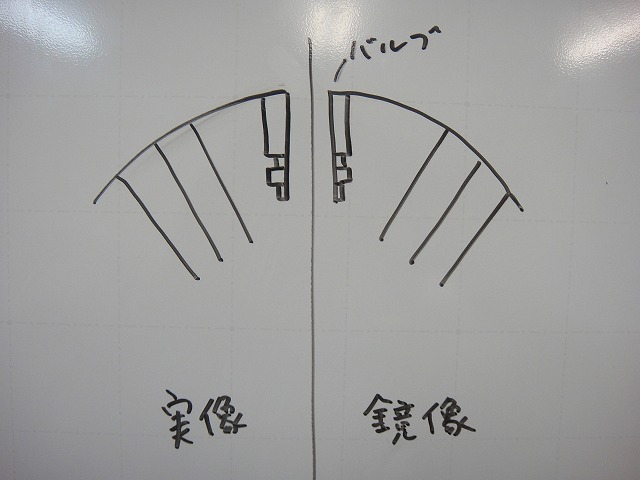
This time I'm hand-lacing a 24H, putting the valve right in the middle of the three-spoke group
and using Campagnolo arrangement, which gives
a spoke pattern that's mirror-symmetric relative to the line connecting the valve and rim seam.

With Fulcrum arrangement, it doesn't mirror-flip.
Since the Campagnolo arrangement seems better balance-wise, that's how I'm building it.
On normal wheels, having the valve between crossed spokes is a no-no.
I've got a screwdriver stuck through the valve hole,
and this looks like that kind of "incorrect" routing.

But when you build it, it comes out like this. Rather than thinking of normal crossing as the "group,"
when you think of parallel lacing as the "group" and determine valve position accordingly, that's where it ends up.
The three spokes to the right as you look from the screwdriver are one group.
If you build it the normal way so crossings don't span the valve hole,
you end up with Fulcrum arrangement.
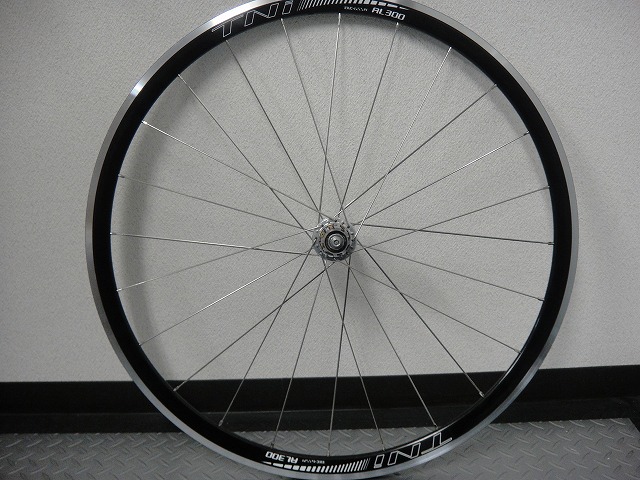
So, it's built.
I've removed the screwdriver, and the spoke pattern is mirror-symmetric relative to the line connecting the valve hole and its opposite side.
Regarding spoke thickness: if in addition to the 2:1 conversion you want to increase the non-freewheel side tension further,
you'd make the 8 non-freewheel spokes thinner.
But using thin spokes on only 8 spokes feels risky.
With wheels of equal spoke count on both sides, if the freewheel side (right) is 2.0mm plain
and the non-freewheel side (left) is CX-RAY,
the specific gravity ratio left:right becomes 63:100 (ignoring length differences).
In this case, if all spokes were the same, left:right would be 100:200,
so that's a pretty substantial correction for left-right tension differences.
If just the left were CX-RAY it'd be 63:200, but
this time I'm trying the opposite approach.

I haven't laced the freewheel side yet.
If you look carefully at the images,
F1 spokes are DT Competition 2.0–1.8–2.0mm,
F2 spokes are Sapim CX-RAY.
F1's specific gravity is 90.3, F2's is 63, so
the total specific gravity of the freewheel side spokes is 153.3.
The non-freewheel side is 2.0mm plain.
I'm doing straight-pull (inpoke) because I think that's better against nipple breakage.
So by simple calculation, the left:right ratio of total spoke specific gravity sums is
100:153.3, but compared to equal-spoke-count wheels,
this (100:153.3 ≈ 65.2:100) is still an excellent number.
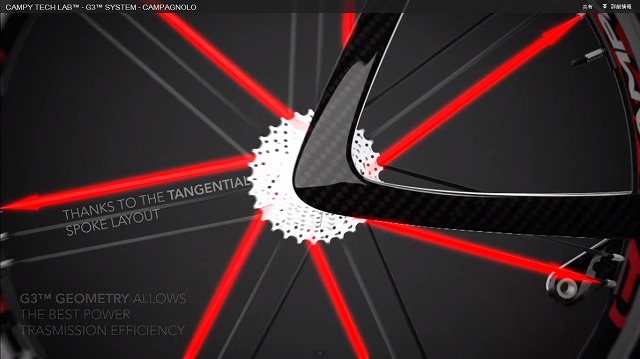
In Campagnolo's take on G3 lacing, regarding power transmission,
it seems F2 spokes are treated as negligible (laughs).
I mostly agree.
So I want to find out whether there's a perceptible difference when riding with
F1 spokes as Competition and F2 spokes as CX-RAY versus
later swapping F1 and F2,
and that's why I'm doing something this weird.
Also, when F1 is Competition and F2 is CX-RAY (or vice versa), I'll measure
the spoke tension of F3 too.
Then when I rebuild with F1 and F2 both as 2.0mm plain, I want to see if
there's any perceptible difference,
and also measure the F1 and F2 spoke tensions (which should be lower)
when F3 tension is the same.
Since I want the final state to be freewheel side 2.0mm plain, I'm doing
the Competition·CX-RAY build first so the rebuilding happens just once.

↑This image is from the viewpoint of normal crossing, not the parallel-laced perspective, but
it shows the 32H rim with both the spoke hole positions for 32H (red line on the outside) and
the spoke hole positions for 24H (black line on the inside) drawn on it.
If you consider the F3 spoke spacing as one unit,
with 32H it's divided into 4 parts, and with 24H into 3 parts.
When building a 24H rim on a 32H hub,
the phase of F3 (red spoke) is exactly the same as it would be at 32H.
Since F2 and F1 deviate away from parallel relative to F3,
the spokes are slightly shorter compared to building with a 32H rim.
Impressions etc.
I've used it just a bit during last night's training ride, and there's no sense of unease in use.
In a blind test, there's no way you'd detect that this is a 2:1 laced wheel.
However, I still have major reservations about selling as a Nomulabo wheel a wheel with only 8H on one side
(and that being a straight-pull spoke too),
so we won't sell it with this spec.
A spoke tension left-right difference smaller than normal can also be achieved
with Yonroku or Yonhachi lacing—using most-tangent (6-cross for 24H or 8-cross for 32H)
on just the non-freewheel side.
So for a sellable product, I'll go with that.
Between 24H Yonroku lacing and 2:1 lacing with a 32H hub,
which is more effective at correcting spoke tension left-right difference?
Overwhelmingly, 2:1 lacing is. That much is certain.
With soldered bracing, you can get the apparent spoke tension left-right difference almost the same with Yonroku too,
so I'll go with this higher-confidence option for the product.
Campagnolo and Fulcrum complete wheels are specially designed to achieve high confidence even with 2:1 lacing,
and it's clear that there's an oppositional structure where hand-built wheels can only push back from a different angle.
I'm going to use this wheel a bit more, then swap F1 and F2, and after that rebuild both F1 and F2
as 2.0mm plain, trying various things.
What I learn from that might be reflected in Nomulabo wheels.
Completely separately, today I got a hint about #4 from a conversation with a customer.
If rim stock is available, I'd like to start building (though I should finish #1 orders first).