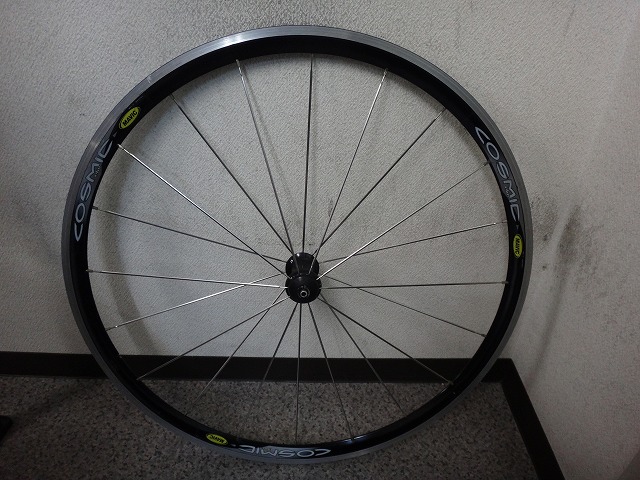
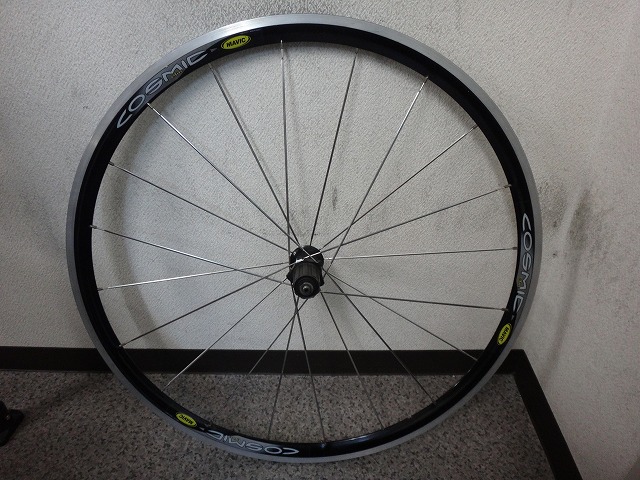
I took in an original Cosmic Elite from a customer.


In the broad sense, disc wheels would be considered the "first complete wheelset,"
but when it comes to "mass-produced spoked wheels for road racing by a manufacturer,"
that would be the 1996 Mavic Ksyrium as the first.
The Ksyrium is a lightweight model for mountain stage finishes,
an aluminum rim wheel with 26H front and 28H rear,
and the front rim is a Reflex rim specially made with different hole counts for complete wheelsets.
Though as I write this, strictly speaking it's a bit different.
Early Ksyrium tubular rims had weights in the 340g range,
which would be impossibly light even for a light Reflex rim,
so the material thickness and everything else were specially made for the Ksyrium.
The later models were around 390g,
so it's safe to say they're simply Reflex rims with special hole counts and colors.
The aero wheel Cosmic series had
the Cosmic Carbon (a non-SSC, 16H front and rear model) in '97,
the Cosmic Pro and Cosmic Expert,
the Cosmic Équip in '98,
and the Cosmic Elite in '99,
and this one here is the original Elite from '99.
All models except the Cosmic Carbon have aluminum rims,
and the Pro with its 38mm-high rim is the only one of this lineup without a reinforced eyelet (described below),
but the other three models use the CXP30 rim with a rim height of 30.5mm,
just with the hole counts and colors changed for each application.
The main reason it was brought in is that the rear wheel has significant runout,
and according to the customer, the spokes appear to be "lifting the rim."
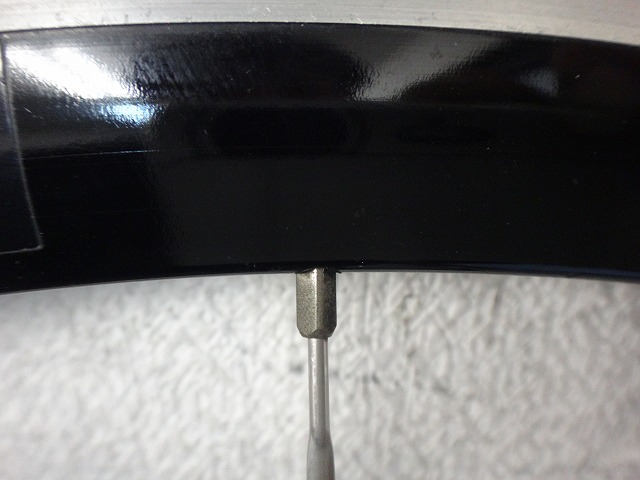
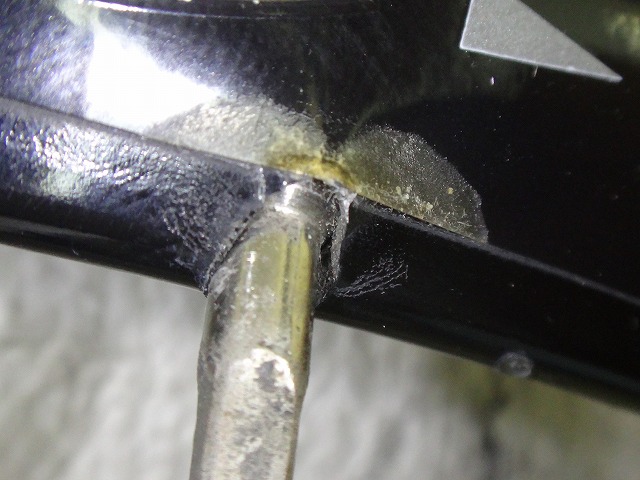
This appearance is because the reinforced eyelet, which is a feature of the CXP30 rim, has cracked.

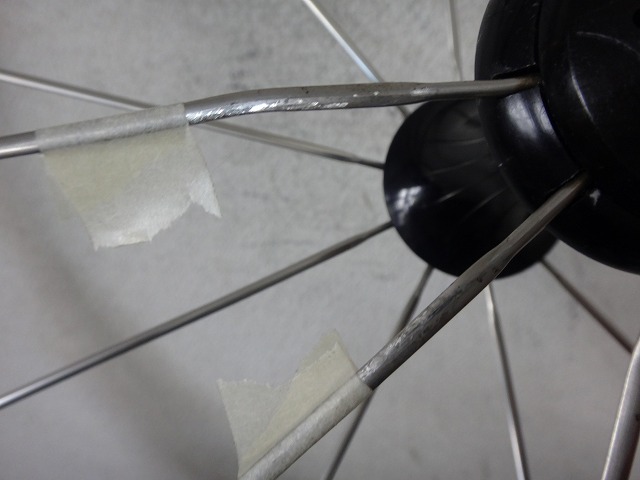
↑The rim holes have an offset and a cutout,
and the spokes extending toward the front from my viewpoint

↑and the spokes extending to the far side look different.

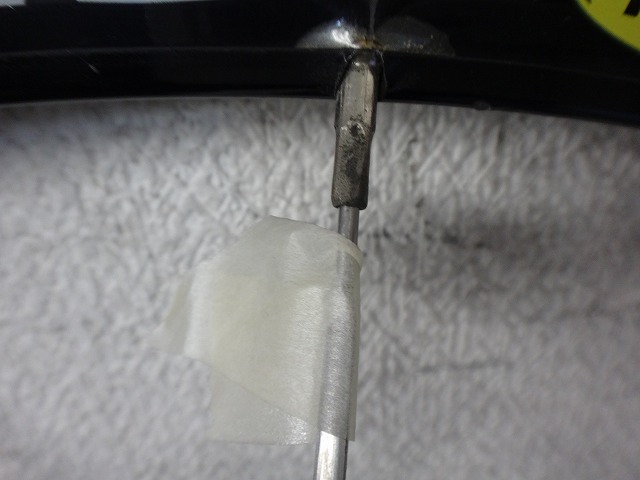
↑This is the area that appears to be lifting,
and the customer marked it with tape,
but clearly something is wrong.

The inner wall is thin,
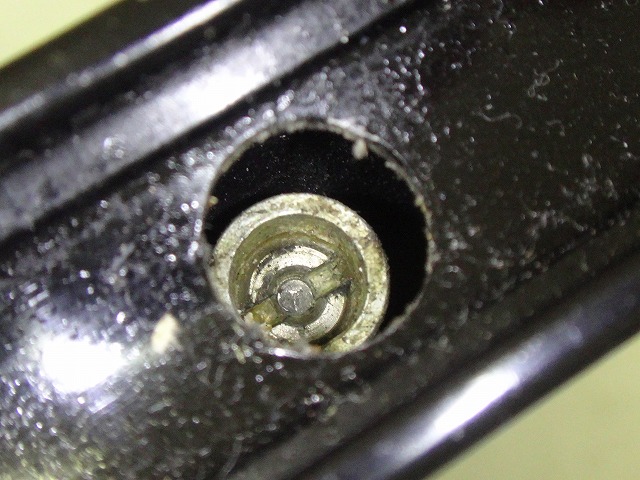
so the nipple is nearly puncturing through the rim hole.

↑This is the reinforced eyelet.
For example, with recent complete wheelsets,
some have machining that thickens only the area around the rim holes,
but that requires high-precision cutting techniques.
In this rim's case, it achieves partial reinforcement
by pressing a reinforced eyelet into only the rim holes.

The eyelet in this area must have cracked.
Since it was sent without rim tape,
I couldn't find any eyelet fragments.

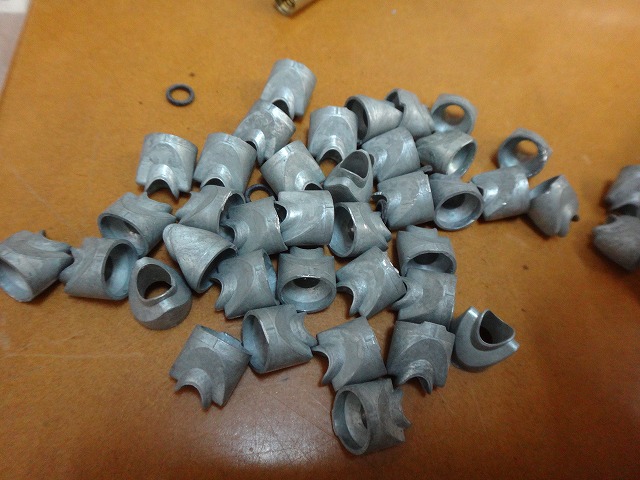
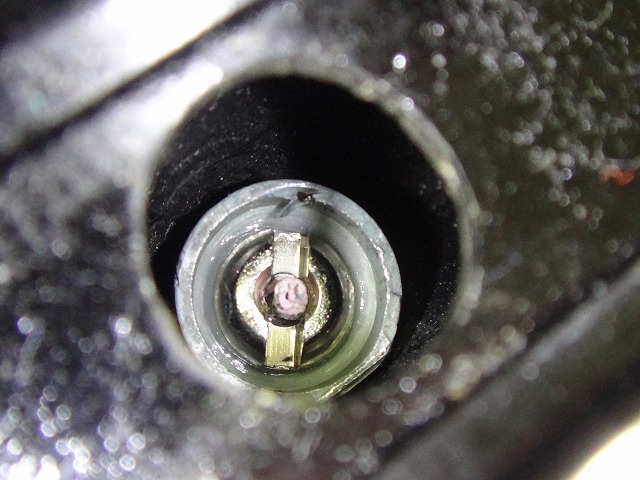
This is the reinforced eyelet for the CXP30.
Just to note, this has been out of production for ages.

I had 40 originally, and since I used one today, I have only 39 left.
I personally have several CXP30 rims in both 32H and 28H,
but I need these eyelets, so I can only build one wheel.

I recovered the nipple. This nipple alone shows severe corrosion marks—
it appears the nipple was turned with the eyelet already cracked.
At 16mm long with a tool grip width of 3.2mm across flats,
I ended up going with a 16mm DT brass nipple.


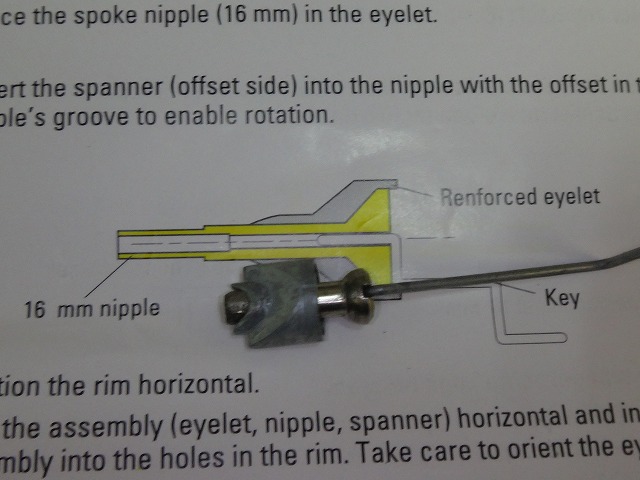
↑You don't necessarily need to use this specialty tool,
but the point is to set it up as shown in the diagram.
The instruction manual is in five languages including French,
but the spelling "Renforced eyelet" in the first image above is incorrect.
In English it should be "Reinforce" not "Renforce,"
and while "Renforce" is French, when conjugated it becomes "Renfort,"
so "Renforcé" is the French form with the English suffix -ed tacked on.

I repaired it by replacing the eyelet.
Reinforced eyelets can fall into the rim interior during assembly,
so as a countermeasure they made them longer—but that alone would add weight, so
the idea was to also achieve weight savings, which led to


↑the expanding eyelet.
Again, this has been out of production for ages.
Incidentally, the lightening cutouts may have been inspired by Aztec glyphs.

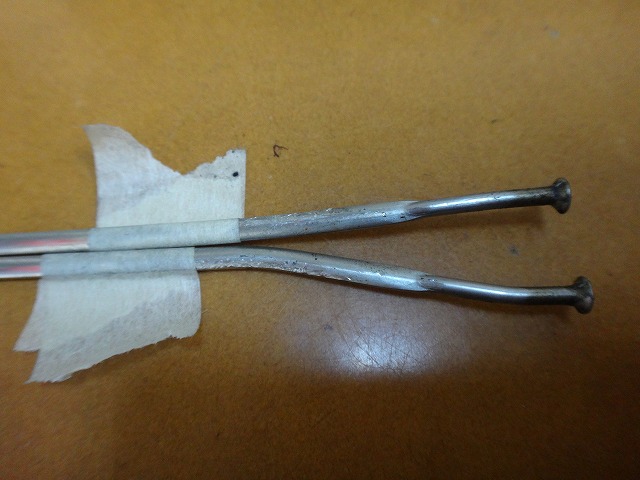
On the front wheel, two spokes are deformed, so the customer wants them replaced.

I replaced them.

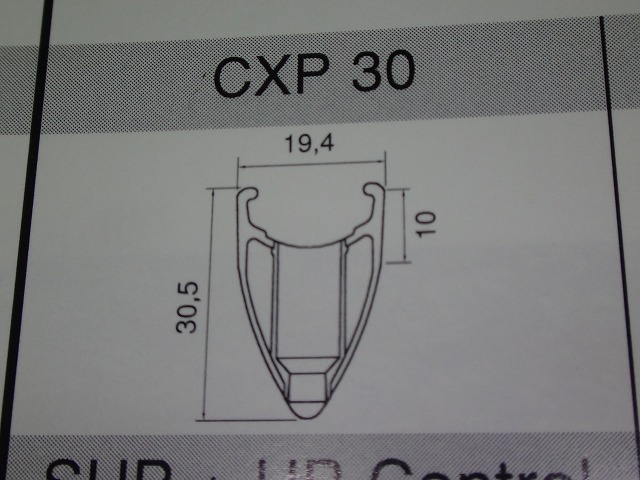
↑The CXP30 dimensions.

↑The rim dimensions for the Cosmic Expert, Équip, and Elite
(whether tubular versions exist depends on the model).
Exactly the same dimensions as the CXP30.
In the reinforced eyelet image above, there's a bag marked M40012,
which is, as shown in the diagram,

↑this.

Also, the customer requested hub regreasing,
but the front hub showed no wear at all.
The rear hub had some secondary rust directly beneath the hub shaft bearing,
which concerned me, but the internals were fine.

Finally.
This freehub body is for Shimano 8/9-speed, and since "8/9-speed" was the notation back then, 10-speed is also compatible.
The customer wants to swap it for a Campagnolo-compatible freehub body,
but unfortunately that's impossible.
Campagnolo freehub bodies didn't exist for Mavic wheels of this era.
So how would you use it with Campagnolo? That becomes a rather complicated story.

First, Mavic had a cassette sprocket called CC9.
CC stands for "Cassette Cog," and cog is French for gear.
You set it up by inserting one sprocket and one spacer at a time into the freehub's splines,
but there existed a "CC9 freehub body" that uses the same spline profile as Shimano's HG (Hyper Glide) freehub body.
When the CC9 sprocket is used with a yellow spacer,
it becomes compatible with Campagnolo 9-speed.
In other words, if you want to use it with Campagnolo components,
you swap the HG freehub for a CC9 freehub
and buy Mavic sprockets.

The CC9 freehub body is Campagnolo-only,
so you're not supposed to use it with Shimano sprockets.
And there's another method besides "setting CC9 with yellow spacer" for using 9-speed Campagnolo:

"Use an HG/CC9 kit—a part designed to modify
Shimano genuine 9-speed gears for Campagnolo dimensions
by adding ultra-thin spacers to the parts where spacers are molded onto the sprocket,
and swapping the standalone spacers for slightly thicker ones—
a truly outlandish method.
In this case, the thicker spacer is gray.
Those of you with sharp instincts will notice that
this method can't change the tooth spacing on the spider arm section.
And the shifting performance drops abnormally (naturally it does).
Even if you use this method to "accommodate" Campagnolo (→ it doesn't actually accommodate it),
you still need to swap to a CC9 freehub body instead of an HG9.
Incidentally, you can also remove one sprocket from the CC9
and swap the yellow spacer for a slightly thicker silver spacer
to create a CC8 state compatible with Campagnolo 8-speed.
In this case too, the freehub must be CC9.
For this Cosmic Elite, removing the freehub requires
pulling the left bearing out of the hub shell, inserting a 12mm hex key,
and turning the hollow bolt securing the freehub from the inside—
so it's incompatible with the FTS-L freehub body that came later.
That's why you can't install a Campagnolo-spline freehub body.
You also can't swap to an 11-speed Shimano freehub.
I mentioned this to the customer over the phone,
but written out in detail, here's what it amounts to.
Plus, since I'm writing this, around 2,000 other people get to learn about it too—quite the deal.
This Cosmic Elite has an HG9 freehub, so
it's compatible with Shimano 8, 9, and 10-speed.
Please use it within that range.

By the way, the Shimano-spline FTS-L freehub is designated M10, but
it has a 2mm spacer inside the spline section.
As a successor to CC9, there's a Campagnolo 10-speed sprocket for mounting on Shimano-spline freehubs called the "M10 cassette,"
and when using the M10 cassette, you need to remove
the 2mm spacer from the M10 freehub body.
The M10 cassette's spacers are black,
but by removing one sprocket and switching to a yellow spacer, you get a CC9 state,
and removing one more and switching to a silver spacer gives you a CC8 state.
In those cases too, the 2mm spacer isn't needed.
Coming back to this later, when Shimano 11-speed came out,
the spline length increased by 1.85mm compared to 10-speed, and
despite a 0.15mm gap,
the solution became "remove the 2mm spacer from the M10 freehub and you can fit Shimano 11-speed."
Wait a minute?
So in other words, the spline depth on the old CC9 freehub body
is the same as what we'd call M10 (no spacer) on the FTS-L freehub?
If you swap the HG9 freehub in this wheel for a CC9 freehub,
Shimano 11-speed sprockets would supposedly fit...
but even if the sprocket can mount, there's a high chance
the low gear would hit the hub shell,
so it probably won't work in practice.
In addition to M10, the FTS-L freehub also has
ED10 (EXARIVE) for Campagnolo
(currently renamed M11 and ED11 respectively).
There's no Mavic-made Campagnolo 11-speed sprocket
for attaching to Shimano splines.
Further addendum

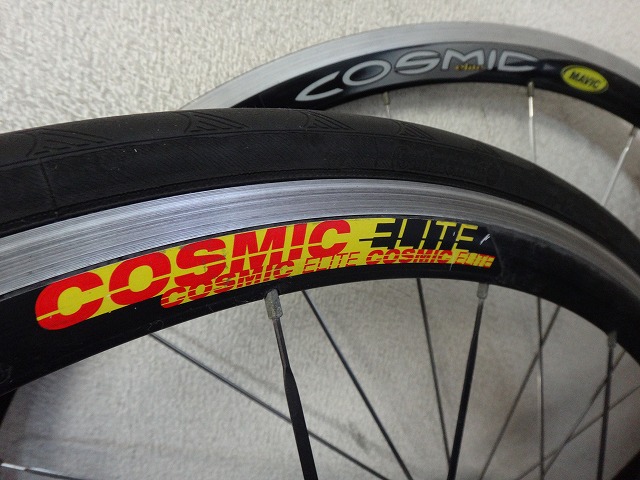
↑This is a 2005 Cosmic Elite,
and again, the rim is a CXP30 with different hole counts.
The CXP30 rim itself has long been discontinued,
but it survived as a rim for complete wheelsets.

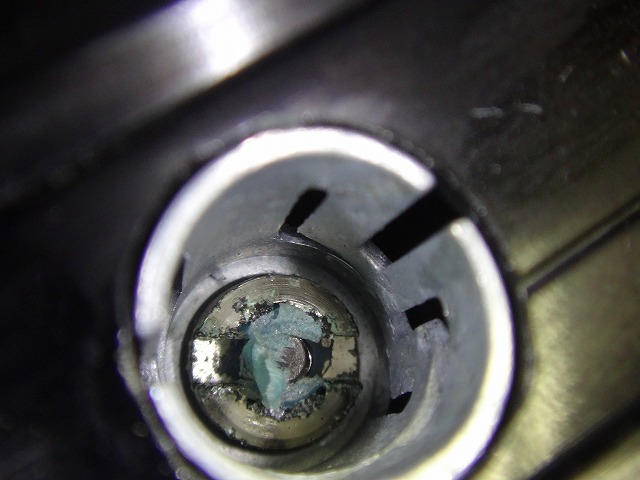
↑This one had an expanding eyelet.
But there's no individual supply for this one.
In the broad sense, disc wheels would be considered the "first complete wheelset,"
but when it comes to "mass-produced spoked wheels for road racing by a manufacturer,"
that would be the 1996 Mavic Ksyrium as the first.
The Ksyrium is a lightweight model for mountain stage finishes,
an aluminum rim wheel with 26H front and 28H rear,
and the front rim is a Reflex rim specially made with different hole counts for complete wheelsets.
Though as I write this, strictly speaking it's a bit different.
Early Ksyrium tubular rims had weights in the 340g range,
which would be impossibly light even for a light Reflex rim,
so the material thickness and everything else were specially made for the Ksyrium.
The later models were around 390g,
so it's safe to say they're simply Reflex rims with special hole counts and colors.
The aero wheel Cosmic series had
the Cosmic Carbon (a non-SSC, 16H front and rear model) in '97,
the Cosmic Pro and Cosmic Expert,
the Cosmic Équip in '98,
and the Cosmic Elite in '99,
and this one here is the original Elite from '99.
All models except the Cosmic Carbon have aluminum rims,
and the Pro with its 38mm-high rim is the only one of this lineup without a reinforced eyelet (described below),
but the other three models use the CXP30 rim with a rim height of 30.5mm,
just with the hole counts and colors changed for each application.
The main reason it was brought in is that the rear wheel has significant runout,
and according to the customer, the spokes appear to be "lifting the rim."
This appearance is because the reinforced eyelet, which is a feature of the CXP30 rim, has cracked.

↑The rim holes have an offset and a cutout,
and the spokes extending toward the front from my viewpoint
↑and the spokes extending to the far side look different.
↑This is the area that appears to be lifting,
and the customer marked it with tape,
but clearly something is wrong.
The inner wall is thin,
so the nipple is nearly puncturing through the rim hole.
↑This is the reinforced eyelet.
For example, with recent complete wheelsets,
some have machining that thickens only the area around the rim holes,
but that requires high-precision cutting techniques.
In this rim's case, it achieves partial reinforcement
by pressing a reinforced eyelet into only the rim holes.

The eyelet in this area must have cracked.
Since it was sent without rim tape,
I couldn't find any eyelet fragments.

This is the reinforced eyelet for the CXP30.
Just to note, this has been out of production for ages.
I had 40 originally, and since I used one today, I have only 39 left.
I personally have several CXP30 rims in both 32H and 28H,
but I need these eyelets, so I can only build one wheel.

I recovered the nipple. This nipple alone shows severe corrosion marks—
it appears the nipple was turned with the eyelet already cracked.
At 16mm long with a tool grip width of 3.2mm across flats,
I ended up going with a 16mm DT brass nipple.

↑You don't necessarily need to use this specialty tool,
but the point is to set it up as shown in the diagram.
The instruction manual is in five languages including French,
but the spelling "Renforced eyelet" in the first image above is incorrect.
In English it should be "Reinforce" not "Renforce,"
and while "Renforce" is French, when conjugated it becomes "Renfort,"
so "Renforcé" is the French form with the English suffix -ed tacked on.
I repaired it by replacing the eyelet.
Reinforced eyelets can fall into the rim interior during assembly,
so as a countermeasure they made them longer—but that alone would add weight, so
the idea was to also achieve weight savings, which led to


↑the expanding eyelet.
Again, this has been out of production for ages.
Incidentally, the lightening cutouts may have been inspired by Aztec glyphs.
On the front wheel, two spokes are deformed, so the customer wants them replaced.
I replaced them.
↑The CXP30 dimensions.
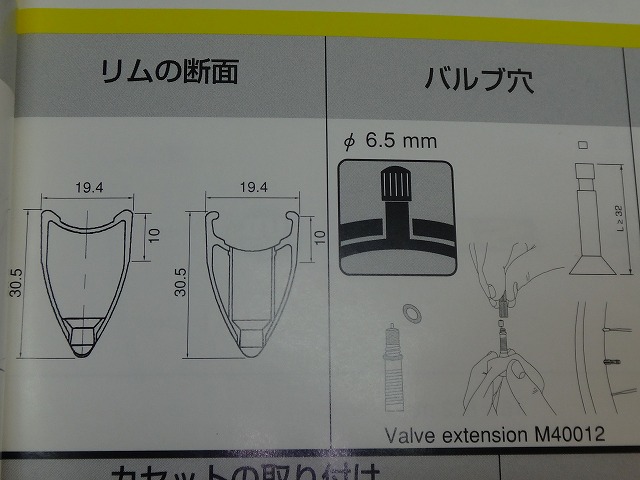
↑The rim dimensions for the Cosmic Expert, Équip, and Elite
(whether tubular versions exist depends on the model).
Exactly the same dimensions as the CXP30.
In the reinforced eyelet image above, there's a bag marked M40012,
which is, as shown in the diagram,
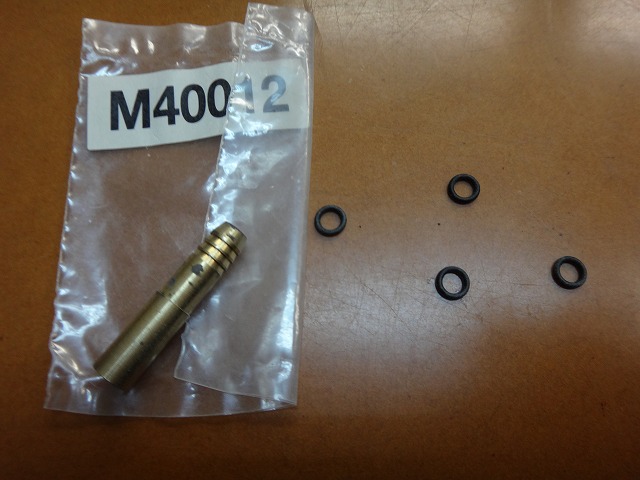
↑this.
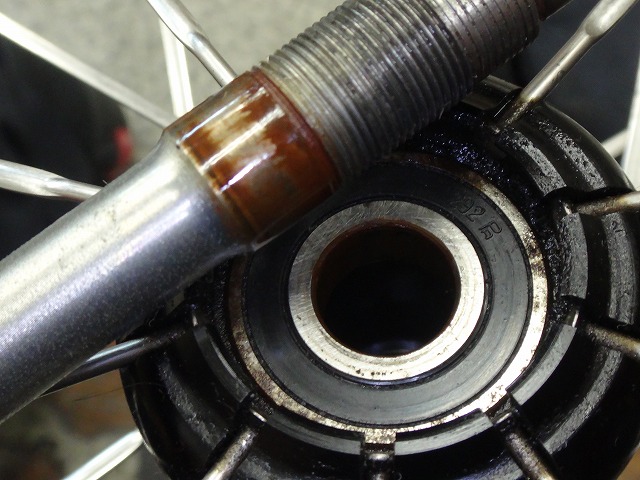
Also, the customer requested hub regreasing,
but the front hub showed no wear at all.
The rear hub had some secondary rust directly beneath the hub shaft bearing,
which concerned me, but the internals were fine.
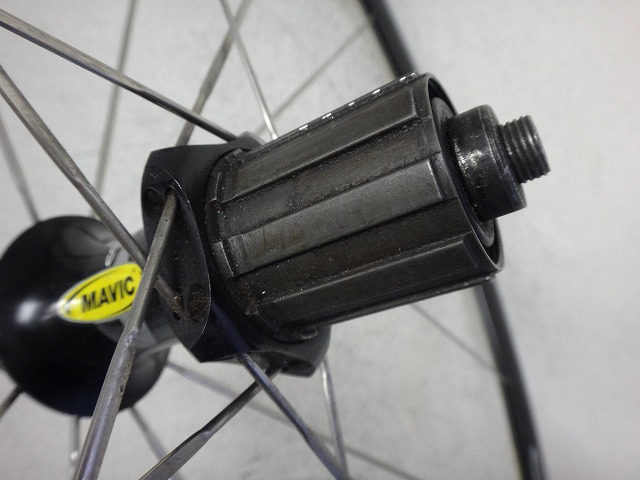
Finally.
This freehub body is for Shimano 8/9-speed, and since "8/9-speed" was the notation back then, 10-speed is also compatible.
The customer wants to swap it for a Campagnolo-compatible freehub body,
but unfortunately that's impossible.
Campagnolo freehub bodies didn't exist for Mavic wheels of this era.
So how would you use it with Campagnolo? That becomes a rather complicated story.
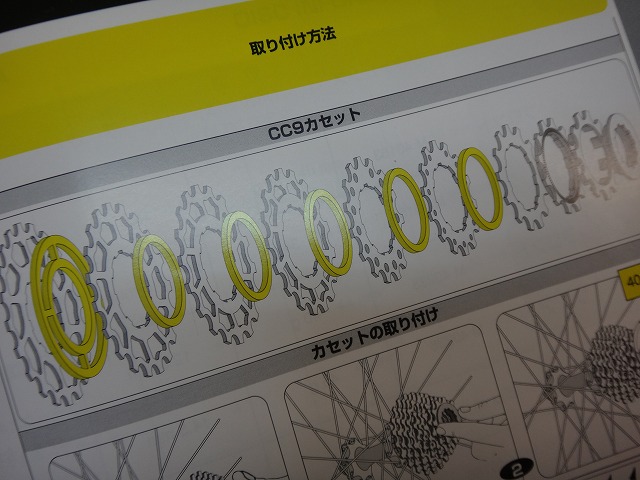
First, Mavic had a cassette sprocket called CC9.
CC stands for "Cassette Cog," and cog is French for gear.
You set it up by inserting one sprocket and one spacer at a time into the freehub's splines,
but there existed a "CC9 freehub body" that uses the same spline profile as Shimano's HG (Hyper Glide) freehub body.
When the CC9 sprocket is used with a yellow spacer,
it becomes compatible with Campagnolo 9-speed.
In other words, if you want to use it with Campagnolo components,
you swap the HG freehub for a CC9 freehub
and buy Mavic sprockets.
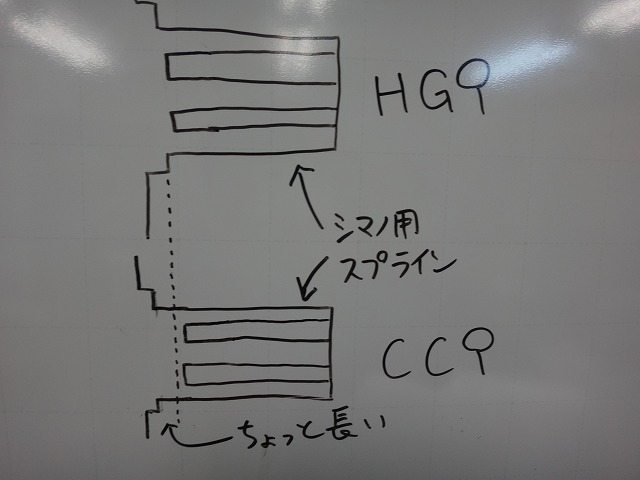
The CC9 freehub body is Campagnolo-only,
so you're not supposed to use it with Shimano sprockets.
And there's another method besides "setting CC9 with yellow spacer" for using 9-speed Campagnolo:
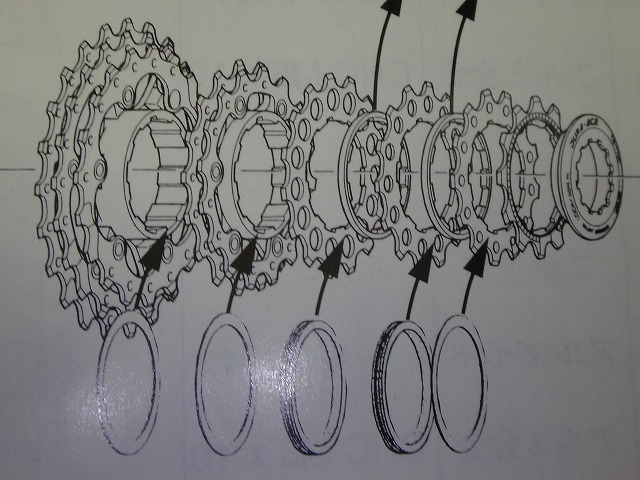
"Use an HG/CC9 kit—a part designed to modify
Shimano genuine 9-speed gears for Campagnolo dimensions
by adding ultra-thin spacers to the parts where spacers are molded onto the sprocket,
and swapping the standalone spacers for slightly thicker ones—
a truly outlandish method.
In this case, the thicker spacer is gray.
Those of you with sharp instincts will notice that
this method can't change the tooth spacing on the spider arm section.
And the shifting performance drops abnormally (naturally it does).
Even if you use this method to "accommodate" Campagnolo (→ it doesn't actually accommodate it),
you still need to swap to a CC9 freehub body instead of an HG9.
Incidentally, you can also remove one sprocket from the CC9
and swap the yellow spacer for a slightly thicker silver spacer
to create a CC8 state compatible with Campagnolo 8-speed.
In this case too, the freehub must be CC9.
For this Cosmic Elite, removing the freehub requires
pulling the left bearing out of the hub shell, inserting a 12mm hex key,
and turning the hollow bolt securing the freehub from the inside—
so it's incompatible with the FTS-L freehub body that came later.
That's why you can't install a Campagnolo-spline freehub body.
You also can't swap to an 11-speed Shimano freehub.
I mentioned this to the customer over the phone,
but written out in detail, here's what it amounts to.
Plus, since I'm writing this, around 2,000 other people get to learn about it too—quite the deal.
This Cosmic Elite has an HG9 freehub, so
it's compatible with Shimano 8, 9, and 10-speed.
Please use it within that range.
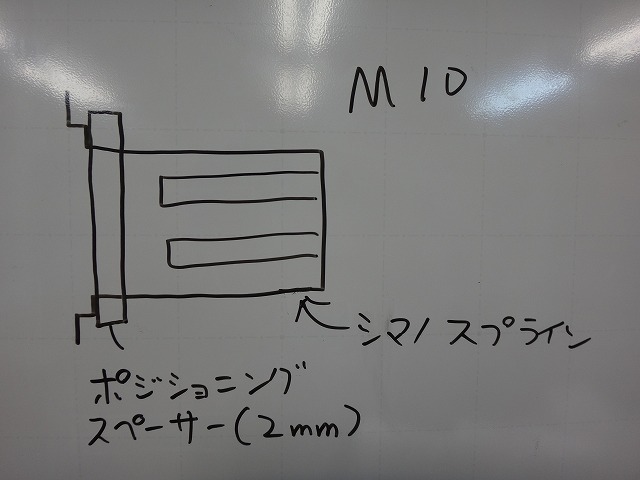
By the way, the Shimano-spline FTS-L freehub is designated M10, but
it has a 2mm spacer inside the spline section.
As a successor to CC9, there's a Campagnolo 10-speed sprocket for mounting on Shimano-spline freehubs called the "M10 cassette,"
and when using the M10 cassette, you need to remove
the 2mm spacer from the M10 freehub body.
The M10 cassette's spacers are black,
but by removing one sprocket and switching to a yellow spacer, you get a CC9 state,
and removing one more and switching to a silver spacer gives you a CC8 state.
In those cases too, the 2mm spacer isn't needed.
Coming back to this later, when Shimano 11-speed came out,
the spline length increased by 1.85mm compared to 10-speed, and
despite a 0.15mm gap,
the solution became "remove the 2mm spacer from the M10 freehub and you can fit Shimano 11-speed."
Wait a minute?
So in other words, the spline depth on the old CC9 freehub body
is the same as what we'd call M10 (no spacer) on the FTS-L freehub?
If you swap the HG9 freehub in this wheel for a CC9 freehub,
Shimano 11-speed sprockets would supposedly fit...
but even if the sprocket can mount, there's a high chance
the low gear would hit the hub shell,
so it probably won't work in practice.
In addition to M10, the FTS-L freehub also has
ED10 (EXARIVE) for Campagnolo
(currently renamed M11 and ED11 respectively).
There's no Mavic-made Campagnolo 11-speed sprocket
for attaching to Shimano splines.
Further addendum
↑This is a 2005 Cosmic Elite,
and again, the rim is a CXP30 with different hole counts.
The CXP30 rim itself has long been discontinued,
but it survived as a rim for complete wheelsets.
↑This one had an expanding eyelet.
But there's no individual supply for this one.